PBR - A Guide in rFactor2
his section serves the purpose of explaining how to use PBR in rFactor2. There are a range of practical examples for how the shaders can be used, as well as tying in information to be found elsewhere.
Workflow Overview
With the introduction of PBR, we are now making use of new tools and different workflows. So it's important to make yourself familiar with those.
With regards to authoring textures. It is now recommended to output TGA files in a MapsSource folder, which can then be converted using a tool.
- Ensure that you name textures appropriately, as the tool conforms to the Naming Conventions
- In the assets folder you can find the MapsConverter application: Maps Converter. Just run this to update any textures that need updating.
- In order to preview converted textures in Photoshop you might need updated plugins, see DDS Export File Formats. In other software you need to look for BC5 and BC7 format support.
Previously the workflow was to setup materials in 3ds Max and forget about them after export. That has now changed.
- For basic information on how to use the 3ds Max plugins see: gMotor 3ds Max Plugins
- We have provided a 3ds Max Material Library 3ds Max Material Library so you can copy in template materials.
- You can usually just edit in the albedo texture for your in map authoring. You can setup the rest in the Material Editor. Although any texture animation settings do need setting up in Max.
- By default the material library materials have UV1, 2, 3 and 4 configured to export. You do not need to modify this, you can choose any combination of the 4 in the Material Editor. However see 3ds Max GMT file UVW Export for a more in-depth look at how these get exported.
- Export your mesh into the GMT folder for the scene, and edit in the SCN entry for the file into the master file.
Now we have the basics setup, we can load the scene in ModDev or the SceneViewer, and configure our materials and fine tune textures in real time.
- It's very important that you develop your assets with how they look in game. You can do this by using either Developer Mode or the Scene Viewer.
- Both support hot texture reload, so you can save your textures out and convert them using Maps Converter, and the viewer should automatically reload the textures with out restarting.
- The Material Editor can be accessed whilst the Scene Viewer or Developer Mode is open. It allows us to change the shader used, material settings and maps for all loaded materials. There are many settings here which are only accessible through this and can not be set in 3ds Max. Remember to save the changes to JSON file after modifying.
- IMPORTANT: JSON files over-ride everything in the GMT file! If you go back and change your material in 3ds Max and export again, you will need to delete the JSON and set it up again in order for those changes to propagate.
PBR Basics
Maps
Coming from a non PBR background there are now 2 extra inputs, and the way previous inputs are handled is different too. Beneath is a brief overview of these basics, but you can find out much more at PBR - An Introduction / Authoring Guide.
- Albedo Maps: Previously known as diffuse maps, these are now to be devoid of lighting information. There are explicit values you should be aiming for too for different materials. We have setup a table of real life values in the Maps & Authoring page linked above. Note these should usually be able to use a range of around 40 to 250 in the luminance of the texture.
- Normal Maps: These largely work the same as before.
- Metallic Maps: This is a greyscale input which says if this is a metallic surface or not. This effects the calculations used for the lighting. Please note that painted metal, is not metallic. Additionally you'll often find that for mixed metal materials such as Galvanized or Anodized metal surfaces require a value of less than 1.0.
- Roughness Map: The roughness map is a greyscale input which determines the nature of the specular reflection. The lowest value will give more mirror like reflections and the highest value will give very dull and lacking detail reflections.
- Specular Map: In the past specular maps were a full colour map input. Now, whilst we still have specular maps or scalars, they are just a greyscale channel which allow us to adjust the intensity of specular reflections when metallic and roughness inputs do not offer enough flexibility. This is now referred to as Specular Level in some tools such as Substance. Note that this only effects non metallic materials, on metallic materials the albedo map acts as a coloured specular map.
- Ambient Occlusion Map: Previously rFactor2 did not have an accurate Ambient Occlusion function. When people rendered out AO maps, they were just multiplied onto the Diffuse Maps. With PBR, these are the amount of ambient occlusion only, resulting in a much subtler effect. Please note it's important that these are calibrated accurately, as overly dark AO maps, can result in overly dark ambient probe output.
Typically we pack multiple channels of data into the same texture. For instance an "MR" or Metallic Roughness texture takes the Metallic in the red channel and the Roughness in the green channel. Typically to avoid texture artifacting we can store 2 channels of texture data in a single map, or a full rgb texture with an optional channel of extra data in the alpha channel. You can see more details of the way we pack textures in the Naming Conventions article, and the Maps Converter tool can automatically convert the texture using the correct DDS format based on the file naming.
Probes
In PBR accurate placement of probes is super important. When I say probes there are two types. Firstly there are ambient probes and secondly there are static mappers which are used to calculate the specular reflections.
- These are both used to calculate the lighting and you need to think carefully where you place them. Try to pick areas where the lighting is neutral or consistent for the areas they are used.
- Pay close attention to the IBL Visualizer in ModDev to see how reflection probes are convolving and also to make sure they are representative areas.
- Try to exclude strong colour casters from Static Reflection Mappers.
- At present it is only possible to assign a Static Reflection Mapper on a per material basis.
- It is possible to assign areas to Ambient Probes, but the closest ambient probe is applied to all materials at present.
Further explanation reference:
Using Shaders
Introduction
This section sets about practical tips for using the shaders, how to achieve certain things, and what to look out for.
At present we have 5 PBR Shaders, and they are configurable to large degrees, allowing you to enable and disable maps, functionality and change many settings. You can find the technical documentation for them here: Shader Definitions.
Before starting this section it's a good idea to make sure you are familiar with the basics of the Material Editor.
Firstly lets start by looking at the common options we have in the Material Editor which are common through out all materials.
Shader Configuration
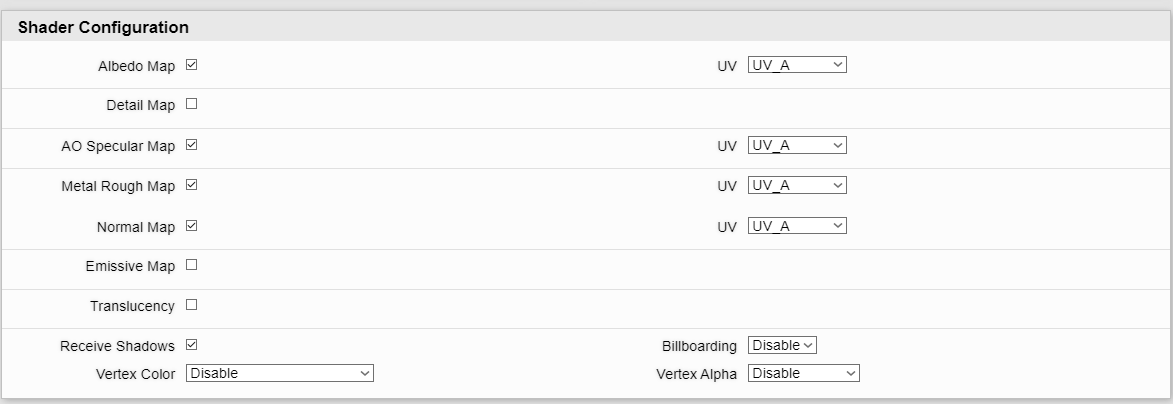
Firstly we have the shader configuration. These are settings which fundamentally rebuild the shader and create a unique variant with your chosen combination.
Here we have each map with it's own sub section, and you can enable or disable that map, configure which UV data it uses and there can be other options related to that map. Such as what blending it might use, or if you wish to use this data from another source. For example when you disable the Metal Rough map, then a check box will appear allowing you to enable using the Albedo Alpha channel for Roughness input.
When configuring the UV you can choose from any of the 3 or 4 channels of data exported with the mesh (Only 3 sets of usable data are exported when you export an object with Billboarding), or use WorldPlanar which takes a top down mapping from the world co-ordinates of the object. For more information on UVW see: 3ds Max GMT file UVW Export
At the bottom of this section are more general options, on the Standard shader there is a translucency section which you can enable. This allows the configuration of how much light bleeds through the object. And also there is some generic material options at the end, allowing to enable or disable receiving shadows, billboarding features and what to do with Vertex Color and Alpha.
When you change settings in this area, you must hit apply before you can edit the sections before.
Parameter Configuration
Parameters are grouped up into areas for their common purpose. Here we will take a look at two common areas which appear on all shaders and what these options allow you to do.
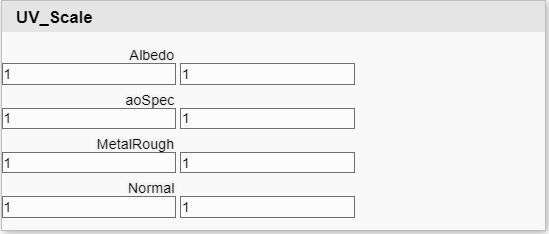
UV Scale
In addition to being able to select the actual UV data in the Shader Configuration, we can also scale that chosen UV data as we please. This effectively means even with the most complex of shader we should be able to give unique mapping to all maps if required. This can help greatly with the advanced blending options of the terrain shader to reduce noticeable tiling patterns.
Material Adjust
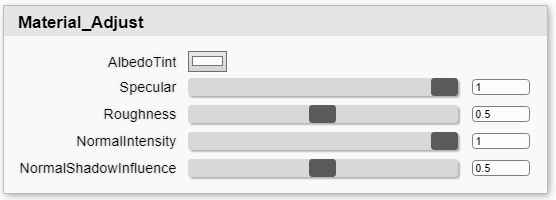
Material Adjust panel is also present in all shaders and offers us the ability to adjust the final output after all inputs, as well as a few general parameters.
- Albedo Tint: Adjusts the albedo with a multiply of this colour after all blending and before final lighting.
- Specular: This is an overall scalar on the specular output. This only effects the dielectric (non metallic) pipeline. This is set to 0.7 by default. For some natural materials such as grass you will need to reduce it to around 0.25.
- Metallic: This is an adjuster where 0.5 makes no change to the previous inputs. At 0, it forces to 0 and at 1, it forces to 1, with inbetween increasing or decreasing the value accordingly.
- Roughnness: This is an adjuster where 0.5 makes no change to the previous inputs. At 0, it forces to 0 and at 1, it forces to 1, with inbetween increasing or decreasing the value accordingly.
- NormalIntensity: This is an overall scalar for the strength of the normal maps in this material. This can be used to allow a subtler normal map with out banding caused by the low resolution of the texture.
- NormalShadowInfluence: This is how much the normal map perturbs the cast shadow. By default this is set at 0.5 to reduce the amount, but on something like an armco barrier that is abstracted to a plane and is faked by a strong normal map, you may wish to increase it.
Textures
In the textures section:
- We can assign maps only at present.
- The Material Editor may show more maps than you can assign in 3ds Max, and it is required to assign them here in order for the shader to work correctly.
- Only maps enabled in the Shader Configuration are shown.
Shaders In Depth
The final part of this guide shows some possibilities for the different shaders and hints and tips for different things you can achieve. Each shader has it's own sub-page for these purposes though.
- PBR - Fast Material Conversions
- PBR - Using Road / Curb Shader
- PBR - Using Standard Blend Shader
- PBR - Using Standard Shader
- PBR - Using Terrain Shader


