gMotorTexture
Each texture specified in a gMotorMaterial must be of the type gMotorTexture. This page details the options available here.
It can be useful to name the texture slot with the function of the texture. This will be automatically filled in if the material is created from a copy of the options available in 3ds Max Material Library.
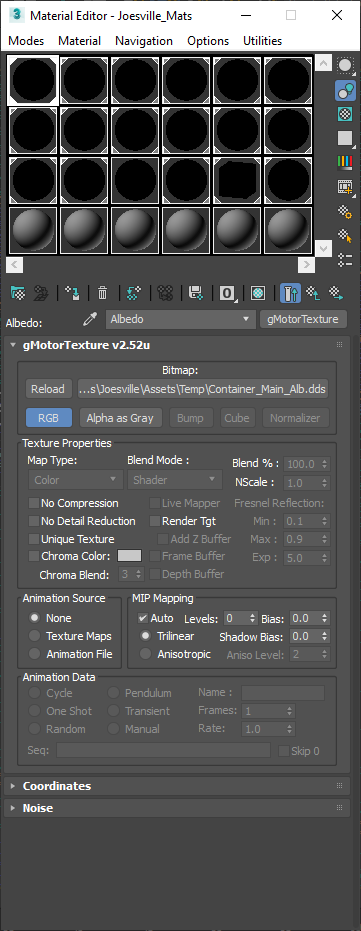
gMotorTexture Rolllout
Bitmap
Here you specify the physical texture to be assigned. Supported texture formats are DDS, TGA, BMP, JPG, and PNG.
In exported meshes only the texture name is stored. The path is derived from the SCN Search Paths.
For texture stages requiring a cube map, you will get a warning if you select anything other than a DDS-format cube map.
There are also buttons for reload if you have updated the map for viewport visibility. You can also chose if the RGB or Alpha channel shows in the viewport, if the Show Shaded Material in Viewport button is enabled for this texture.
Texture Properties
This section allows you to specify a range of settings for the texture. They are detailed below.
Blend
Selects the percentage of the current texture to blend with the previous combined textures. Currently only active for cube map texture stages.
NScale
This scales the strength of the normal map. This function does not currently work.
No Compression
Check this box to disallow automatic DXTn compression of this texture. This option only applies to non-DDS textures.
No Detail Reduction
Selecting this option means this texture will be unaffected by any texture detail settings (will always remain at its original size).
Unique Texture
This option will load a unique copy of this texture even if a texture with the same name has already been loaded. Used only for special effects.
Chroma Color
In the past if checked, texture pixels that match the selected color will be transparent (i.e., will not be drawn). Click on the color swatch to select the chroma color. However this now enables Alpha Test transparency.
Chroma Blend Pixels
Sets the size of the border around a chroma-color pixel to blend with the pixel. This is used to soften chroma edges.
Live Mapper
If checked, this stage will use the reflection mapper specified for the material. Only applies to cube maps texture.
Render Target
Sets this stage to be a render target.
Add Z Buffer
Only available if Render Target is checked, this option will add a z buffer to the render target. Most render targets will NOT require a z buffer.
Frame Buffer
This option will be ticked if this slot works as a frame buffer.
Depth Buffer
This option will be ticked if this slot works as a depth buffer.
Fresnel Reflection
These options are deprecated.
MIP Mapping
None
This stage does not use MIP mapping.
Auto
This stage will use MIP maps – if the file format is DDS, the stage will expect the MIP maps to be contained in the DDS file; for other image file formats, the appropriate number of MIP levels will be generated at load time using a triangle filter. For best results, MIP levels should be generated offline, and stored in the DDS file format. The following options apply when using MIP mapping:
Trilinear
Use trilinear filtering for this stage;
Anisotropic
Use the specified level of anisotropic filtering for this stage.
Aniso Level
Selects the anisotropic filter level to use (default: 2). Note that the actual aniso level used is dependent on the number of available hw aniso levels, and the current global aniso setting. The actual aniso level will be the lesser of the global aniso level, and the max of requested level, and the available hw levels:
Actual level = min (global level, max (requested level, available level)).
Levels
The number of MIP levels to be used by this stage. 0 levels indicates that the stage will use all MIP levels (down to 1x1); 1 level is equivalent to no MIP mapping; any other number of levels will cause the stage to use only that number of levels, regardless of how many are available. Note that if using less than the maximum number of MIP levels, the GPU will transition to lower MIP levels as if all were present; it will simply use the smallest supplied level out to infinity
MIP Bias
The MIP LOD bias applied to this level. Positive numbers cause lower MIP levels to be switched in sooner, resulting in blurrier textures. Negative numbers cause lower MIP levels to be switched in later, resulting in sharper textures.
Animation Settings
None
Set this for a non-animated texture
Texture Maps
Set this for textures which will use a sequence of maps for animation
For animated textures, the Animation Data settings apply:
- Cycle – the animation runs from beginning to end, then restarts at the beginning, and runs continuously this way.
- Pendulum – the animation runs from beginning to end, then restarts at the end and runs to the beginning, then restarts at the beginning, and runs continuously this way.
- One Shot – the animation runs from beginning to end one time only, then remains on the last frame.
- Transient – same as One Shot; in addition, the object using this material is deactivated.
- Random – not implemented
- Manual – the animation must be run from the application.
- Name – the base name of the texture sequence, and optional file extension if the files are not .BMP format.
- Frames – the number of files in the texture sequence.
- Rate – the rate (in frames per second) at which the texture sequence is played.
- Sequence – this represents the order in which the animation files will be played. The sequence must be enclosed in parenthesis, and can be of the form:
- (0, 1, 2, n), or
- (0 – n)
- or any combination of the above.
- Skip 0 – if checked, frame 0 in the texture sequence is skipped, and the sequence is played from frame 1 through frame n. When the animation is stopped, it will display frame 0. This allows frame 0 to be a special frame on which to “park” the animation.
In the example shown, the base name is testa.tga and the number of frames is 6, therefore the files testa00.tga through testa05.tga are required. This animation sequence will be played in cycle mode at 7.89 frames per second (if the overall frame rate is at least this high). The frames will be played in the order shown in the sequence; the sequence could also be entered as (0, 1, 2-6, 5, 4, 3-0) for example.
Animation File
Set this for texture which will use a movie for animation
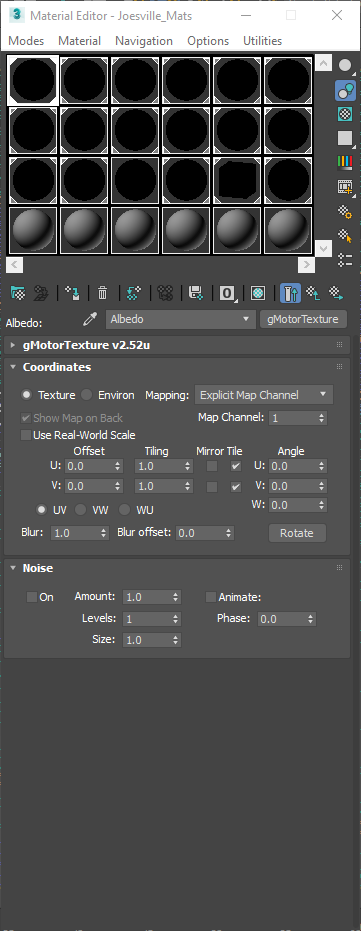
Coordinates Rollout
This section allows you to configure the UV assigned to this texture slot. Only upto the first 4 slots configuration are exported with the mesh. For a more detailed explanation of this see here.
There is a large number of configuration options available here, however many of them do not work.
Map Channel Configuration
You can select from Texture and Environment options to choose a set of mapping UV to export. It's unclear if the Environment options work at this time.
Mapping Modifiers
There are various modifiers listed which allow the modification of the UV before export. Whilst most of these will work with how the texture is display in the viewport, only the tiling options are known to persist into the exported mesh.
Noise Rollout
This rollout is not used.