Working with new IBL/PBR Car Shader
This document is targeted at people who are building their own cars in rFactor 2. If you are only doing new liveries for existing cars, please refer to How to paint a car with the new material system - old for a guide on how to do that.
SKIN/LIVERY MATERIAL EVALUATION
Every good (and realistic) material starts from a proper evaluation of what's happening in the real livery and car paint. Do not rush this stage if possible and demand (if needed) more images to the manufacturer, especially when any other route it's impossible (no public images). Always plan this stage, and give it proper priority. These shaders are looking good and showing potential only if properly setup, otherwise it can look ever worse than a basic shader, like we had before. Collect real pictures and videos of the actual livery you want to reproduce. Give more reliability to video in daylight, and pictures taken under artificial light. Great shots are those close up in the garages, under artificial lights. In these conditions you have less chance to be mislead by the presence of a Polarizing Filter in the camera, which will absorb much of the reflections. Also, don't trust to much the presentation pictures, or those shiny renders that many times car manufacturers are releasing, since these images are, most of the time, heavily photoshopped. Sometimes, the best image/video materials for material evaluation, are those from amateurs that are not trying to cheat with PS, filters, Instagram garbage etc.. .... More material you have, better the “triangulation” you can do, to ID all the various parts of the given livery/paint scheme. Remember, we are not working globally per car anymore. Every livery/paint scheme, will need proper material evaluation and image/video gathering.
SKIN/LIVERY SOURCE FILE to REGION MAP
Once you know all the core materials that are part of your planned livery, it's time to mask those materials in the diffuse, and create a colored region map. This map will let you to control up to 6 unique materials, through a set of PBR controls for each region/material. It's extremely important that the region map does totally match the representation of the materials you have in the albedo map , since a wrong region map will assign wrong physical material proprieties for what have been represented in the albedo. For example, a piece of carbon in the albedo map, would look really weird if assigned to a region which is intended to be chrome...this is the kind of mistake we need to avoid. So, just double check your region maps with both real pictures and the albedo map. Everything has to match.
Good practice is to create a folder in every skin/livery source (PSD) that does contain the region map composition.
SKIN/LIVERY SOURCE FILE to SPECULAR MAP (Albedo map Alpha Channel)
As for the Region Map, each livery needs its own specular map. Let's forget the old way, with a global spec map, which were based on a “naked” version of the car, without taking into account the carbon parts which were covered by stickers or wrapped, or painted over etc. To create the dedicated Spec map, just be sure the carbon bits on such map, are present ONLY if not covered by other elements, in the diffuse and region map. For example, if a wing it's made of Carbon Fiber, but then it's totally wrapped with a yellow decal, we need to remove that Carbon Fiber pattern from the dedicated Spec map, otherwise we will get that wing with a sticker/wrap material setup, but showing a naked Carbon fiber specularity. Again, double check that your Albedo/Region and Spec map, are totally matching and coherent. Good practice is to create a folder in every skin/livery source (PSD) that does contain the specular map composition.
GLOBAL MAPS – AO, Damage maps and EDGE SPECULAR MASK (AO map Alpha Channel)
Be sure you are also producing the Edge Spec Mask (which is stored in the AO map's Alpha Channel), through the Edge Baker tool. This tool it's pretty easy to use, as it does create a mask based on the higher LOD mesh of the car model. This tool will bake all the edges and cavities, so that we can tame the specular highlights along these zones in the car body, reducing the jaggies. Also, mask any car floor bit here in the Edge Spec Mask, so that it won't reflect the environment (since we have no yet a Specular AO via shader).
As for the Ambient Occlusion baking, these are the global maps you can reuse for all the liveries of a given car. As for the AO and Damage maps, that is just as it was before. We do really suggest to bake the Car's AO using these settings;
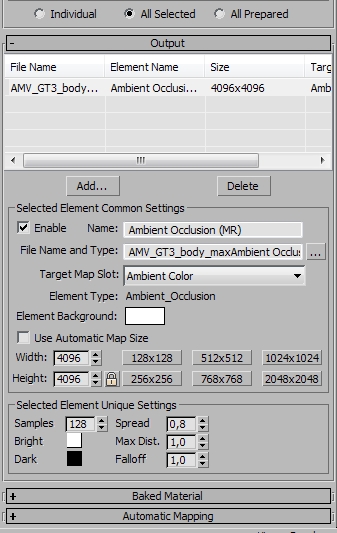
Put all these maps in the SKIN PSD, as a source/reference.
How to work with materials
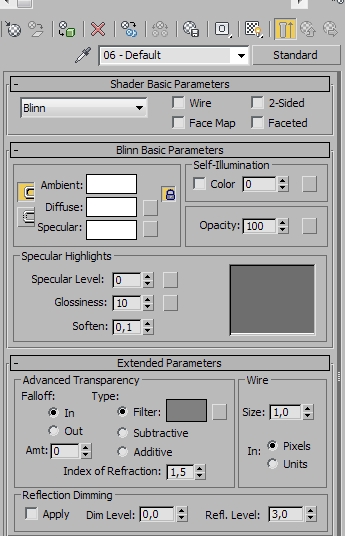
In 3Ds Max
First action to work with the new IBLCarShader, is to assign this shader to our wildcard material (WCCARBODY), in 3DsMax, fill the texture stages, assign the correct mapper (REFMAP0) and export the GMTs with the correct flags in the exporter. This is more or less same as our old way to work.
Doesn't matter what textures you'll be using at this point, as this is mainly to assign the new shader and start working with the materials, outside 3Ds Max
Override the .json material, inside the .veh file
At this stage we need to open the .veh file for the given livery/paint scheme, and add this string at the top of the file;
MaterialOverride="CARNAME_BaseMat.json"
As a general rule, and good practice, it's a good idea to use the car name and append "_BaseMat.json" and make this base material global for all liveries for the same car.
DefaultLivery="AMV_GT3_01.DDS"
MaterialOverride="AstonMartinGT3_BaseMat.json"
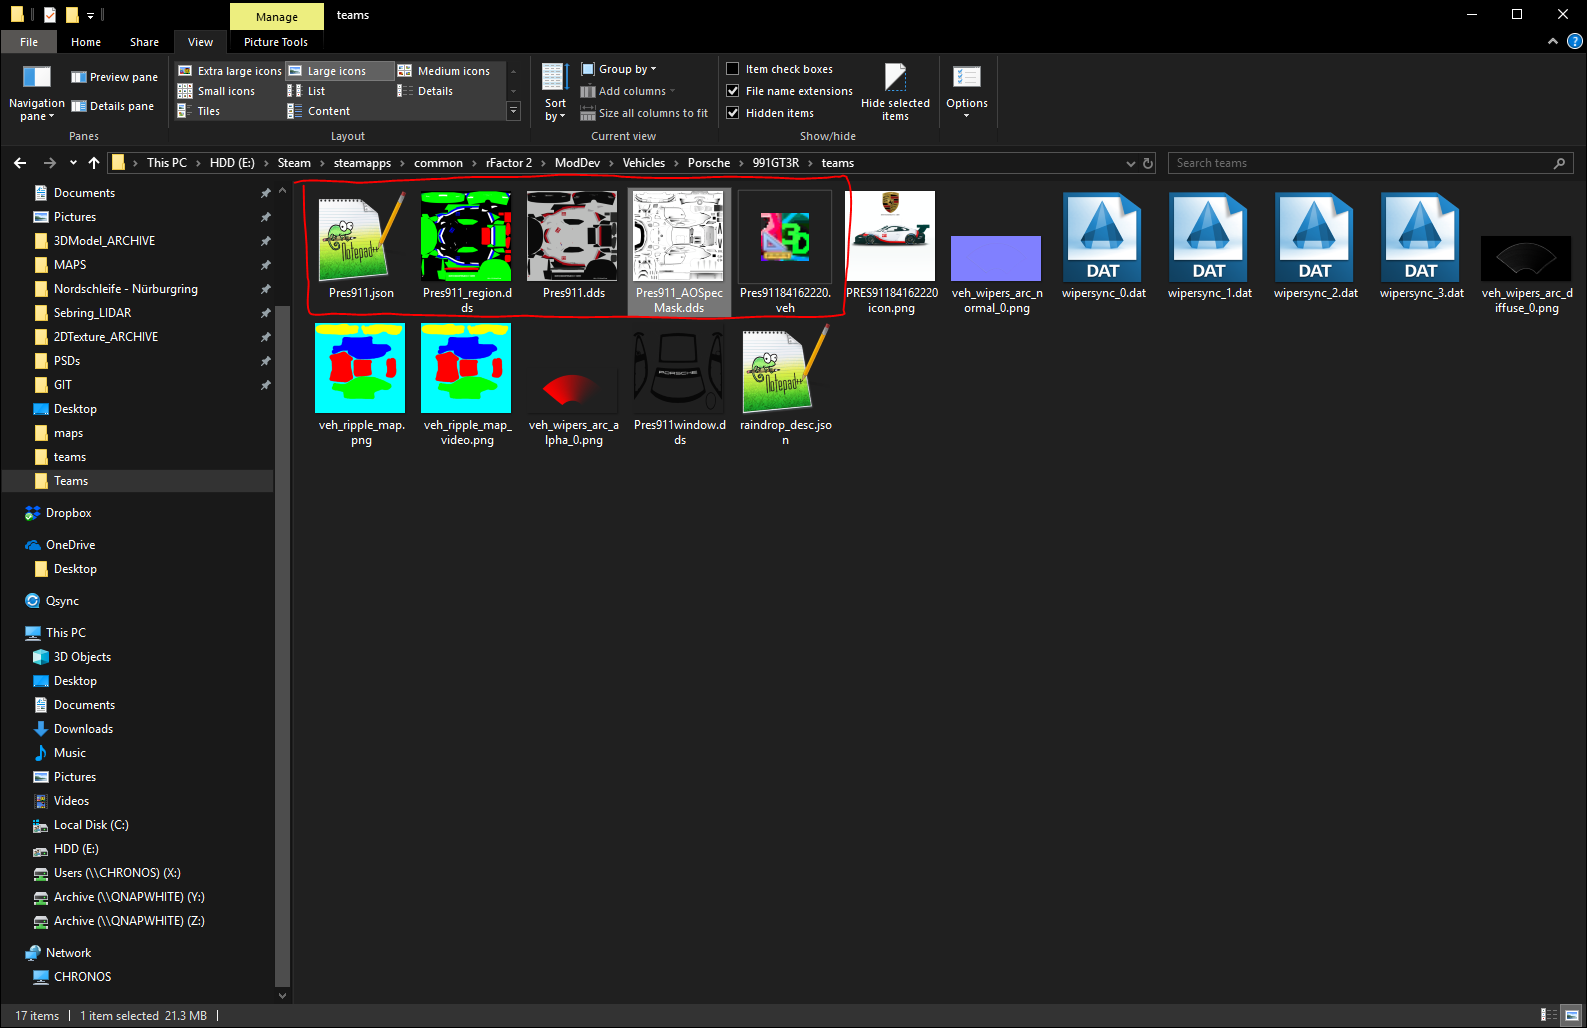
As for the .dds, these .json files needs to live in the same folder “/teams”. This is extremely important to make the system working correctly. It's also important that we do this override, before to even start editing the materials, since this will set the correct Source Path where to search & save the material settings.
Remember, all the unique files you'll be producing (.veh, .json, region maps, AO maps etc), per livery, they all need to be in the /teams folder;
First Load in the Material Editor (Web UI)
At this point we can load our car, that we just exported, in devmode, and open a browser at this address; http://localhost:5397/materialeditor/index.html
This will start the Material Editor, which will listen the devmode session, allowing you to visualize all the edits you'll be doing in the Mat Editor, in real time.
We do suggest, especially at this stage, to only load and edit a single car livery per session.
Once the car is loaded and the Mat Editor it's operative, the first action to do is to browse the material list in the Editor, and search for the “WCCARBODY_000”, which is the car we want to work with (since this is the only car that we loaded in the session). Remember that you can use all the tricks you usually use with a browser; you can just start a Search (CTRL+F) in the browser and type “wccarbody...” so that you don't have to scroll to find it.
Click on that material to access all the settings...
Top Bar Buttons and operations (just a quick info about what those buttons are doing);
listening/editing (volatile, everything you do it's just temporary, until you save)
Apply (force the settings in the editor to be assigned to the material / still volatile)
Save To /ModDev (save/overwrite the .json in the source path)
Download (download a local version of the settings, in a new json file, in the download folder)
Upload (upload a local version of the settings, in the browser and assign those values to the materials loaded in the editor)
Home (go back to the material list)
Assign all the correct maps for the livery/paint you are working with. For the shader requirements, follow the guidelines in the IBL Carbody Shader Reference document. Now it's time to just assign all the maps we previously discussed. You can hot load/reload the textures and maps, directly in the Editor. Also, double check the mapper is correctly setup (REFMAP0), and check that the Source Path (top gray bar, in the editor) it's correct, which means it has to point to the car “\teams” folder.
Save the material
If everything has been setup correctly, we can now save a early version of our material. Press the Save To /ModDev button, on the top bar. This will create a temporary material called like the wildcard, "wccarbody_000.json". We now need to rename this file, using the name we previously used in the .veh override; "AMV_GT3_01.json", and move it to the /teams folder. You need to do this operations only once, for every livery. From now on, every time you'll press the Save To /ModDev button, you'll be updating/overwriting this AMV_GT3_01.json in the /teams folder.
Edit the material/s
Here we go; once we have basics all setup and ready, we can focus on the material/s editing, which means giving each active region the correct values to simulate the materials present in the diffuse/albedo (and of course, real life livery/paint). At this stage you can always save to moddev, when you want to, or you can also A/B different settings using two browser tabs, with editor loaded on both, and using the Apply button to assign the setting you like more, between the two versions.
Always remember to save when you are happy with your settings.
Semantics/Terminology;
Skin/Livery; The only creation of the specific livery and paint scheme
Global maps; The creation of all the global textures and maps, used by the car, despite it's specific livery
Livery maps; The creation/generation of all the maps needed to set the IBLCarShader
Livery Materials/Shader Setup; The process to setup up all the livery materials (IBLCARShader), with all the Livery maps, the Global maps, the proper .veh override and everything else that does bring the planned Livery ingame, showing it's final and wanted output. Needed for approval and totally dependent from the previous stages. Also, at this stage, the car model should be at its ~90% of developing, with everything in place and properly setup (both 3D and all the other materials used by the car, other than LODs etc...).
Each of these needs a proper planning and time-frames. In the past we were used to the “one for all” situation, where the words shader/material/maps they were all more or less perceived by the production, like the same developing stage, since (apart the skins) everything was set globally and affecting all the liveries in a car pack. Now every livery needs its own production pipeline which really need proper communication and planning so that artist, production and art direction are all on the same page.