Track AI Tutorial
Track Preparation
Make sure there is no existing AIW file. This can sometimes happen if you copy data files from an older track to the new one. It is recommended start a new AIW file from scratch rather than trying to modify an older one.
Make sure that a section of drivable surface is underneath world 0,0,0. If no garage locations are defined, the cars spawn to world 0,0,0 when you hit “Race” button. If there is no drivable terrain in the location in question, build a temporary road to the track, starting world 0,0,0. Once you have defined and saved the first garage location, this temporary road can be removed.
Make sure that all xSector GMTs exist on the track and they are populated to track’s SCN file with proper parameters. The track will most likely crash when loaded without AIW and xSector GMTs.
Make sure that you have selected ZERO AI drivers before loading the track. The only car you want loaded at first is your's (player).
Set car damage to ZERO to prevent the car suffering any damage that could disturb the creation process.
As a general tip, it is often easier to work with swingman camera (Page-Up key) rather that in-car camera
There are a few hot keys in the AIW Editor, which help the creation process.
CTRL + Shift + Arrow keys Slides the car. This is useful while placing things like a pit location. Pressing the above combination plus the ALT key will slide the car faster.
SHIFT + Arrow keys Used to adjust racing lines and corridors at each selected waypoint. Pressing the above combination plus the ALT key will fine-adjust the line.
Important Notes
When building a new AIW file, it is VERY important to follow the correct sequence. The editor generates lots of things “under the hood”, like many auto-generated connections and paths.
Some of these auto-generated functions happen on-the-fly and others when saving the AIW and reloading the track again. So, it is very important to follow the building sequence literally. If “save and reload the track” is in the workflow, please do so.
These auto-generated functions are dependent on other user-recorded items and features. If the AIW building sequence is not correct, the editor fails to auto-generate these essential items, and the end result might be a non-functional AIW which is beyond any repair.
During the creation process, you will want to save often. It is possible to put the AIW Editor in a state, that it can’t recover from. More often than not, this is caused by incorrectly using a feature rather than bug-related issue. A backup AI file is kept of the previous version on each save.
There is NO undo function. Each change is permanent for the working session once it’s been made, and permanent to the AIW file once saved.
There is a backup of your previous AIW kept on each save. This is saved in the same folder as the current one and named "Backup.aiw"
Don’t be afraid to exit the AIW editor without saving if something is not working as expected or you make a mistake.
Do NOT leave the mouse cursor over the AIW editor menu area during any adjustment of lines, garage- or pit spots. When sliding the car around as described above, any car movement records “mouse click” in the menu area. This might lead to unwanted result, if these “phantom” mouse clicks do some functions which are not intended.
Entering the AIW Editor
Launch the game in DevMode, load the track, enter the track and enter the AIW Editor by clicking menu item.
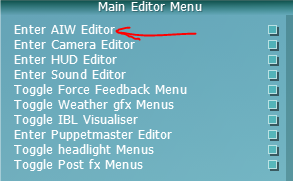
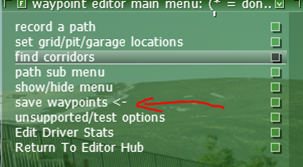
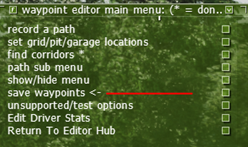
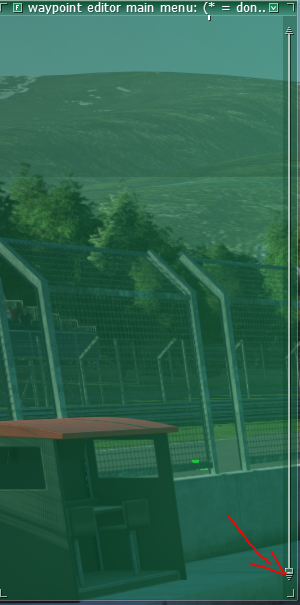
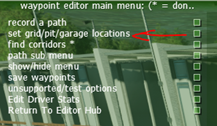
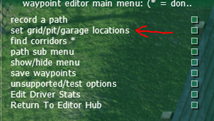
The AIW Editor main menu appears
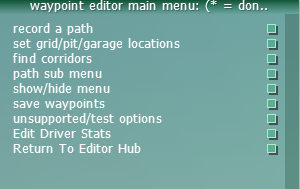
Recording Paths
Make sure that you followed the above guidelines and prepared the track for AIW creation. Drive a few laps around the track and test that it works correctly and all parts of the track are driveable.
Main Path
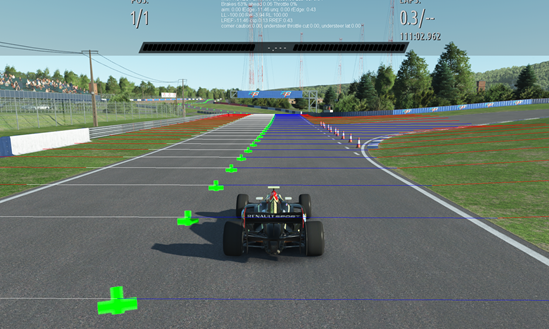
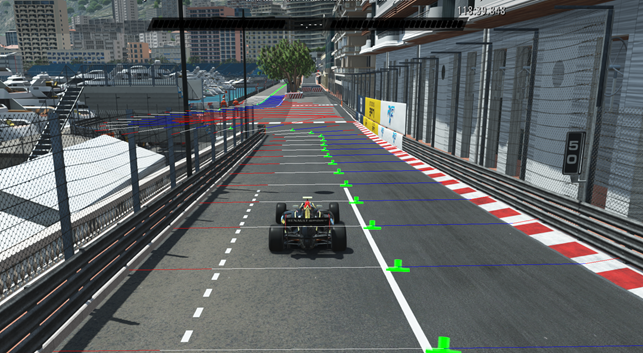
The main path is the path which follows the track centre line. This is the first thing we lay down.
Drive out on the track facing in the racing direction. Orient the car so it is in the middle of the width of the track. Switch to Swingman camera (PageUp).
Click “record a path” button in the menu and move mouse cursor out from menu area.
This starts recording process. Drive slowly around the track, being careful to keep the car in the middle of the track as best as possible.
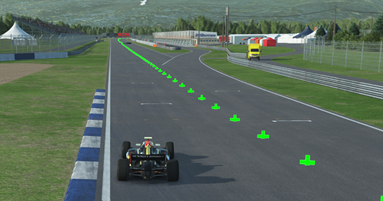
You can see red plus signs placed behind you on the path you are recording.
Eventually, as you are nearing a complete lap, you will see very first waypoint icon placed at your start position. Aim for it as you drive up to it. When you cross over it, the menu will change.
You will be asked what path it was that you just drove.
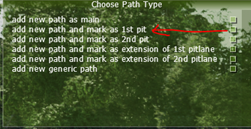
Select “add new path as main”.
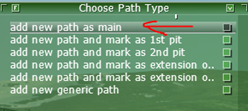
Then save waypoints.
You now have a new AIW file which contains the main path. Next, we need a pit path.
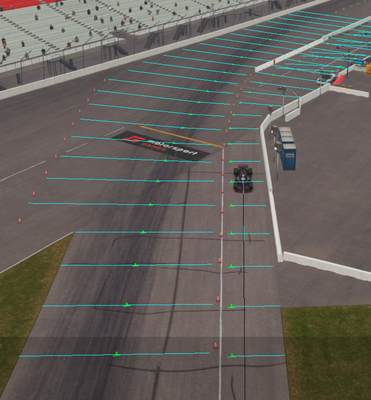
Pit Path
Now that the main path is placed, you should add a path that defines the pitlane.
Drive the car to the location, around 100 or 200m before where the car would exit the racing line and turn to enter pitlane.
Important
Please start comfortably BEFORE the AI leaves the fast path, and finished comfortable AFTER the AI should rejoin the main path. This way the AI will not violently swerve off the racing line.
Click “record a path” and drive through the pitlane to the location where car would enter the racing line again.
Make sure that you keep the car on fast lane when driving through pitlane.
When you reach the point around 100 or 200m after where you are entering the racing line again, stop the car and click “press to stop” button.
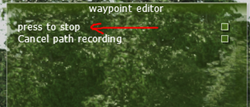
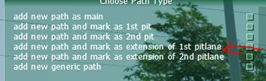
Then assign this new path as a pit path by clicking “add new path and mark as 1st pit”.
Save waypoints.
Exit the track (ESC), leave the track (leave track – button) and reload it again. Enter the track and AIW Editor.
Connecting the pit path to the main path
Next, we need to connect the pit path to the main path. This is done by making a branch on both ends of the pit path to the main path.
Drive to beginning of the pit path. Box-select with mouse the first waypoint of the pit path (drawing box around it). It turns to red and a new menu appears.
Next select a suitable waypoint from the main path.
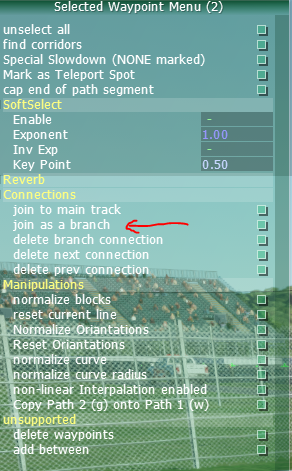
On the menu, click “join as a branch”.
Then click “unselect all” in top of the menu.
Main menu appears. Save waypoints.
Next drive to the end of pit path. Select the last pit path waypoint and a suitable waypoint on main path. Click “join the branch”, “unselect all” and save the waypoint again.
Exit the track (ESC), leave the track (leave track – button) and reload it again. Enter the track and AIW Editor.
Pit Path Extension
Most oval tracks (and some North American road courses) have garages in the track’s infield area. This differs from typical European style race tracks where the pit building and garages are located right next to the pitlane.
In ovals, the physical distance between garages and pitlane is so big that the AI cannot find their way from the garages to the pitlane without the help of an additional path.
This path is called a “Pit Path Extension”.
The pit path extension is a path which goes in front of the garages and merges to the pit path. The AI will follow this path to the pit path, and eventually finds its way to the race track. The pit path extension is NOT mandatory. Record it only if the garages are physically far away from the pit path.
There are a few limitations for the pit path extension.
The pit path extension is a one-way path, so the AI can drive on it only in one direction. Because of this, the pit path extension must be designed in such a way that it passes all the garage spots, but goes only in one direction.
It is possible to have multiple pit path extensions and for them to connect to each other.
Recording pit path extension
Drive the car to the location where the pit path extension starts, facing in the driving direction.
Click “record a path”
Start driving (slowly) along the designed extension path. You can see red plus signs placed behind you on the path you are recording. Stop at the location close to the pit path, but do not cross it.
Click “press to stop”
Click “add new path and mark as extension of 1st pitlane”
Save waypoints.
Next, box-select (with mouse) the last waypoint of the extension path and a suitable waypoint from the pit path (like we did with the pit path branches).
Click “join as a branch”
Click “unselect all”
Next, drive close to the first waypoint of the pit path extension.
Box-select (with mouse) the first waypoint.
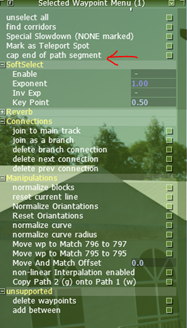
Click ”cap end of path segment”
Click “unselect all”
Save waypoints.
Exit the track (ESC), leave the track (leave track – button) and reload it again. Enter the track and AIW Editor.
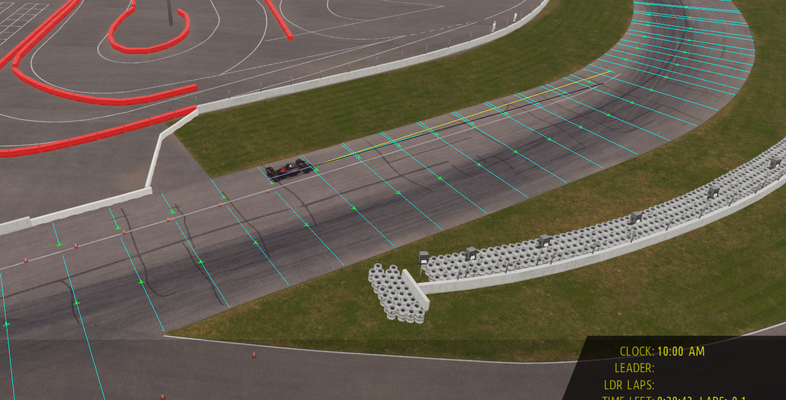
Corridors
Next, we are going to define corridors. There are a few types of corridors as described below:
Main Corridors: The AI uses corridors to get information on the width of the track - what is legal racing surface as opposed to illegal surface.
Collision Corridors: These define where the barriers are for the AI so that they can avoid them if they run off.
Cut Corridors: These define the legal racing limits for the player.
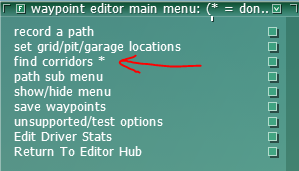
Finding corridors is an automated process and usually takes only a few seconds.
Click “find corridors” in main menu.
Save the AIW.
Exit the track (ESC), leave the track (leave track – button) and reload it again. Enter the track and AIW Editor.
In general it is recommended to go around and optimize the corridors as soon as possible, to ensure that they have not given support roads etc as legal. You can find further information about this here: Track AI Tutorial (AIW)#Corridoradjustments
Cut Track / Track Limits Corridors
It is very important to make a pass and verify that that the “Cut Track” corridors are correctly configured. This should be done after you are happy with the main corridors which control how the AI races.
These can be controlled separately with their own functions.
As a rule, track limits should be set appropriately as follows:
Set the cut corridors to be just beyond the white lines of the race track. This will mean drivers need to keep two wheels on the white lines to stay legal.
On wide open and flat exit curbs you may extend the corridors to around 1.5m from the edge of the curb. This will roughly ensure that drivers need to maintain all 4 wheels on these large exit curbs.
Add extra grace on any common areas that is legally defined beyond these white lines. For example at Le Mans we should allow the entire width of the Mulsanne straight, except for where any curbs are placed.
See the bottom of this article for how to setup Pit Entrance and Exits, but in summary, they should respect the pit line markings in terms of blend lines at entry and exit.
Pit Locations
Next, we are going to define a pit stall for each team. A pit stall is the location where the car stops for service in pitstops.
Garages per Pit Location
Pit stalls are linked to garage spaces. The garage space is the location, usually inside garage building, where the car is parked when it is not on the track. A single pit stall can be shared between a maximum of 3 garage spaces.
We recommend that there are as many pit spots as possible on a track, reducing the number of garages per pit spot. This makes pit group ordering much easier with online races.
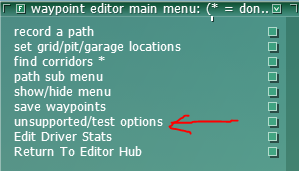
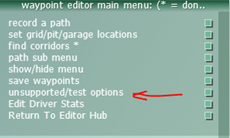
Click “unsupported/test options” in main menu.
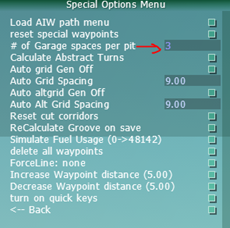
Change the “# of Garage spaces per pit” value to the maximum required.
Go back to main menu and save the AIW.
Recording Pit Locations
Now we are ready to record pit spots.
It is recommended that we record all spots in one pass, so all auto-generated connections and lines will be generated at once. However if you must, you may just record a few temporary locations.
We want to make the recorded pit locations visible in game, so we can actually see that the location is recorded in the correct place.
In the main menu, go to “show/hide menu”.
In show/hide menu, click “show pit spots” and then “Back”.
Now we will see a blue box around the recorded locations in the game.
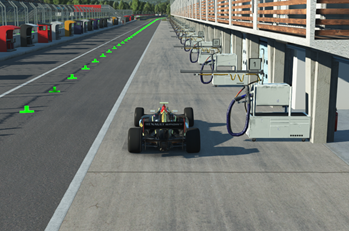
Drive the car to the location, where you want your first pit stall to be recorded.
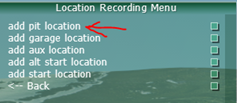
In the main menu, click “set grid/pit/garage locations”

Click “add pit location”
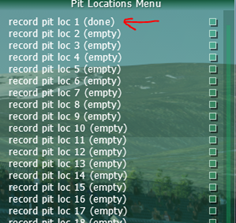
Click “record pit loc 1 (empty)”
In game, a blue box appears around the recorded location.

Repeat the “drive to the location and click record pit location x”, until all pit stalls are recorded.
You can also use the hot keys (CTRL+ Shift+Arrow keys) to move car around on the pitlane.
When you have finished recording all the pit spots, scroll down the pit locations menu and click “back”.
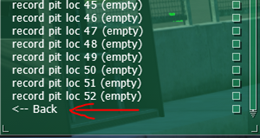
When you click “back”, you might see empty main menu. It is actually not empty, but scrolled down so all menu items are hidden on top.
Scroll/drag the menu up using the scroll button.
Save the AIW. When saving the file, the game complains about missing garage spots. Don’t worry, we are going to record them next.
Garage Locations
Garage locations are the spots, usually inside garage building or tent, where the car is parked when it is not on the track.
As we setup one garage location per pit spot earlier in pit stall recording stage, we need to record same amount of garage locations as we recorded pit spots.
The recording process for the garage locations is exactly the same as the pit locations.
To make the recorded garage spots visible in game, go to show/hide menu and click “show garage spots” and then “back”.
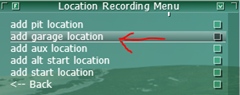
In main menu, click “set grid/pit/garage locations”

Click “add garage location”
Drive the car (or use hot keys to slide the car) to the location (facing out), where garage spot should be recorded.
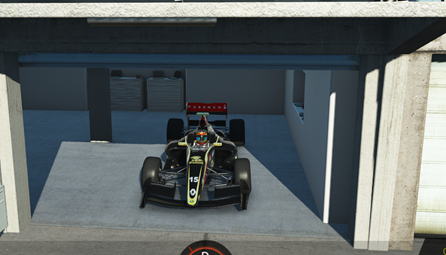
Click "record garage location 1 (empty)"
The game will show a garage spot number (rather than a box).

Repeat the “drive to the location and click record garage location x”, until all garage locations are recorded.
When you have finished recording all the garage spots, scroll down the pit locations menu and click “back”.
Again, when you click “back”, you might see empty main menu. It is actually not empty, but scrolled down so all menu items are hidden on top.
Scroll/drag the menu up using the scroll button and save the file.
Driving Lines
The driving lines are used as a base guide to help the AI navigate around the track. There are 4 types of driving lines which we will record.
Fastest - fastest, optimal racing line
Left and right - side by side paths for formation lap: These lines are used by the AI on formation laps. Make sure that there is enough space between them so that the AI does not collide with each other during the formation lap(s)
Block - defending line, where the AI defends their position on the track against other AI and the player
There are tools for improving all driving lines in the AIW Editor. Those tools are intended for use after we have complete and fully functional AIW file, not at this stage of AIW creation process.
More information can be found in the section "Track AI Tutorial (AIW)#Improving driving lines".
Recording fastest path
The best way to create the “fastest” path is to drive it as if you were actually racing the track. The key here is to be smooth, but fast. Do not over-drive the car, slide it around considerably or lock the brakes.
To begin, just start driving the track to warm up the tires and get the feel for it.
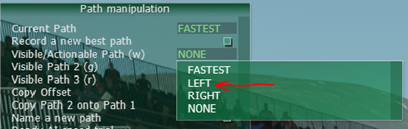
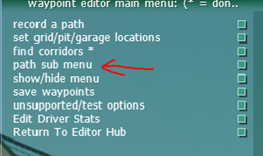
When you are ready to set a fast lap, click “path sub menu”.

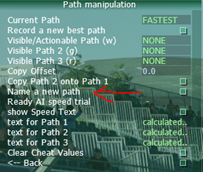
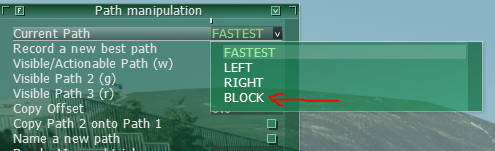
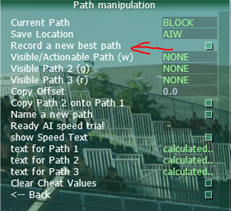
Make sure the current path is set to “fastest”
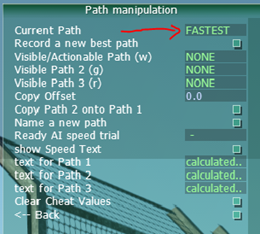
and click “Record new best path”
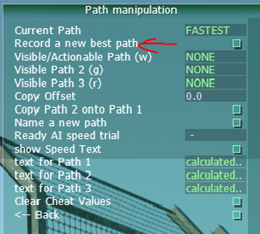
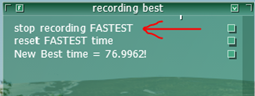
Drive fast laps. When you are happy, click “stop recording FASTEST”.
Save waypoint.
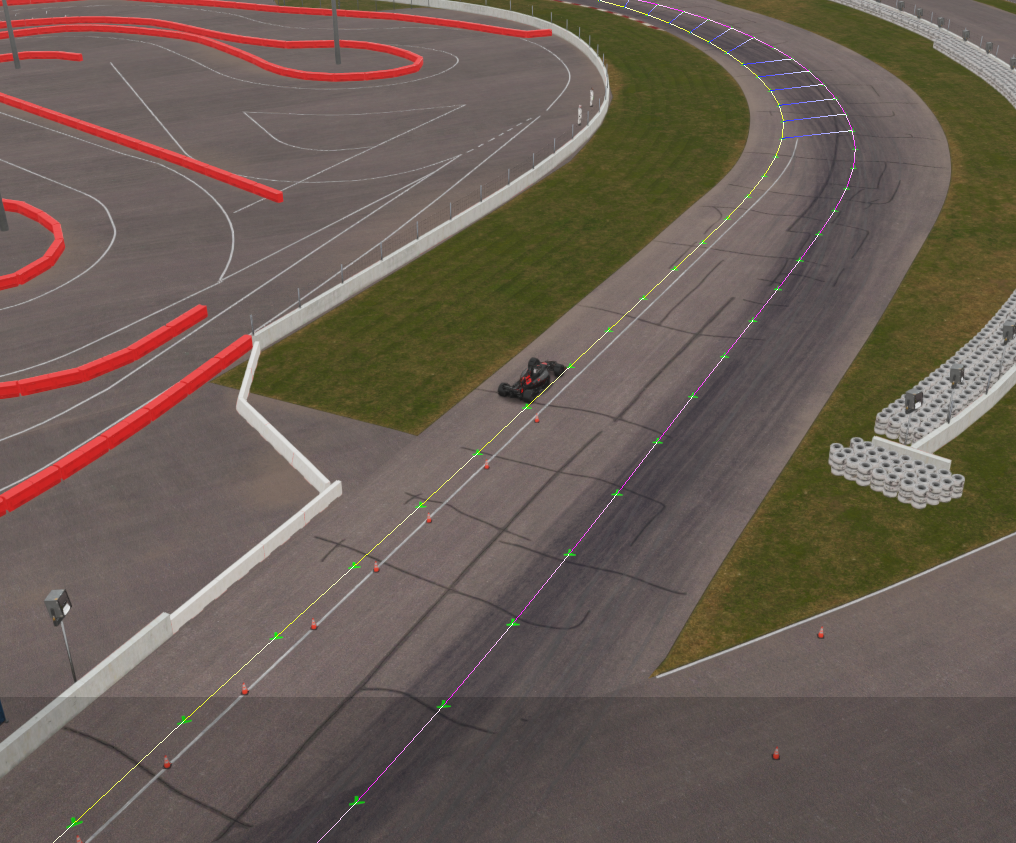
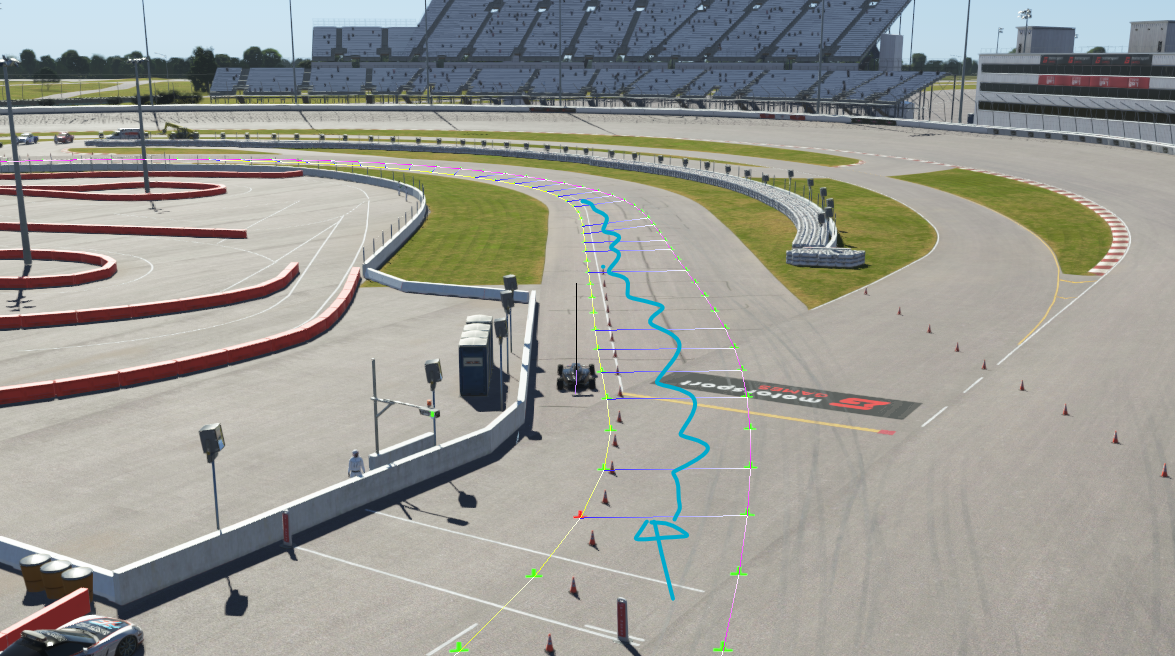
Once the track is reloaded, the next thing we need to do is smooth out the fast path on the start-finish line. Often the 'start' and 'end' points of the path don’t line up linearly, and so will cause a kink in the racing line. This kink makes the AI hit the brakes at the start-finish line, ruining their lap times and smooth racing.
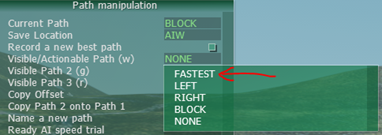
To smooth out the kink, click “path sub menu”.

In “Visible/Actionable Path (w)” drop down menu, select “FASTEST”
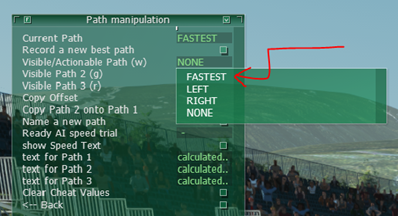
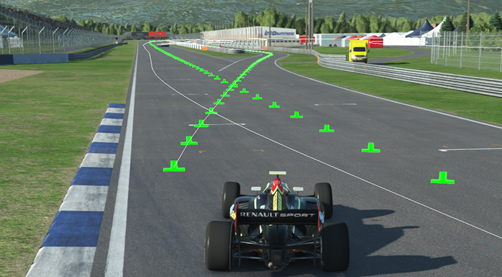
The fast path is rendered in the game, and you can see the kink at the start-finish line.
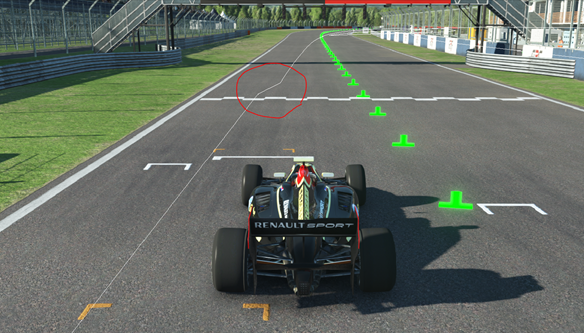
To fix that:
Select a few waypoints (box-select with mouse) around start finish line. When box-selecting waypoints, make sure that you do not accidentally select unwanted waypoints in the background.
The safest way to select waypoints is in top view. Use swingman camera adjustments to rotate the camera to top view.
The waypoint menu appears. Click “normalize curve” function.
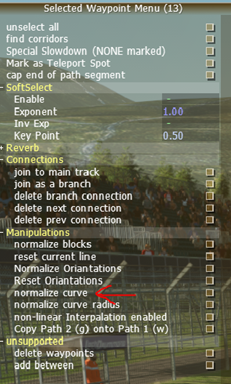
This smooths out the kink. Now the AI behaves normally at the start-finish line.
Finally, click “unselect all” in top of the menu. Save waypoints.
Exit the track (ESC), leave the track (leave track – button) and reload it again. Enter the track and AIW Editor.
Recording left path
The left path is recorded in exactly the same way as the fast path. The left (or right) path does not have to be driven at full speed, but in same way as the main path. Concentrate more on car location at left side of the track.
Left and right paths are also used by the AI on formation laps. Make sure that there is enough room between the paths, so AI do not collide with each other during the formation lap(s).
Click “path submenu”

In “Current Path” drop down menu, select “LEFT”
Drive the car close to start-finish line (left-side of the track), but do not cross it.
Click “Record a new best path” and start driving around the track, keeping the car close to left edge of the track.
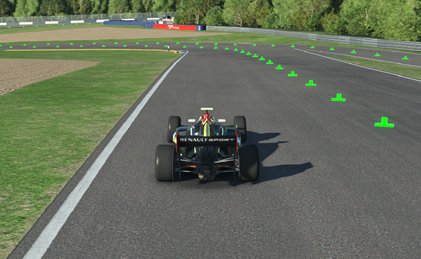
When the lap is completed, click “stop recording LEFT”, and save waypoints.
Then we need to smooth out the kink at the start-finish line in the same way as we did with the fast path.
Click “path sub menu”
In “Visible/Actionable Path (w)” drop down menu, select “LEFT”
Box-select a few waypoints with the mouse around the start-finish line. Waypoint menu appears.
Click “normalize curve”
Click “unselect all”
Save waypoints.
Recording right path
Right path is recorded exactly same way than left path.
Click “path submenu”
In “Current Path” drop down menu, select “RIGHT”
Drive the car close to the start-finish line (right-side of the track), but do not cross it.
Click “Record a new best path” and start driving around the track, keeping the car close to right edge of the track.
When the lap is completed, click “stop recording RIGHT”, and save waypoints.
Then we need to smooth out the kink at the start-finish line in the same way as we did with the fast path.
Click “path sub menu”
In “Visible/Actionable Path (w)” drop down menu, select “RIGHT”
Box-select with mouse few waypoints around the start-finish line. Waypoint menu appears.
Click “normalize curve”
Click “unselect all”
Save waypoints.
Recording block path
The block path’s nature is similar to the fast path. But this time drive the lap around like someone is trying to overtake you. Drive a defensive line, but as fast as possible. Don’t expect the lap time to be as quick as when you are driving normal racing line.
The block path is also used when the AI drives against other AI (not only against the player). That’s why it is good practice to put the same effort to create the block path as you did on the fast path, to get the best possible racing experience against the AI.
There are a few rules of thumb for a good block path which gives a good driving experience against the AI.
Drive smoothly, but fast - as you did with the fast path.
Do not make over-aggressive defensive/blocking moves. On straights, keep side-to-side movements within one car width.
Do not change the driving line at braking zones before a curve. That may cause unnecessary crashes before curves between AIs. That might also surprise the player, when AI defends its position at an unexpected location. Take the defensive line before hitting the brakes.
The block path is not mandatory for a fully functional AIW file, but we recommend that it is added. It will improve the AI racing and the player racing experience against AI a lot.
By default, block path is not available in the editor. So, let's add it first.
Click “path sub menu”
Click “Name a new path”
The screen goes black, and only the cursor blinks.
Type “BLOCK” with capital letters

And finally hit enter. The path menu comes back.
Now, select “Current Path” drop down menu “BLOCK”
Start driving around the track. Warm up tires and practice driving the defensive line.
When you are ready to start recording the block path, click “Record a new best path”.
Again, do not over-drive the car. Be smooth, but fast.
When you are happy with the lap, click “stop recording BLOCK”.
Save waypoints.
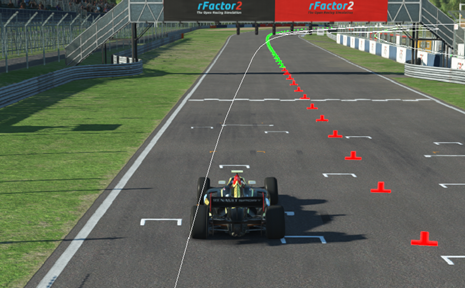
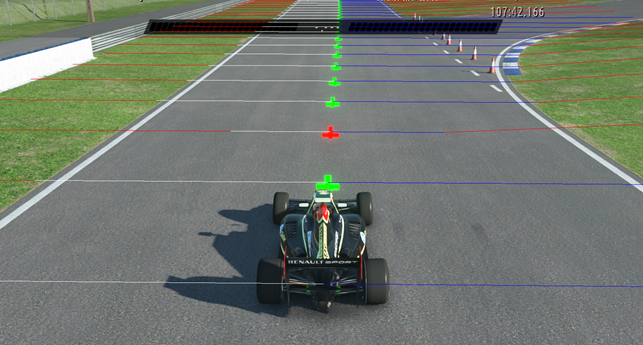
At this point it is a good time to smooth out pit in- and pit out branches to the fast path. If the branches are not smooth and “seamless” to the fast path, the AI cars will brake heavily and might do weird steering movements before entering the fast path.
Click “path sub menu"

Select from ”Visible/Actionable Path (w)” drop down menu “FASTEST”
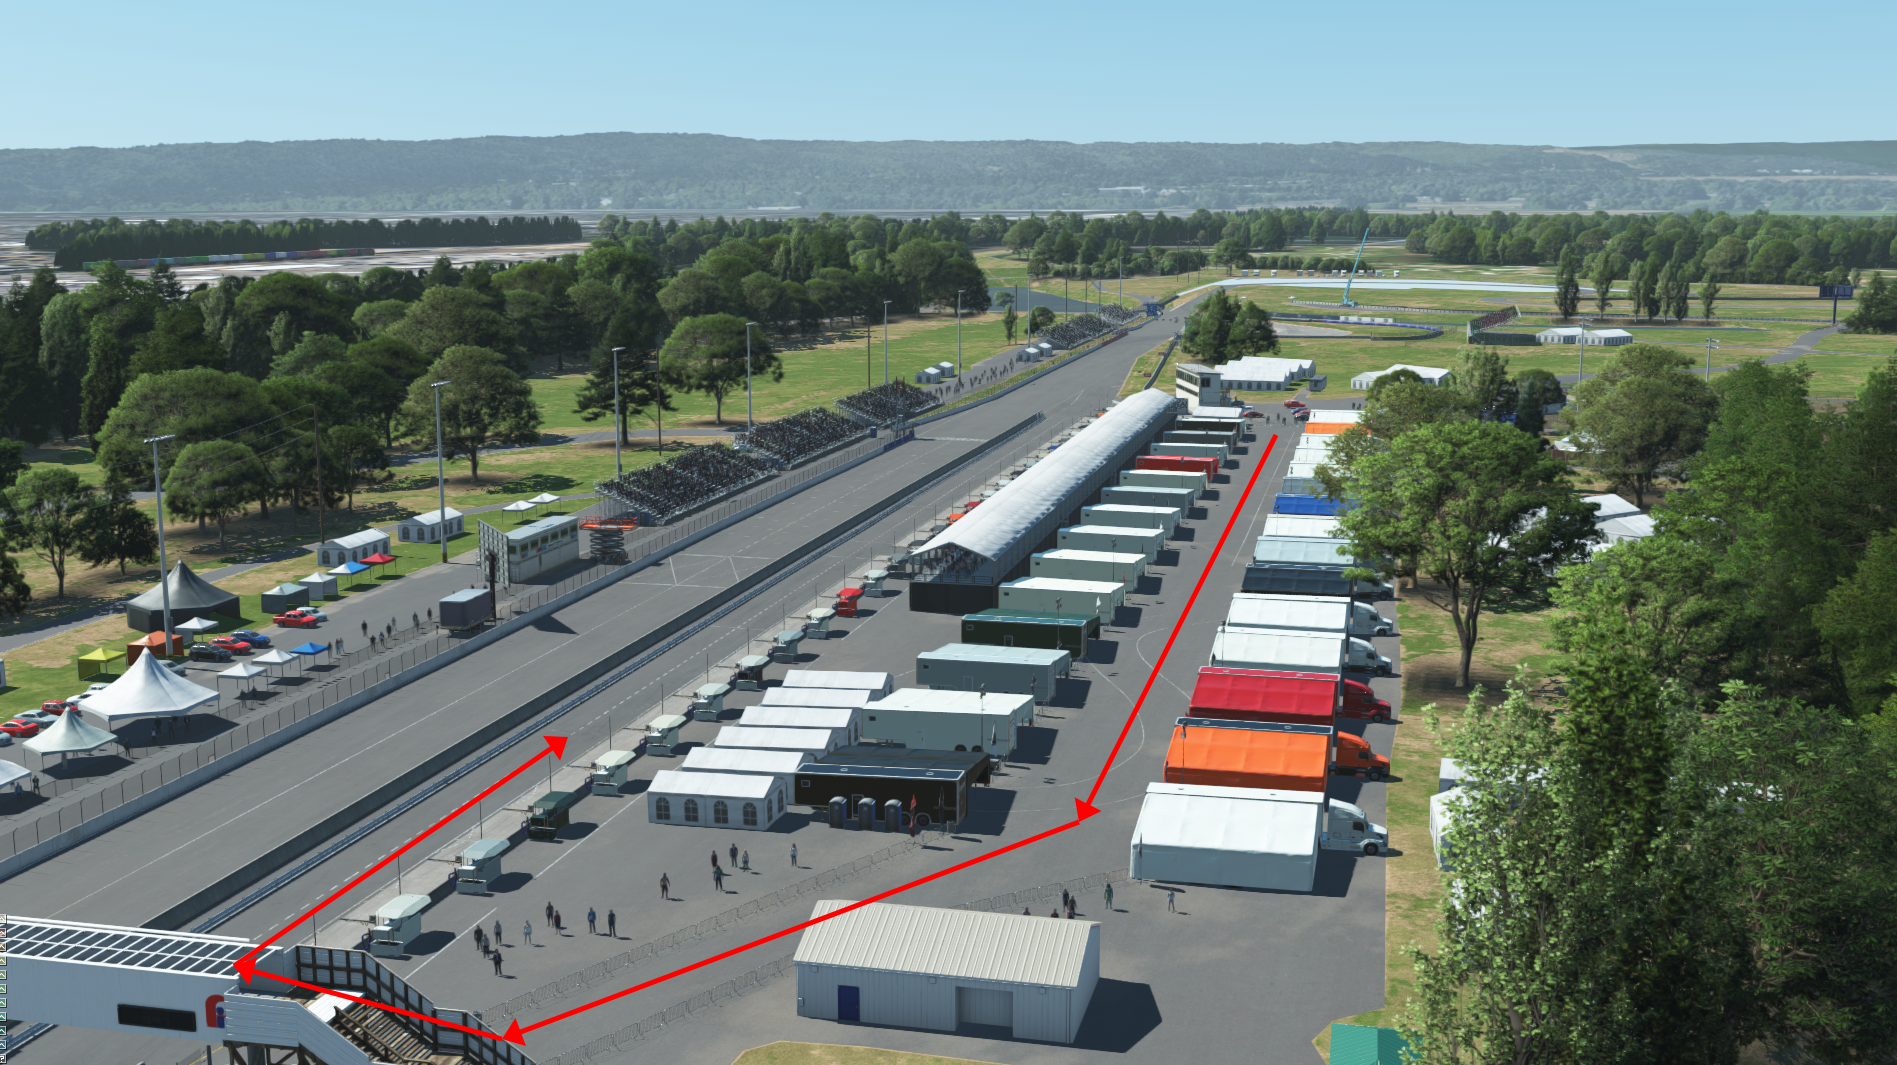
Drive to the location, where pit path starts.
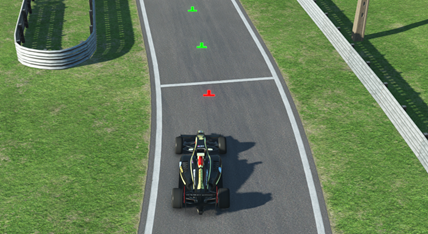
As you can see, the pit path does not match to the fast path seamlessly.
Box-select the first few waypoints of the pit path with the mouse. Move the mouse cursor out from the AIW editor menu area!
Start adjusting (using SHIFT+Arrow keys) the selected waypoints' location so that they meet the fast path. You might want to adjust swingman camera angle more to top view, to help see better when adjusting.
Match the first pit path waypoint exactly on top of the fast path. Then continue adjusting other pit path waypoints so that the transition is smooth to the pitlane.
Try using the path smoothing tools to get the line smoother, any imperfections will result in AI braking too much on pit entry.
When unselecting waypoints, it might be a good idea to use waypoint menu “unselect all” function, to avoid accidentally moving other (accidentally selected) waypoints.
When you have finished adjustments, the end result should look something like this:

Save waypoints.
Next, drive to the end of the pit path.
Using very same method, adjust the pit path waypoints so that the pit path seamlessly merges to the fast path.
Save waypoints.
Recording Special Slowdown Spot
Next, we need to define “Special Slowdown” waypoint. Special Slowdown is typically the waypoint just before the pitlane officially begins. In track art, this is the point where pitlane speed limit starts and usually it is marked with white or yellow line and speed limit sign. When the AI sees this waypoint, they know they HAVE to brake and get their speed down to the pitlane speed limit.
Drive the car to pit entry location and park it just before white/yellow line.
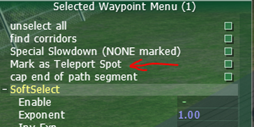
Select closest the waypoint before the line.
In waypoint menu, click “Special Slowdown (NONE marked)”
Click “unselect all”
Save waypoints.
Recording Teleport spot
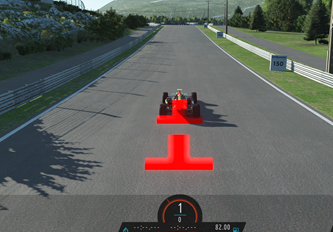
The next waypoint to select and mark will determine the “Teleport Spot”.
This is the location all the cars will jump to if you skip the formation lap. This should be a good distance away from the start-finish line, and if possible not in the middle of a corner. You want the cars to be about 5 seconds after spawning here to be reasonably close to the S/F grid, but not to have crossed the Start Finish line yet.
The rolling start will only work if the lap distance is beyond 75% and they have not crossed the S/F yet.
Drive to the location where you want all cars to jump when skipping formation lap.
Select the waypoint.
Click “Mark as Teleport Spot”
Click “unselect all”
Save waypoints.
Exit the track (ESC), leave the track (leave track – button) and reload it again. Enter the track and AIW Editor.
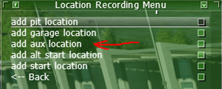
Recording Aux locations
Aux locations are safety car locations. We will need two of them. One location where safety car is parked in the pitlane during the race, and the other where the safety car is located at the beginning of the formation lap(s).
Drive to the location in the pitlane, where the safety car is parked during the race. Note this should generally be at the end of the pitlane near the exit.
Click “set grid/pit/garage locations”
Click “add aux location”
Click “Pace Car Pit Start”
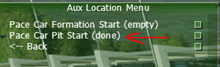
Next, drive to the location where the pace car sits at the beginning of the formation laps(s).
Click “Pace Car Formation Start”
Click “Back”
Save waypoints.
Exit the track (ESC), leave the track (leave track – button) and reload it again. Enter the track and AIW Editor.
Recording grid locations
We have two grid types in rF2 - the main grid and alternative grid. The main grid is used for standing starts and the starting location for formation lap(s). The alternative grid is used for starting point of formation lap(s) and rolling starts, like in NASCAR or Endurance type racing. From this grid cars start formation lap(s) behind the pace car, and finally do rolling starts of the race.
The main grid is always located on the race track, typically on the main straight. The main grid is mandatory for a fully functional AIW file. The alternative grid can be located on either the pitlane or race track. The alternative grid is not mandatory, but it is good to have it in so that the track supports all kinds of race start choreographies. The use of the alternative grid can be configured in the GDB file.
Before we start recording the main grid, it is a good idea to make the grid locations visible in game. To do that:
Click “show/hide” menu.
Click “show grid positions”.
Click “back”
Now the recorded main grid locations are visible in game.
Now to record the positions:
Drive the car to the location where pole position is. Typically grid locations are painted on the track, so position the car using those markings.
It might be good idea to adjust swingman camera angle more to top view, to help positioning the car accurately.
Click “set grid/pit/garage locations”
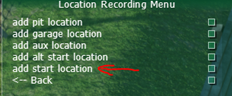
Click “add start location”
Click “record start loc 1 (empty)”
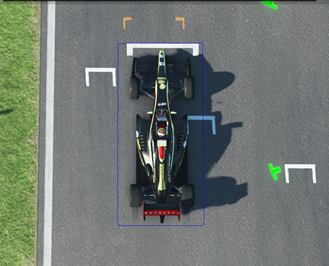
A blue box appears around the recorder grid location.
Drive the car to the second grid location. Or you can use hot keys (CTRL + Shift + Arrow keys, and ALT if you want to make car slide faster) to slide the car to the next location. Remember to move mouse cursor out from AIW editor menu area before sliding the car.
It might be good idea to pause the game (P – key) before sliding the car. Then the car does not move by itself, if the road leans to some direction.
Click “record start loc 2 (empty)”
Repeat “move the car - record the location” – functions until all grid locations are recorded.
When done, click “back” at the bottom of the menu.
Save waypoints.
Exit the track (ESC), leave the track (leave track – button) and reload it again. Enter the track and AIW Editor.
Recording alternative grid locations
Recording alternative grid locations is done in exactly the same way as the main grid locations.
Make alt grid locations visible in game:
Click “show/hide” menu.
Click “show alt grid positions”.
Click “back”
Now recorded alt grid locations are visible in game.
Click “set grid/pit/garage locations”
Click “add alt start location”
Drive the car to the location, where alt grid pole position is.
Click “record alt grid loc 1 (empty)”
A blue box appears around the recorded location.
Repeat “move the car – record the location” – functions until all alternative grid locations are recorded.
When done, click “back” at the bottom of the menu.
Save waypoints.
Exit the track (ESC), leave the track (leave track – button) and reload it again. Enter the track and AIW Editor.
Automatically Generating Grid Positions from Front Row
Usually, all grid locations are recorded manually based on track art. However in the AIW Editor, there is an automated option to generate grid and alternative grid locations too.
Let’s have a look at the automated process.
First, make grid location visible in the game.
Click “Show/Hide Menu”
Click “show grid positions”
Click “Back”
Next,
Click “unsupported/test options”
In Special Options menu we have several items, which affect grid generation.
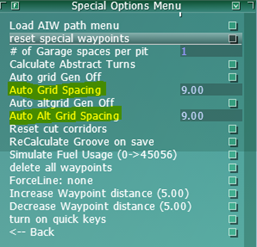
Auto Grid Spacing- and Auto Alt Grid Spacing – values define the distance (in meters) between each start location. The default value is 9 meters, which is pretty good.
Click “Auto grid Gen Off” until it changes to “Auto grid gen follows main”.
This means that when the grid is generated it follows the track main path.
Then, click "Back”.
Drive the car to the location, where pole position is.
Click “set grid/pit/garage locations”
Click “add start location”
Record pole position location, click “record start loc 1”
Drive the car to the 2nd place grid location
Record 2nd location, click “record start loc 2”
Remaining grid locations are generated automatically, based on Auto Gris Spacing value.
Alternative grid generation works exactly same way.
Note with NASCAR type ovals, you can choose “Auto altgrid follows pit” – option in “unsupported/test options” menu, before recording first two alt grid locations. Then the grid follows pit path instead of main path.
When done, save the waypoints, exit the track (ESC), leave the track (leave track – button) and reload it again. Enter the track and AIW Editor.
Simulate fuel usage
Next, we need to simulate the AI cars' fuel usage. We must use Skip Barber car for this. Otherwise calculations won't be correct.
Load the track with Skip Barber car. The car is installed in DevMode by default.
Enter the track and enter the AIW Editor.
Click “unsupported/test options”
Click “Simulate Fuel Usage”
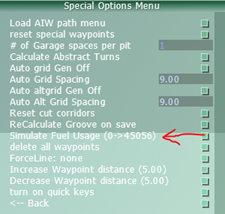
Click “back”
Save waypoints.
When the track is loaded and you have entered the AIW editor, save waypoints one more time. This ensures that all auto-generated elements have been handled properly. Now you have a fully functional AIW file ready for testing.
Troubleshooting
While testing it, you might find that the AI behaviour needs adjustments. The following sections give information on how to do this.
Corridor adjustments
With corridor adjustments, we can prevent the AI using certain parts of the track (eg cutting corners too aggressively) and guide them to use preferred driving lines.
First, we need to make the corridors visible in game.
Click “show/hide menu”
Click “show corridors”
Click “back”
Now the corridors are visible in the game.
Corridors are colour-coded.
Red – illegal driving surface
Blue – legal driving surface, right side
White – legal driving surface, left side
Adjusting the corridors can be done by selecting waypoint(s) and using the following hot keys:
SHIFT + Arrow keys left and right, adjusts right side corridors
SHIFT + Arrow keys up and down. adjusts left side corridors
When using CTRL – key together with SHIFT + Arrow keys, adjustments are faster.
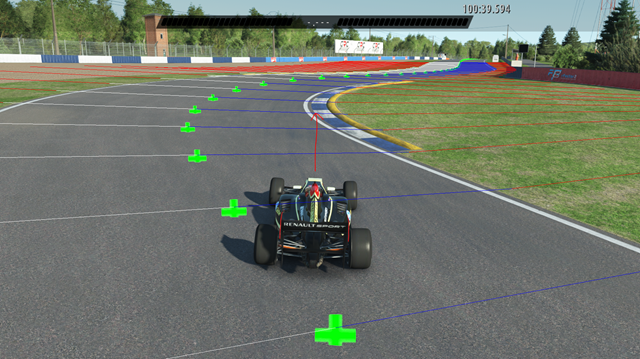
Here is an example of adjusted left-side and right-side corridors.
Please notice the red lines (=illegal driving surface) are adjusted on the track side. Only a narrow “gate” on the track remains as a legal racing surface.
This means the AI always tries to drive through that narrow “gate”, and does not use the full track width.
Prevent AI from driving on Curbs
In this case, the AI tries to cut the curb too aggressively. The AI car hits the sausage curb too hard and loses control at chicane exit.
To prevent that happening, let’s adjust the corridors in such a way that the AI does not hit the sausage curb.
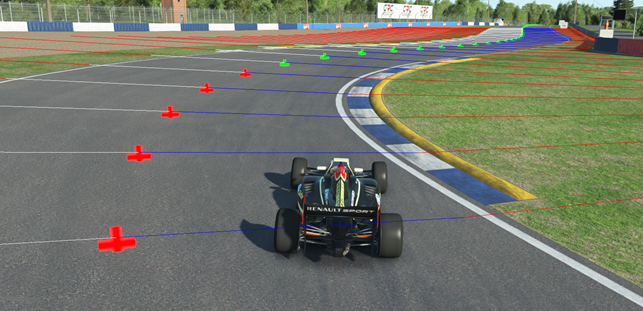
Please notice, that the right-side corridors have been now adjusted inwards. Red lines (=illegal racing surface) are partially over the curb, which prevents the AI car hitting the yellow sausage curb again. Now, when the AI drives through this chicane, the car stays under control all the time without spinning at the exit.
Oval Aprons
On ovals, it is generally good idea to make the apron an illegal racing surface otherwise the AI tends to use the apron for overtaking. If the front AI car keeps the inside line, the challenging AI car behind tries to overtake through the apron. This can lead to unnecessary crashes, because the AI might lose control when moving from a high-banked racing surface to a low-banked apron.
The apron is an illegal racesurface anyway, but the Editor’s “find corridors” – function cannot see any difference between the apron and the racesurface. Just like it cannot see any difference between asphalted run-off areas at road courses. (Unless they use different materials with illegal setup in the TDF file.)
Please notice, that the pit path has its own corridors. So, you can adjust main path corridors safely all around the oval without affecting pitstops and paths to the pitlane.
Reducing Side by Side action
Another AI issue which can be fixed with corridor adjustments is when the AI try to squeeze themselves two- or even three-wide into a narrow place on the track causing major crashes. These kind of places can be narrow chicanes, very tight and narrow hairpins and so on. For example, Formula E tracks or Monaco – type street tracks are overall pretty narrow with tight corners. Like here in Monaco chicane, there is no way that AI survives through the chicane without crashing, if we do not prevent them going two- or three-wide in the corner.
On the left-side, corridors are adjusted inwards (red lines). This “strangles” legal racing surface just enough so that there is room for two AI cars, which will get through the chicane without crashing.
The three-wide situation never happens, because the legal racing surface is not wide enough for three cars.
Driving lines for different type of racecars
Although most cars with similar characteristics can use the default racing line you created, sometimes other cars may have issues with it and not drive to their full potential.
A good example is Spa Eau Rouge. If you make the fast path with a quick open-wheel car, lower downforce GT cars probably cannot survive that corner without crashing.
In this case you can create a unique racing line for certain car types. This line is referenced in the talent file for each car, and those cars will use that line.
To create a unique path follow the procedure outlined above when you created the BLOCK line. This time though, give the line a name you can recognize for that car. In the case of the Skip Barber you might use something like, “Skippy_RacingLine”.
Select the line as the “visible/actionable” line, click “record new best path”, and race the track using the car in question. When you’re happy, stop recording and “save waypoints”.
Now, from the main waypoint menu click “Edit Driver Stats”. You’ll want to select “default” as the driver at the top of the Driver Edit menu.
Now, for “current path”, select the path you recorded, and then save waypoints. The AI will now use this alternate racing line when they are driving the car in question.
Improving driving lines
Sometimes the recorded fast path is not as smooth as it could be on corners and this affects the AI's performance on track. We can debug and fix these issues (to a certain point) in the AIW Editor to improve AI behaviour as long as the path is reasonably good. (These tools cannot fix a fast path which is fundamentally bad.)
Drive the car to the corner which you want to debug.
In path sub menu, set "Visible/Actionable Path" to "FASTEST", click "Show Speed text" and set "text for Path 1" to "radius"
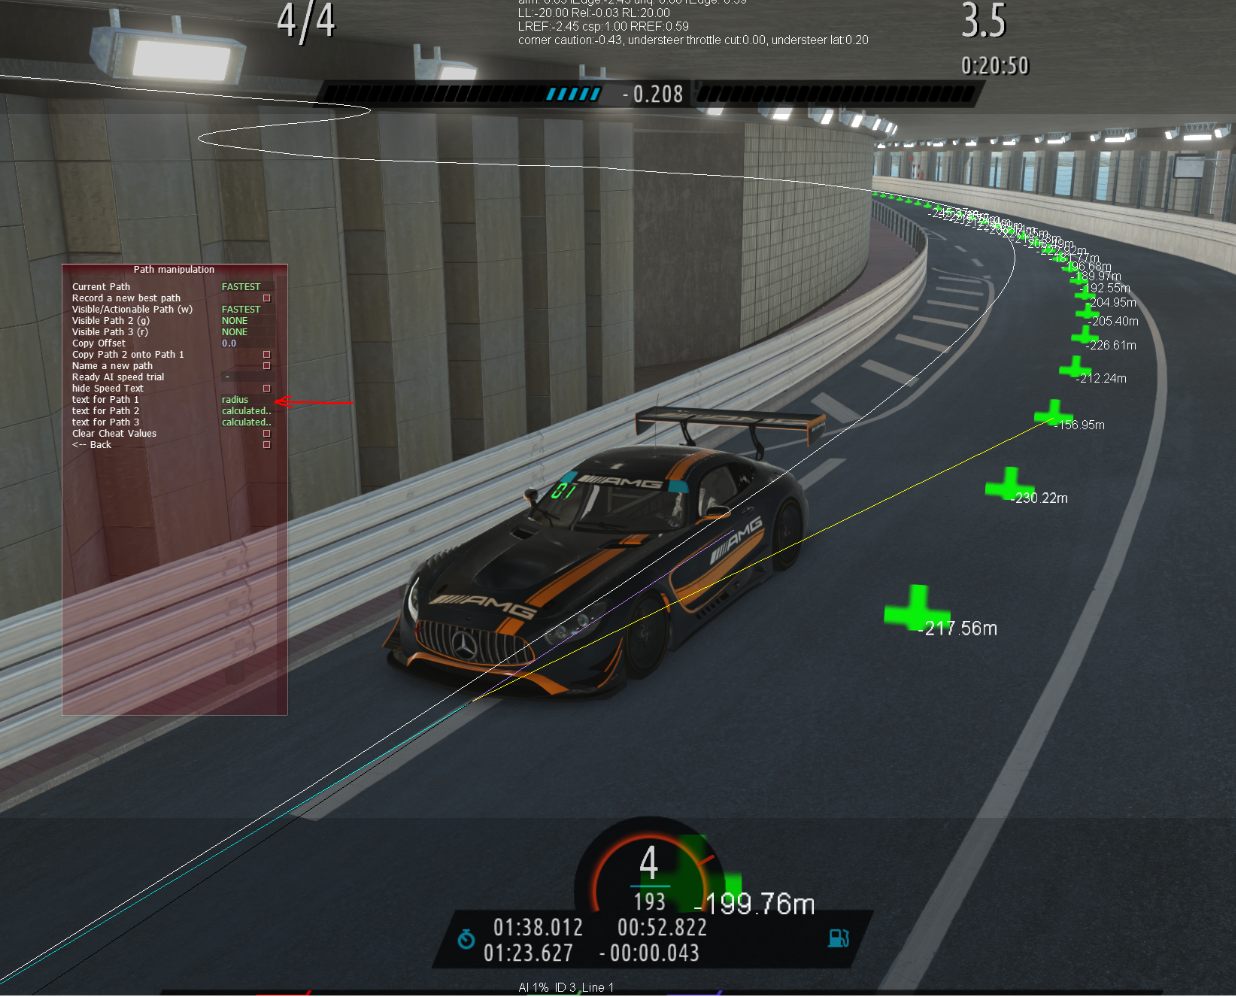
The yellow line shows the controlling waypoint. When you view the corner radius values, you see we have a tight point in the middle. The corner radius value is much smaller than the waypoints before and after it.
Select a region of waypoints from before and after the rogue value waypoint. When selecting a region of waypoints, make sure that the radius values of the selected waypoints are either all negative or all positive.
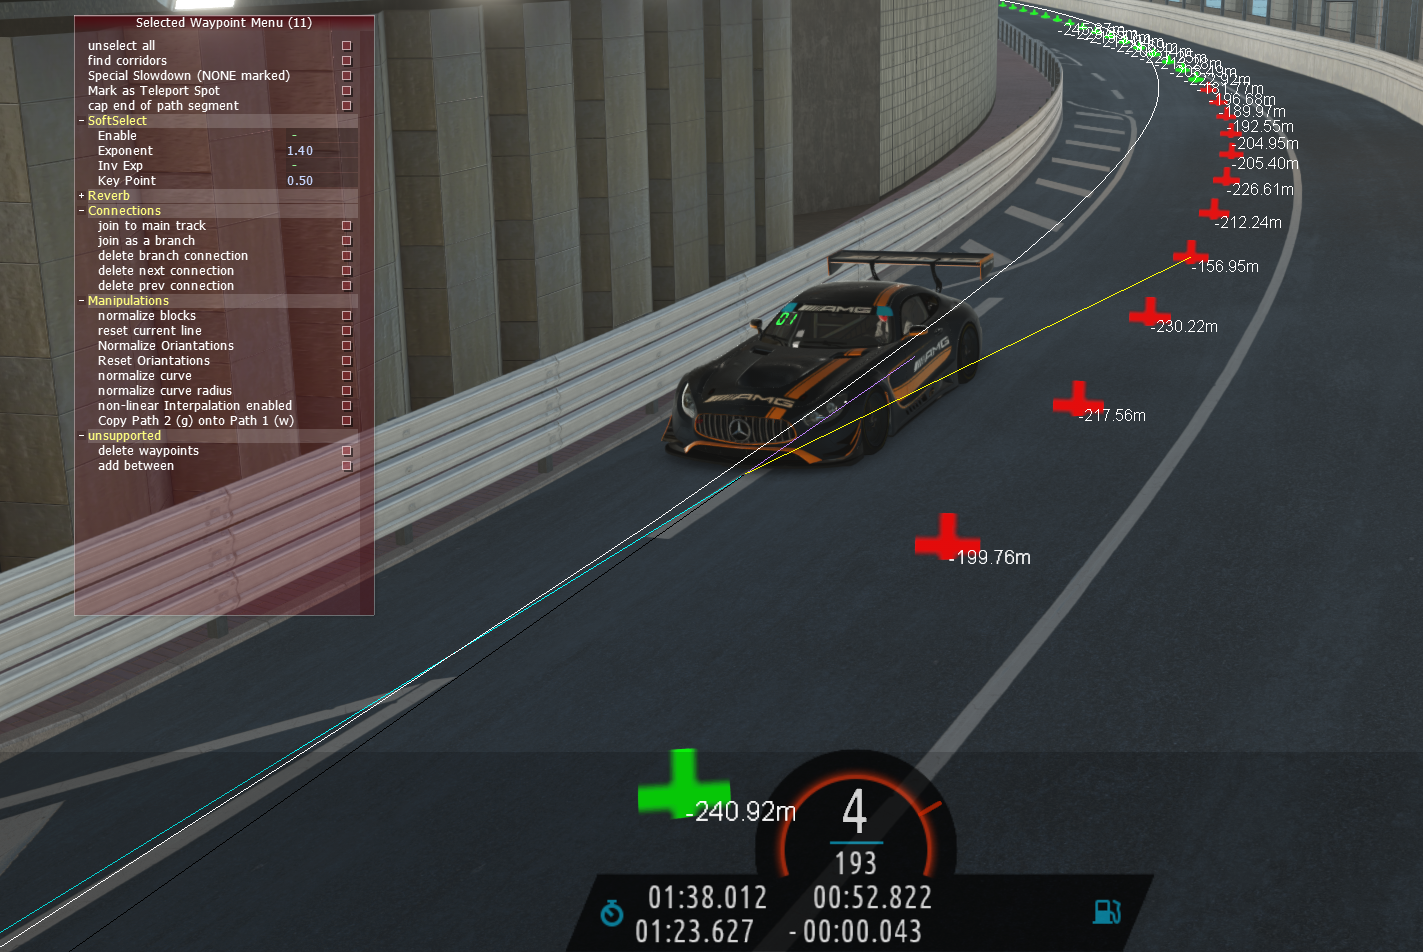
Then click "normalize curve radius"

The Editor smooths out the corner radius values, but we still have a little error at the end of our selection.
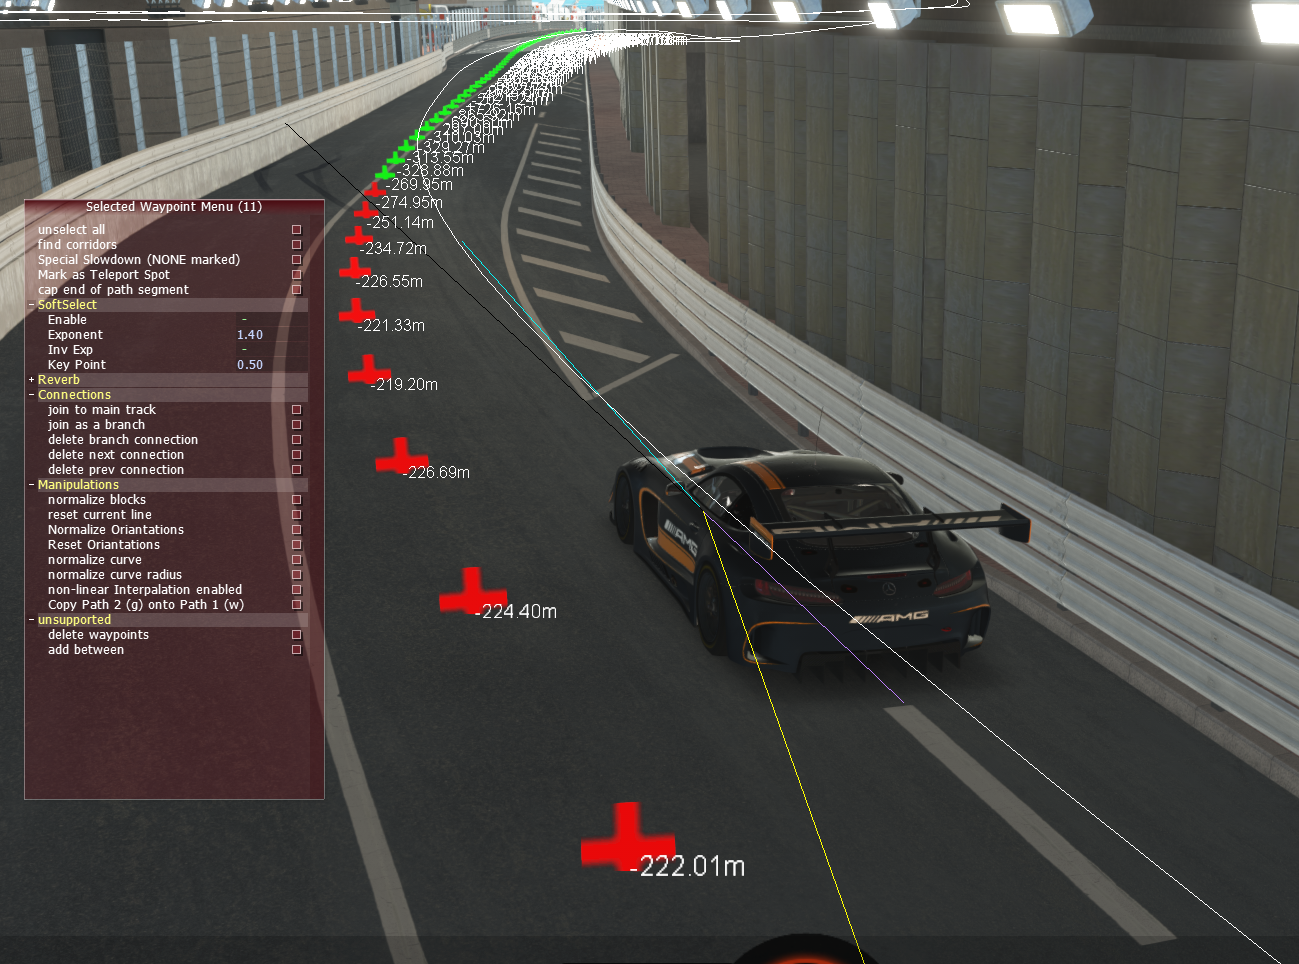
Unselect all waypoints. Then we need to repeat the process on other areas to get it right.
When smoothing out corner radius, always travel down the track. Never against the driving direction.
In this specific case and corner, once the radius is over 200m on all waypoints, we are good. Small differences don't matter once the corner radius opens up generally do not matter.
Finally, let the AI cars drive around the track and observe they have no issues with the corner, although make sure to test with both actual AI drivers and multiple car types..
This same method can be used for improving all driving lines, not just the fast path.
In the "Path manipulation" menu, you can select other paths from the "Visible/Actionable Path" dropdown menu and use the workflow described above to smooth corner radius values.
In the "Special Options" menu, you can force the AI to use the path in question by changing "ForceLine" option, and observe how the AI behaves on the path.
Often AI issues in races occur when there are problems on the Block Path, so make sure to check this too, by forcing the AI to drive it in the unsupported options menu.
Copying Lines from one Path to Another
Some times you make a small mistake on a path and just wish to redo a single corner, via driving rather than manual manipulation. This can be achieved by recording a new path and copying to it.
(You have your fast path, with perhaps one corner that you aren't satisfied with)
You then select "name new path", call the new path whatever you like, for example "t10fix".
You then record and drive the lap, but this time the only thing that matters is nailing that one corner.
Finish the lap and save the file.
Now you go into the path sub menu, select your original fast path as "path (w)" and the new patch path as "path 2 (g)". You will now see the two paths overlaid together, w being white and g being green.
Next, go to the problem corner and select all the main waypoints covering that corner. It's a good idea to start and finish marking waypoints from a point where the two paths are right on top of each other, or on a straight section which is easy to smooth.
With all those WPs selected you should now see the "selected waypoint menu" (rF2 switches to this menu as soon as you have one or more waypoints selected).
Open the "manipulations" sub menu and click "copy path 2 (g) onto path 1 (w)". You will now see the change where the paths have merged together!
Now "deselect" all waypoints!
The last thing to do is to look for any kinks at the beginning and the end parts of the path. These areas are pretty much guaranteed to need some smoothing, but the built in tools should work fine on straight sections of road.
Race Start
Rolling Start does not work, it says stay behind the Safety Car after it has pitted.
There are a couple of things to check for this.
The pitlane does not have a clear barrier between it and the road it can cause issues. You can fake a boundary by adjusting the corridors, and far corridors so that there is one.
Ensure there are no branch connections before the pit lane entry point to the main line. This can also cause issues.
Ensure that Teleport Spot is set far enough from s/f line
Pit Lane
After finishing a pit stop the AI tries to drive onto a support path
We have seen this happen a few times where the AI after finishing a pit stop tries to drive onto the support path which is behind the pit wall. To resolve this move your main pit lane waypoints closer to the pit spots, and readjust your driving paths and corridors of the pit lane. This should stop the AI from thinking the way point behind the pit wall is better for them.
Track Cutting
Detecting Pit Exit Cuts
In order for pit exit cuts to be tracked ensure that the AIW is configured correctly via Cut Corridors and Path Connections.
Firstly make sure that the cut track corridors are correct for both pitlane and main race surface, and in general ensure that the pit lane does not cover more area than the main race track unless it should - or this may result in false assignments to the pit path when it should not.
Note that sometimes the road can overlap the pit lane. Make sure this is appropriate.
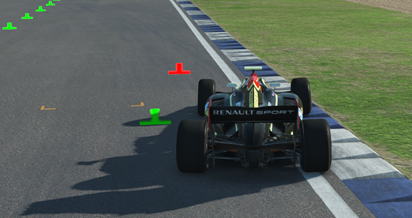
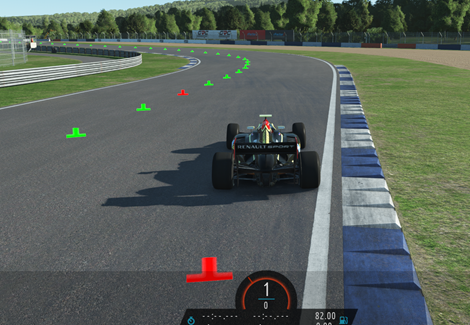
Secondly check that there are no connections from the Pit Path to the Main Path where you do not want allow cars to join. In the image beneath they need removing. To view these show connections in the AI Editor.
These can be removed by deleting the branch from the pit path waypoint, but needs to be done one by one. The branches going through the cones in the image beneath should be removed.
In order for these connections to not be made automatically, ensure that your corridors and cut track boundaries are correctly configured. The game will not add them if the pitlane cut corridors do not go close enough to the opposite side of the race track. It does attempt to regenerate them each time you load an AI file in the AI editor though.
These are the correct branch connections: