Shadow Groups / Settings
Introduction
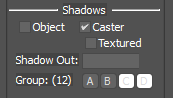
There are a few Shadow Settings which can effect the visual quality and performance of shadows.
We can choose if the object just casts are shadow or if it is rendered too.
We can choose if the cast shadow uses the material's albedo map alpha channel to mask out the shadow.
And we can set the distance at which the shadow is no longer rendered.
Shadow groups are used to reduce the amount of objects casting shadows at different settings.
They are made up of a combination of power of 2 values. So you can have the first, second and third visgroups enabled by 1 + 2 + 4.
These values can be set in the exporter, however they are not written into the GMT files, they are configured in the SCN file with ShadowGroups=(8) for example.
In the 3ds Max plugins they are signified by a character rather than numerical value.
Textured Shadows
These are more expensive that normal shadows, using the opacity map of the material to mask out the shadow. These should be used sparingly. Often this is mostly just used for Fences, Trees and Spectators which are not 3d modelled. Objects which need to cast shadows with this type of transparency should be separated from those that can cast solid shadows for performance reasons.
Shadow Out
This should be used to make small objects shadow draw distance shorter. For example small objects such as cones can have a distance of only 100 to 200m, however a large building should be rendered further probably as far as the maximum of the scene.
Setting or leaving the value at 0.0 ensures that the overall scene value is used.
Shadow Groups
This section details what the different levels signify. The available Shadow Settings are Maximum, High, Medium, Low and Off.
If no shadow group is defined, the object will be visible at all on settings.
1 = A = Low
Visible on low detail only. This setting is typically not used as usually any object will be visible on all over settings and not need a shadow group assignment, unless you intended to swap out this object for a higher resolution one.
2 = B = Medium
Visible on medium detail only.
4 = C = High
Visible on high detail only.
8 = D = Maximum
Visible on maximum detail only
Examples
Below are some examples.
- An object to be visible on max setting only would have a value of 8.
- An object to be visible on high and max shadow settings would have a value of 12.
- An object to be visible on medium, high and max shadow settings would have a value of 14.
- An object to be visible on all settings would have a value of 15, or no shadow groups set.
Recommended Group Values
Beneath are recommended objects which should be visible at different levels.
Low (No groups set)
- All immediately track side barriers (walls, tyres, fences, armco but not internal tyres where they have a canvas wrap if separate object)
- All bridges that pass the race track
- All track side trees
- Pit Building (including pit doors)
- On track large advertisement
Medium (14)
- All large track side buildings
- All grandstands
- Marshals
- All other barriers close to the track (Digital Flags, Interior Tyre Stacks, Secondary importance fences, tyre stack lods etc)
- On track marshal signs, bollards, cones and other small props etc
- Bushes / Hedges which are immediately track side and not underneath trees.
- Tree lines behind initial track side trees
High (12)
- All prominent tall props
- Details Close to the track (5 to 30m typically depending on prominence) including:
- Spectators
- Vehicles
- Props
- Bushes
- Media Elements (TV Screens / Gantries)
- Marshal Stands
- Pit Stands
- Pit Box Props
- Bridges that the track goes over, rather than under.
- Crowd Fences which are beyond initial fence
Maximum (8)
- All remaining objects usually meaning:
- Far Buildings and Props (Tents, Camping props, vehicles etc)
- Far Details (Barriers etc)
- Far trees visible ahead of tree walls
- LOD Objects