Car Lights
This page covers how to configure lights on cars including how to use the built in editor.
Setup
Car lights are set in the GEN file for the car.
Beneath are some examples of the physical lights. It's important to keep the number of physical lights to a minimum for performance, and additionally only a limited number of lights are rendered at a time.
The values shown are recommended at present for GTE cars (obviously some things like position will need customising for each car).
  Light=HeadlightL
  {
    Type=Spot Pos=( 0.678, 0.535,-1.958) Dir=(-0.05,-0.15,-0.99) Range=(0.0, 400.0) Active=False Attenuate=(0.25, 0.25, 0.0005) Hotspots=(1.0, 150) Falloff=(25) Intensity=(12) Color=(255, 247, 238)
  }
  Light=HeadlightR
  {
    Type=Spot Pos=(-0.678, 0.535,-1.958) Dir=(0.05,-0.15,-0.99) Range=(0.0, 400.0) Active=False Attenuate=(0.25, 0.25, 0.0005) Hotspots=(1.0, 150) Falloff=(25) Intensity=(12) Color=(255, 247, 238)
  }
  Light=TailLight
  {
    Type=Spot Pos=(0.0, 0.7, 2.4) Dir=(0.0,-0.2, 0.85) Range=(0.0, 4.5) Active=False Attenuate=(0.55, 0.06, 0.048) Hotspots=(115, 165) Falloff=(0.75) Intensity=(1.0) Color=(255, 5, 5)
  }
Glow meshes can additionally be configured as shown below. These meshes are responsible for the glare on the actual headlights.
  Instance=HLIGHTDS
  {
    Moveable=True
    MeshFile=HLGLO_DS_991rsr.gmt CollTarget=False HATTarget=False LODIn=(0) LODOut=(350) Reflect=True
  }

  Instance=HLIGHTPS
  {
    Moveable=True
    MeshFile=HLGLO_PS_991rsr.gmt CollTarget=False HATTarget=False LODIn=(0) LODOut=(350) Reflect=True
  }

  Instance=BLIGHTPS
  {
    Moveable=True
    MeshFile=BLGLO_PS_991rsr.gmt CollTarget=False HATTarget=False LODIn=(0) LODOut=(250) Reflect=True
  }

  Instance=BLIGHTDS
  {
    Moveable=True
    MeshFile=BLGLO_DS_991rsr.gmt CollTarget=False HATTarget=False LODIn=(0) LODOut=(250) Reflect=True
  }
Light Configuration
Let's take a look at each of the values that makes up the lights.
Light Name
The name of the light signifies it's purpose. There are various options here, but typically only HeadlightL, HeadlightR and TailLight are used.
- Headlight / HeadlightL / HeadlightR
- Taillight / TaillightL / TaillightR - If only one of brake or tail light is specified, then it is copied to the other too.
- Brakelight / BrakelightL / BrakelightR
The following lights are not currently implemented due to previously mentioned performance limitations with the number of physical lights, they can only be specified by glow meshes:
- Rain Light
- Reverse Light
- Warning Light
Type
This is a generic type setting for lights. Car lights should be configured as Spot.
Position (Pos)
This is relative to the vehicle. X is left to right. Y is up / down, and Z is how far to the front or back of the car.
Direction (Dir)
This is a direction vector for the light along the same axis as the position. It is important to ensure that the these point down on the Y axis around -0.15 typically.
Range
This is near and far range of the headlight. Typically we can not simulate accurately super far headlights of modern cars due to the limit on headlights the game has. It is recommended to set around a maximum of 400-500m for LM classes. For other cars this is likely to be less. Note this value can often be over-ridden by the strength of attenuate settings.
Attenuate
This setting is very important for producing natural and linear headlights. Realistically, car headlights should have quite a high attenuation on the Y axis, slightly less on the X and very low on the Z. This will mean they show very far into the distance, but do not light things up high in the sky or super far to the side.
- Typically we have to set the X value stronger though due to headlights not casting shadows on barriers, which would result in excessive lighting up of areas outside the barriers.
- The Z value (and others), will effectively over-ride the range value. You may need to adjust these to get your range working correctly.
Attenuation settings apply on top of hotspots, fall off and intensity.
Hotspots
The two hot spots configure the coverage of the light. The values are in degrees, the first is the centre hot spot and specifies the area that the light has full coverage. The second is the outer area and specifies where the light fades out. Typically, the first value should be small, and the second quite high. (1, 150).
Fall Off
Fall off controls the power at which the light fades out from the inner hot spot to the outer hotspot.
Intensity
This is the strength of the light. Headlights can have something in the range of 12-15. Where as rear lights would only have around 1.
Glow Configuration
Glow meshes are used to give the illusion of light from a surface. They should use the High Lum Sun shader and only cover the area of the bulb.
The following instances are allowed for lights.
- HLIGHTDS \ HLGLO_DS (Driver / Left Side)
- HLIGHTPS \ HLGLO_PS (Passenger / Right Side)
- BLIGHTDS \ BLGLO_DS
- BLIGHTPS \ BLGLO_PS
- RAINLIGHT
- REVERSELIGHT
- WARNINGLIGHT
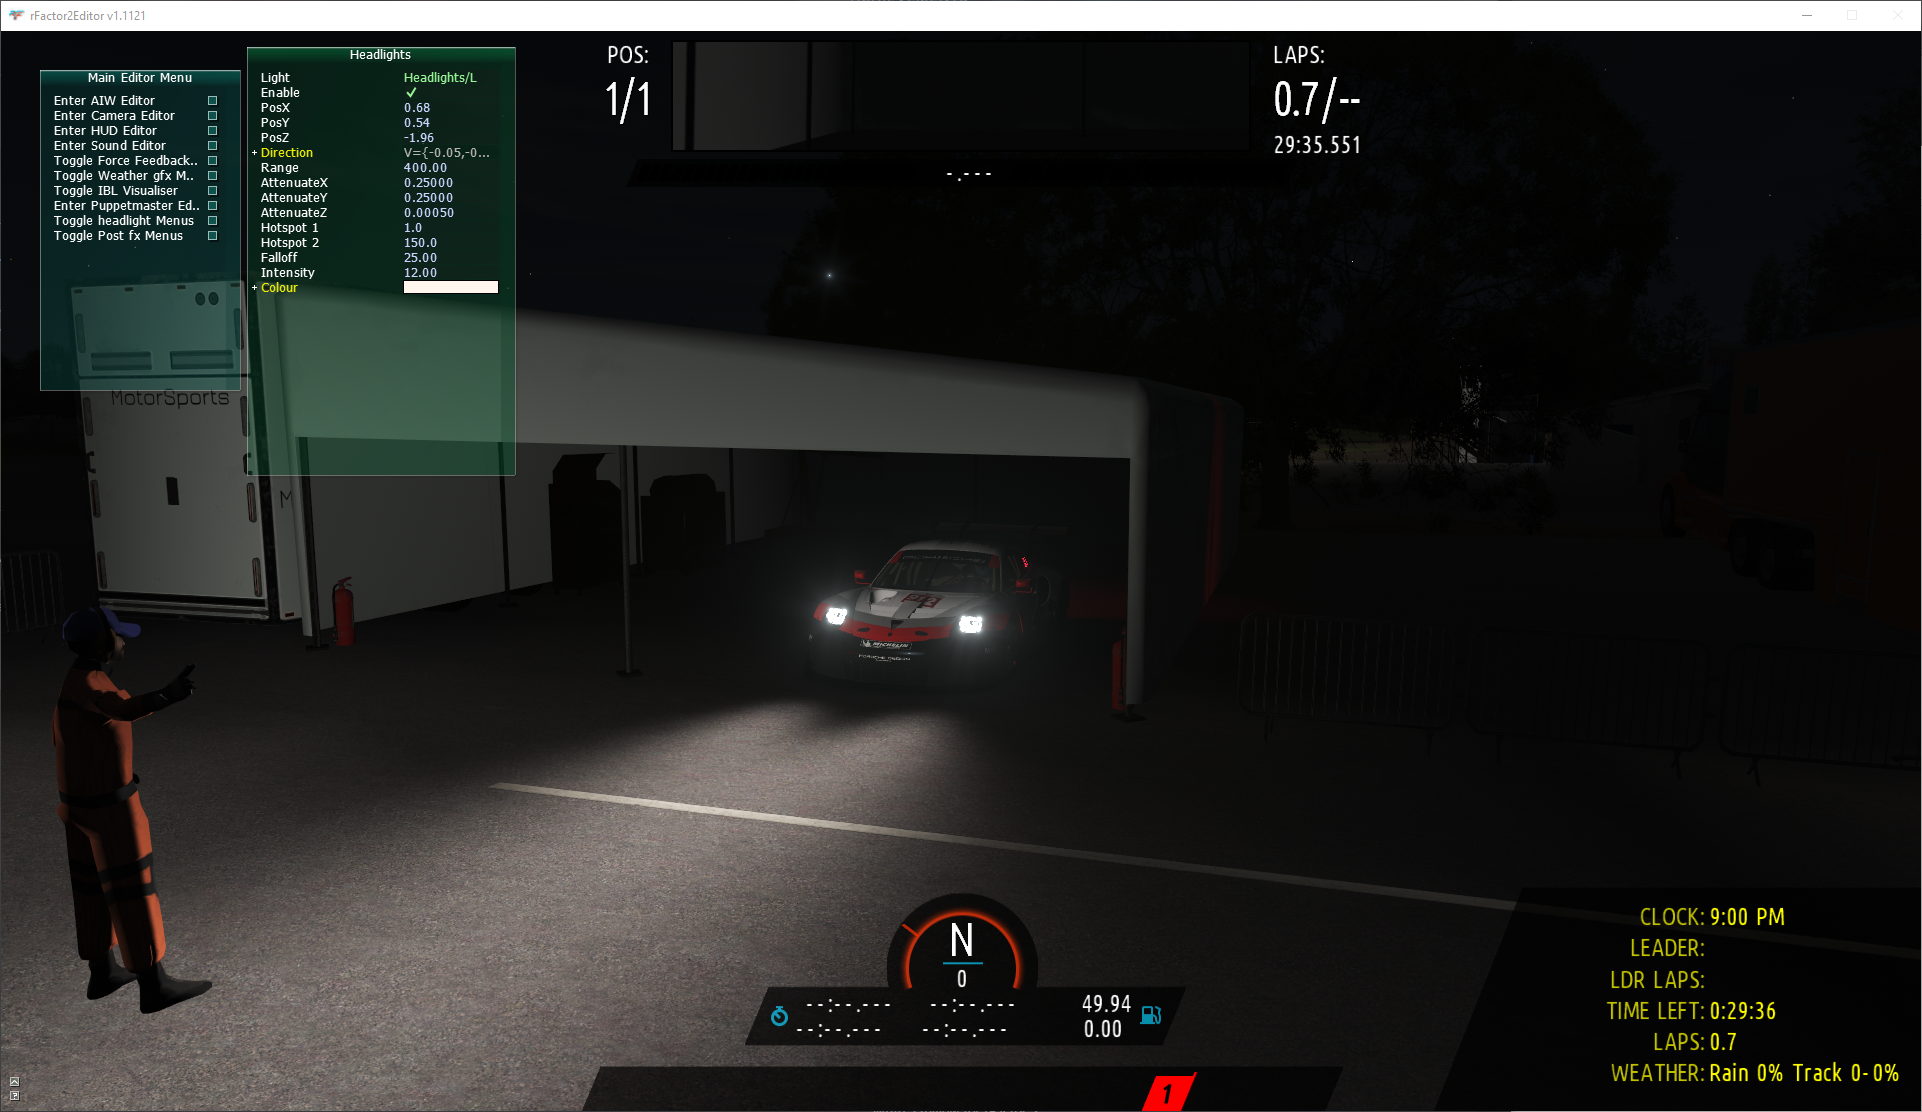
Headlight Editor
Developer Mode has a built in Car Headlight editor. This allows you to modify existing properties for lights configured on the car.
Some notes about using the editor and setting up lights:
- It only edits the lights for the currently selected light.
- The settings do not save back to the GEN file, but will persist for the duration of your session.
- You must edit the Left and Right lights separately.
- Any lights not setup in the GEN file will appear with 0 values.
- It is recommended to configure a single car, before then testing it in a large pack. At it's important to consider how the lights look with multiple cars in the same area as well as alone.