Overview
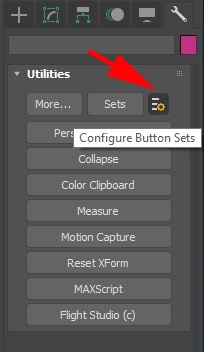
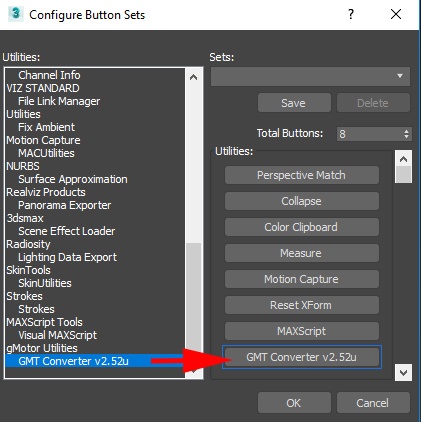
After installing the plugin components as described in the Installation section, open the Max Utility tab (hammer icon), and select the icon shown circled in red in the Max Utility Panel. This will launch the Configure Button Sets dialog. From here, set the number of buttons for the Utility panel, and drag the GMT Converter utility onto an empty button, as shown in the figure. Once completed, your Utility panel should be similar to the one shown in the Max Utility Panel with GMT Converter figure.


The GMT Converter consists of five components:
- The Main Control panel, which allows for global export settings and operations;
- The GMT Output panel, which controls export-specific options;
- The Instance panel, which allows for per-object attributes settings;
- The Scene panel, which is used to create scene (.SCN) files;
- The Animation panel, which is used to export animations.
- The Reflection Mapper panel which is used to setup probes and the objects and export their SCN configuration.
The rollup panels can be rearranged in any order you wish by dragging and dropping to their new location. All Instance panel data settings are saved in the Max file as app data, so once the file is saved, it will require the converter.dlu file to reload. Other configuration-specific settings are saved in the editable file gMotorPlg20.ini, located in the Max PlugCfg directory.
Main Control

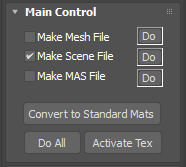
This is the GMT Converter Main rollup has the following options:
- Make Mesh File – selecting this option will cause all selected meshes to be exported as GMT file(s) (according to the GMT Output settings) when either the associated Do button, or the Do All button, is pressed.
- Make Scene File – selecting this option will cause a scene file to be created (according to the Scene Panel settings) when either the associated Do button, or the Do All button, is pressed.
- Make MAS File – selecting this option will cause a MAS file to be created (according to the MAS Panel settings) when either the associated Do button, or the Do All button, is pressed.
- Do Buttons – these buttons are shortcuts to the associated action – they allow you to create mesh, scene, or MAS files without having to go to the associated panel.
- Convert to Standard Mats - this button will convert gMotorMaterials to Standard materials. This can be used if we need to export the scene to a different environment.
- Do All – pressing this button will execute all operations (mesh, scene, or MAS) which are currently selected.
- Activate Tex – pressing this button will refresh texture map rendering in the main viewports if it becomes corrupted.
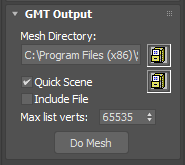
GMT Output


- Mesh Directory – all exported GMT files are output to this directory. Use the Browse button to launch a Folder browse dialog.
- Quick Scene – selecting this option will create a scene file with most setting defaulted to something reasonable, including search paths for meshes and maps. This can be used to quickly export SCN snippets to copy into a master file, be sure to change the Scene File Output setting to Selected in that case. Use the Browse button to launch a File Create/Select dialog.
- Include File – generate the GMT as a C/C++ include file. Not available.
- Max List Verts – maximum number of vertices allowed in a single list. If the number of vertices exceeds this amount, additional lists will be created. This should be set to 65535.
- Do Mesh – convert all selected objects into GMT files.
The GMT Progress panel will appear during mesh conversion, providing stats about each mesh with details of the output geometry, and the option to cancel the conversion at any time.
Instance


The instance data is automatically filled when selecting one or more objects in any Max window.


