If you want to share custom liveries/teams for an online event, for example for an important league race, there are two ways to do this:
- Enable skin transfer on the dedicated server: this means all clients that have selected a custom livery will, after connecting to the server, automatically transfer that livery to the server where it will be redistributed to all other users joining that same server. That is not the topic of this guide.
- Create a new component that you distribute to your everybody involved beforehand. The easiest way to do this is via a workshop item that people can subscribe to. An alternative is to make it available for download from the dedicated server. You can even distribute and install it manually.
Background
Before getting started: What is a a component (or rfcmp)? Simply put, an 'rfcmp' is what we call a component or 'package' file, it contains the content you wish to install. This can be a track, a car, or even a custom showroom, and in the context of this guide a collection of custom cars with custom liveries. For our purposes here, we don't need to get into the details of what a component is, all that's needed is a basic set of steps to create one, and then how to install and distribute it after.
The advantages of using this method:
- Drivers don't have to show up early to an event just to make sure their skins get uploaded and distributed on the live server. Instead they can make sure they have downloaded and installed the content ahead of time.
- More control: admins can check all liveries and related files are working and make sure no mistakes were made by each driver when they set up their custom team, and no liveries are used that would violate the guidelines for that competition.
- Less load on the server, no skins are transferred by the server itself, and therefore it requires no extra bandwidth. All clients have the full content before joining the event.
This method does require a little extra work, but once you get the hang of it should be relatively easy to keep doing.
Table of Contents
Part 1: Setting up the VEH files
When creating an update of a base component, what we're effectively doing is starting with just the physics, audio and graphics data for that vehicle and defining the actual cars (VEH files) ourselves, replacing the ones that were in the original update that came with that car. So we need to setup a collection of new VEH files and attach our liveries to those. A VEH file contains all of the details for any specific car. That includes what physics, upgrades and sound the vehicle has (things we typically do not want to mess with) but also information like:
- Car number
- Team name
- Driver name
Step 1: Creating a new, empty folder.
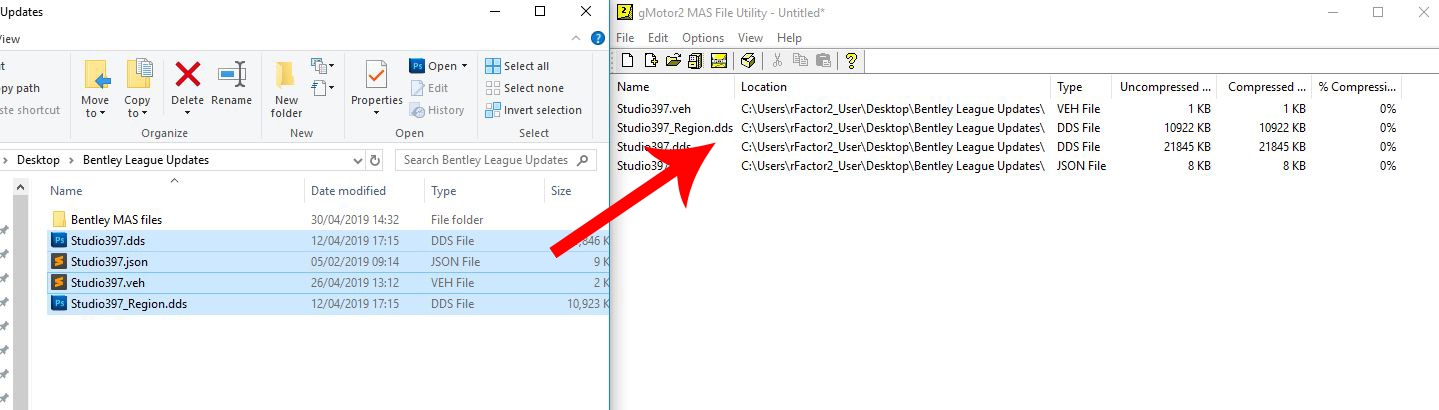
Make a folder (on your desktop) with the name of the car you want to create an update for. The name is not really relevant other than for yourself. So for example, choose something like 'Bentley League Updates'.
Step 2: Collect all your livery files into that folder.
Collect all of your custom livery files inside 'Bentley League Updates' folder. If you don't know how to create a custom livery see How to paint a car with the new material system:
<team-name>.json
<team-name>_region.dds
<team-name>.dds
<team-name>WINDOWIN.dds
For this guide let's assume your car is called 'Studio397':
Studio397.json
Studio397_region.dds
Studio397.dds
Studio397WINDOWIN.dds
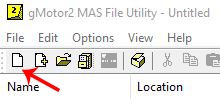
Step 3: Open MAS2.exe
This is a tool we ship with rFactor 2, so go to the location where you have that installed and double click it to launch. You can find it in the Support\Tools folder.
Step 4: Extract files from the existing upgrade MAS.
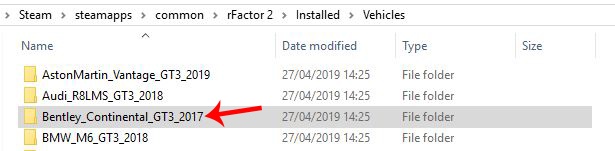
Next we're going to grab a bunch of files from the original upgrade that we will use as a template for our new vehicles. For that you navigate to the installed car in your rFactor 2 installation, so in our example case that would be Installed\Vehicles\Bentley_Continental_GT3_2017 where we will be looking for a file called 'car-upgrade.mas':
- Navigate to Installed\Vehicles\Bentley_Continental_GT3_2017:
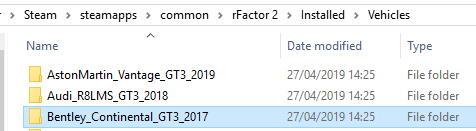
- Locate the correct subfolder for the original upgrade (the highest version of the two you will see, the other being the base) where you will find this mas file.


- Select and highlight one of the VEH files and right click:
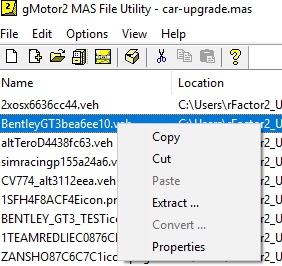
- Select 'extract' and save to 'Bentley League Updates' folder.
Step 5: Edit the extracted files, creating a template for your new ones.
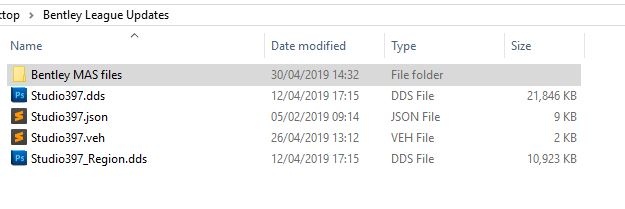
Rename the VEH <team-name>.veh. Using our example this would be Studio397.veh, so now we have these files:
Studio397.veh
Studio397_region.dds
Studio397.json
Studio397.dds
Studio397WINDOWIN.dds
Step 6: Configuring the livery and other information about your vehicles.
Open <team-name>.veh (Studio397.veh) in a text editor and change the following lines in the text:
DefaultLivery="<team-name>.dds"
MaterialOverride="BentleyGT3_BaseMat.json"
Example:
DefaultLivery="Studio397.dds"
MaterialOverride="BentleyGT3_BaseMat.json"
- Next edit the car details for your car:
Number=<my car number>
Team="<my team name>"
PitGroup="Group1"
Driver="<unique driver name>"
Description="Bentley Continental GT3 #<my car number>"
Engine="Bentley 4L V8"
Manufacturer="Bentley"
Classes="GT3, GT3_Bentley_Continental"
FullTeamName="Bentley"
TeamHeadquarters=""
Category="Bentley, Bentley Continental GT3"
Example:
Number=397
Team="Studio 397"
PitGroup="Group1"
Driver="Jefferson Bartholomew"
Description="Bentley Continental GT3 #397"
Engine="Bentley 4L V8"
Manufacturer="Bentley"
Classes="GT3, GT3_Bentley_Continental"
FullTeamName="Bentley"
TeamHeadquarters=""
Category="My League, Bentley, Bentley Continental GT3"
Save and exit.
Step 7: Repeat for each car!
Repeat the above for all custom teams and make sure each team has it's own uniquely named VEH file.
Part 2: Packing the MAS file
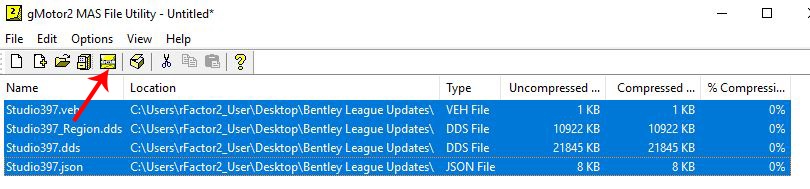
Step 1: Populating the new MAS file.
- Create a new folder inside 'Bentley League Updates' named "Bentley MAS files"
- Open MAS2.exe again
- Navigate to the folder 'Bentley League Updates'
- Select all the contents of 'Bentley League Updates'
- Drag the files into the main window of the MAS tool
- NEW! IMPORTANT You now must include the upgrade.ini in your update rfcmp in this case for the Bentley: B_Cont-GT3_Upgrades.ini. This file must be packed in the .mas file along side your other files or the cars will fail to load.
- The upgrade.ini for each car can be found in car-upgrades.mas.
Step 2: Creating the new MAS file.
- Select all contents in the MAS tool window and click on the 'create mas' icon in the top bar
- Save the MAS as Bentley_Myleague.mas in 'Bentley MAS files'

Part 3: Packing the 'update rfcmp'
Step 1: Create a new update component.
- Click on the filing cabinet icon and check where the working directory is set to. This will be where the rfcmp file will save to at the end of this guide.
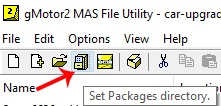
- The default location will always be \Steam\steamapps\common\rFactor 2\Packages
Step 2:
- Note which EVEN numbered version of the Bentley you have installed (in this example v2.46)
- Inside the folder 'Bentley League Updates' right click and select NEW -> Text Document
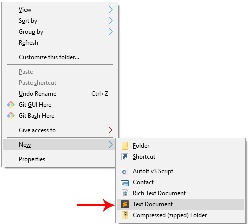
- Rename the file Bentley_Myleague_v2.46MLA.rfcmp - (MLA is 'My League Abbreviation')

Step 3:
- Open MAS again (if it's not already open)
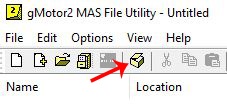
- If MAS is still open click on the white page above to clear the window
- Click on the box icon at the top 'Create the package file'
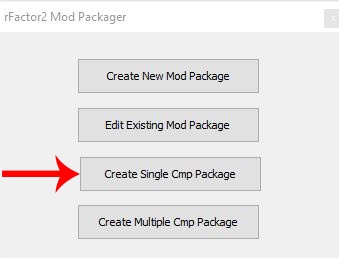
- In the dialog click on 'Create Single rfcmp package' button.
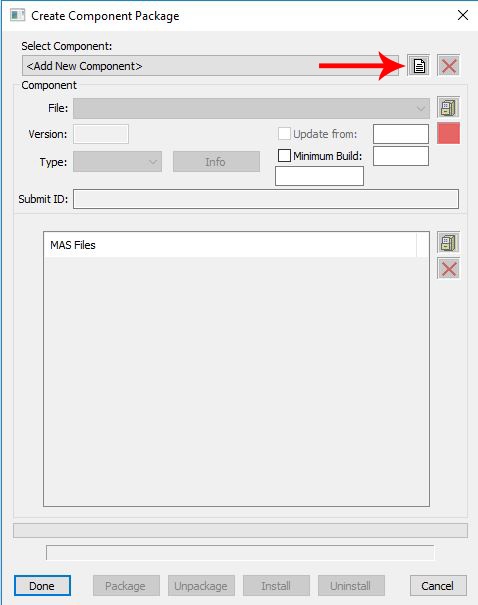
Step 4: Select Component
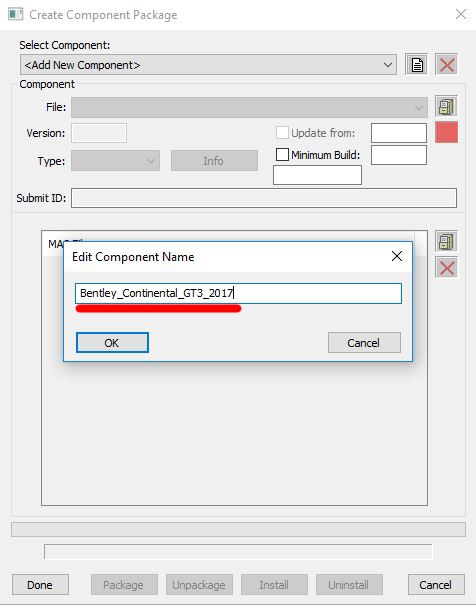
- In the first pop up window start with the top Selection 'Add New Component' by clicking on the paper icon
This next step is very important! - Navigate to \Steam\steamapps\common\rFactor 2\Installed\Vehicles
- Find the folder for the car you want to update
- In this case Bentley_Continental_GT3_2017
- Select and copy the folder name
- Paste 'Bentley_Continental_GT3_2017' into 'Edit New Component Name' and click save
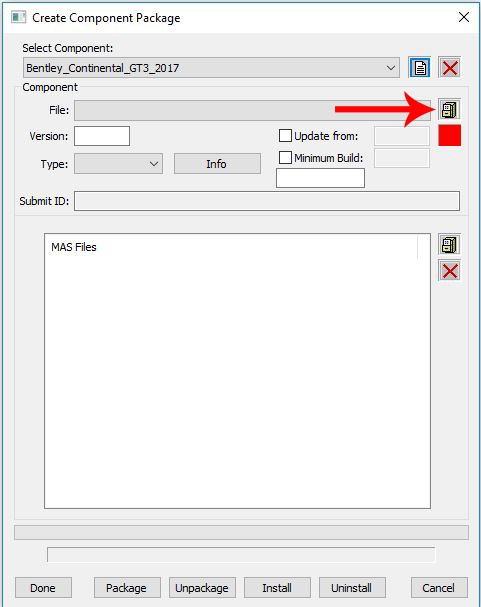
Step 5: Component
- Next to the File drop down click on the file cabinet icon
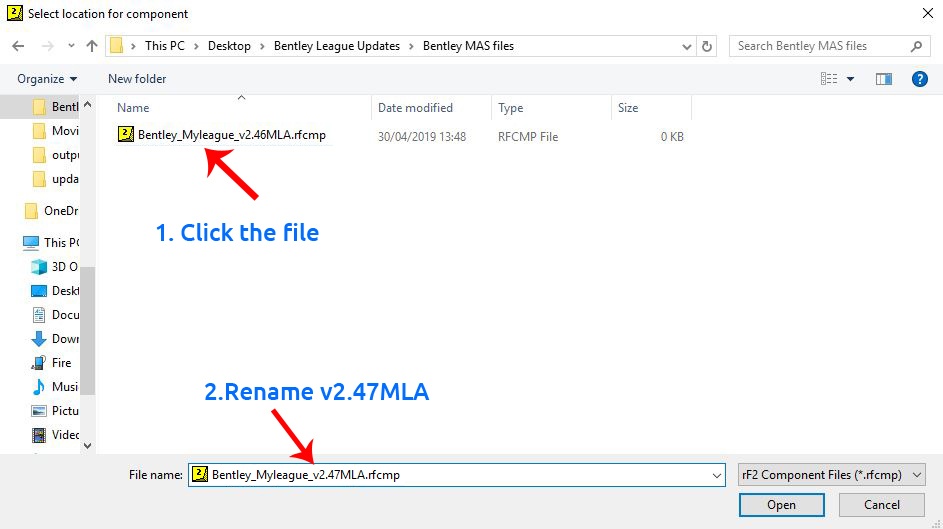
- In the browse pop up navigate to "....Bentley League Updates\Bentley MAS files"
- Click on the file Bentley_Myleague_v2.46MLA.rfcmp and rename Bentley_Myleague_v2.47MLA.rfcmp and click OPEN
- 1. In the left field 'Version' put in v2.47MLA
2. Check the box 'Update From'
3. In the right text field "Update from:" enter v2.46 (notice this is the base even numbered version)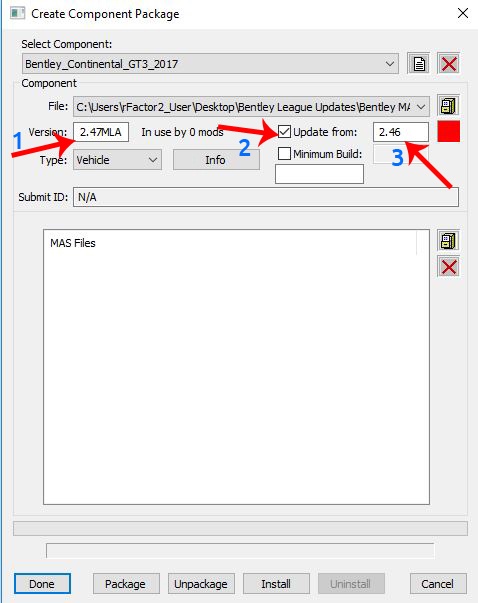
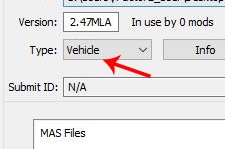
- In the 'type' dropdown select Vehicle
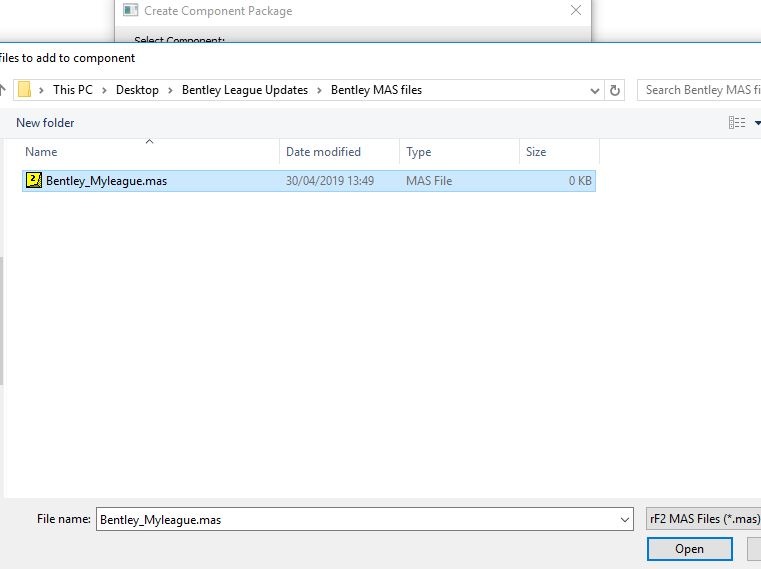
- In the bottom window click on the box icon
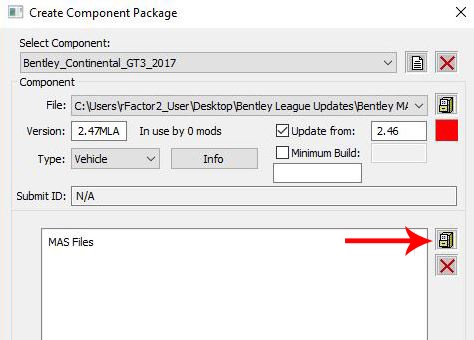
- In the browse pop up navigate to "....Bentley League Updates\Bentley MAS files" and select Bentley_Myleague.mas
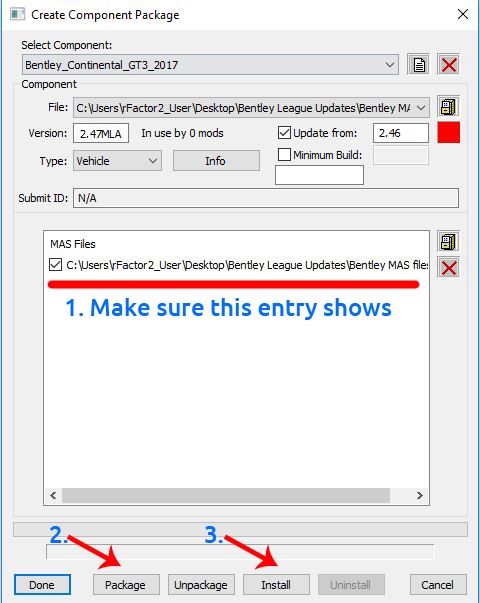
- 1. Make sure your mas file shows in the window
- 2. Last step click the Package button at the bottom and then Install
- 3. Note you do not have to click 'Install', but we highly recommend you install the rfcmp to check it works in Single player before distributing to your league.
- The rfcmp file Bentley_Myleague_v2.47MLA.rfcmp will be saved into \Steam\steamapps\common\rFactor 2\Packages
And that is it!