If you want to share custom skins liveries and team for an online event, for example for an important league race, there are a couple of ways to do this:.
- Use skin transfer: this means all clients will have to connect at some point to transfer their skin livery to all users via the dedicated server itself (see Sharing with Skin Transfer for further info)
- Create an 'update rfcmp' that you distribute to your league -before hand, and that beforehand. This either gets manually installed or can be distributed via a workshop item.
In this guide we will be focusing on method 2: Creating an 'update rfcmp'.
Before getting started: what What is an rfcmp?
- Simple put, an 'rfcmp' is what we call a 'package' file it contains the content you wish to install. This can be a track, a car, or even a custom HUD or UI, and in the context of this guide a livery pack.
For our purposes here, however, we don't need to get too into the details of what an rfcmp is, all you need to keep in mind is how to create it and then how to install and distribute it after.
The advantages of creating an 'update rfcmp' are:
- Clients don't have to show up early to an event just to make sure their skin gets transferred to all other clients
- More control: the admin can check all skins and make sure no mistakes were made by the client in setting up their custom team
- Less load on the server, no skins are transferred by the server itself and therefore it requires no extra bandwidth
...
Part 1: Setting up the VEH files
The VEH file contains all of the details for any specific team.
Each custom team will have it's own veh file that contains
- Car number
- Team name
- Driver name
Step 1:
- Make a folder (on your desktop) with the name of the car you want to create an update for.
...
- Collect all of your custom skin livery files inside 'Bentley League Updates' folder (If you don't know how to create a custom livery see How to paint a car with the new material system)
<team-name>_region.JSON
<team-name>.dds
<team-name>WINDOWIN.dds
...
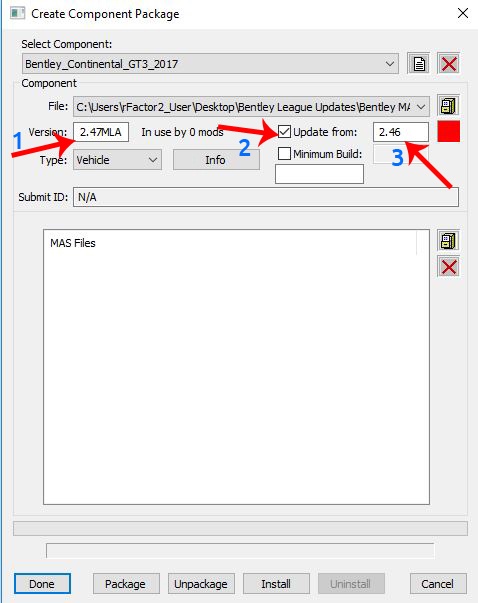
- Next to the File drop down click on the file cabinet icon
- In the browse pop up navigate to "....Bentley League Updates\Bentley MAS files"
- Click on the file Bentley_Myleague_v2.46MLA.rfcmp and rename Bentley_Myleague_v2.47MLA.rfcmp and click OPEN
- 1. In the left field 'Version' put in v2.47MLA
2. Check the box 'Update From'
3. In the right text field "Update from:" enter v2.46 (notice this is the base even numbered version) - In the 'type' dropdown select Vehicle
- In the bottom window click on the box icon
- In the browse pop up navigate to "....Bentley League Updates\Bentley MAS files" and select Bentley_Myleague.mas
- 1. Make sure your mas file shows in the window
- 2. Last step click the Package button at the bottom and then Install
- 3. Note you do not have to click 'Install', but we highly recommend you install the rfcmp to check it works in Single player before distributing to your league.
- The rfcmp will be created into \Steam\steamapps\common\rFactor 2\Packages (see Step 1)
And that is it!
