Rain Effects on RealRoad and RealKerb Shaders for Tracks
Table of Contents
Introduction
Goal of this guide is to help the artists in the process of implementing Rain Effects for Tracks, from the art creation to the shader settings.
Requirements
Software
- 3Ds Max 2012 with rFactor 2 latest Plugins and Shaders
- Photoshop CC 2018
- Latest nVidia DDS Plugins, 64bit
Hardware
- A Wacom Tablet and Pen
- A PC/MAC with at least 8GB of RAM
Assets
- Roads and Kerbs Puddle Maps needs to be mapped on UV 5
- UVW template of the UV5 @ 16K Resolution (16384*16384)
Final Puddle Map downsampled to 8K (or 4K for a very small track course)
A brief introduction to the rain effects
What is affecting the Road and Kerbs wet/dampness reflections?
- The Groove on the asphalt, more rubber it will display more slippery/shiny look. This information is based on the RaceGroove alpha channel and the amount of rubber we have when it starts raining. This is a blurred reflection.
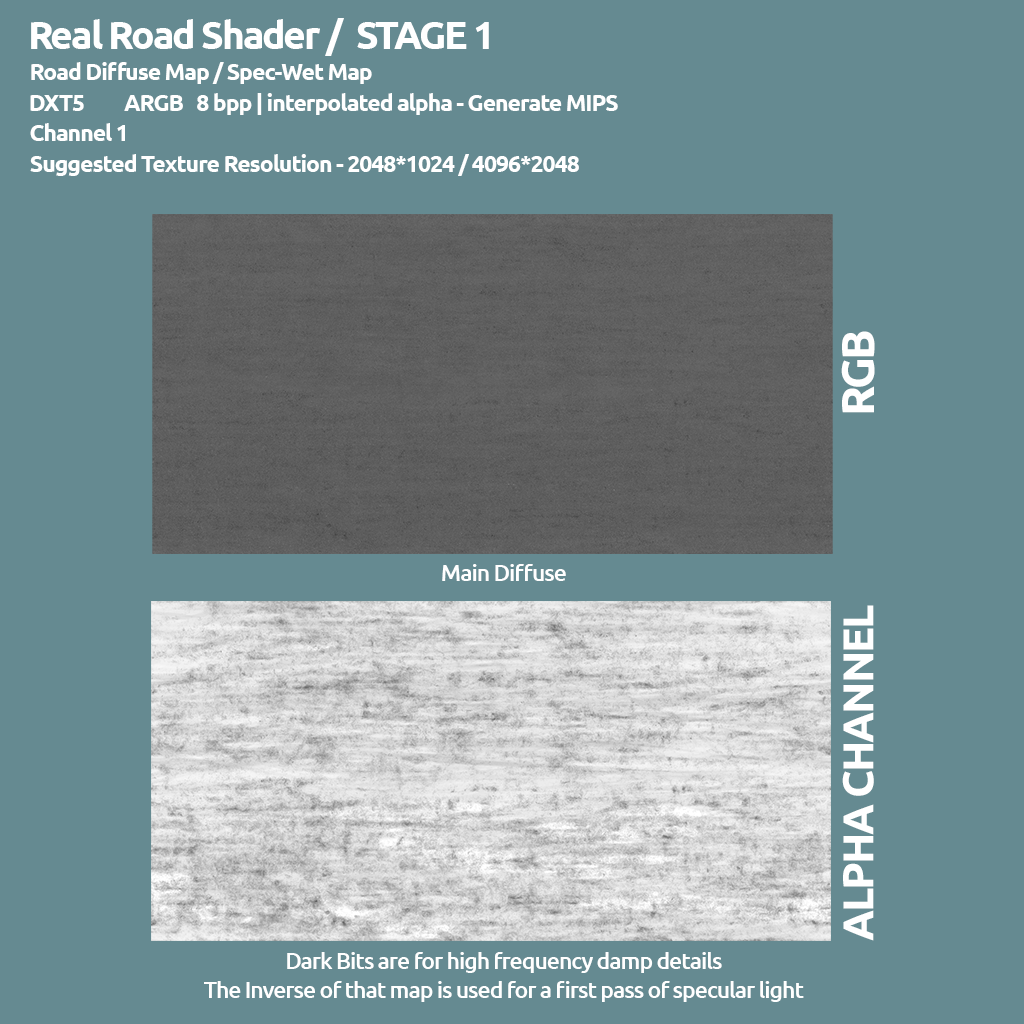
- The High Frequency dampness, like crackles and overall wet randomness on the tarmac. This information is based on the Road/Kerb diffuse map alpha channel. This is also a blurred reflection.
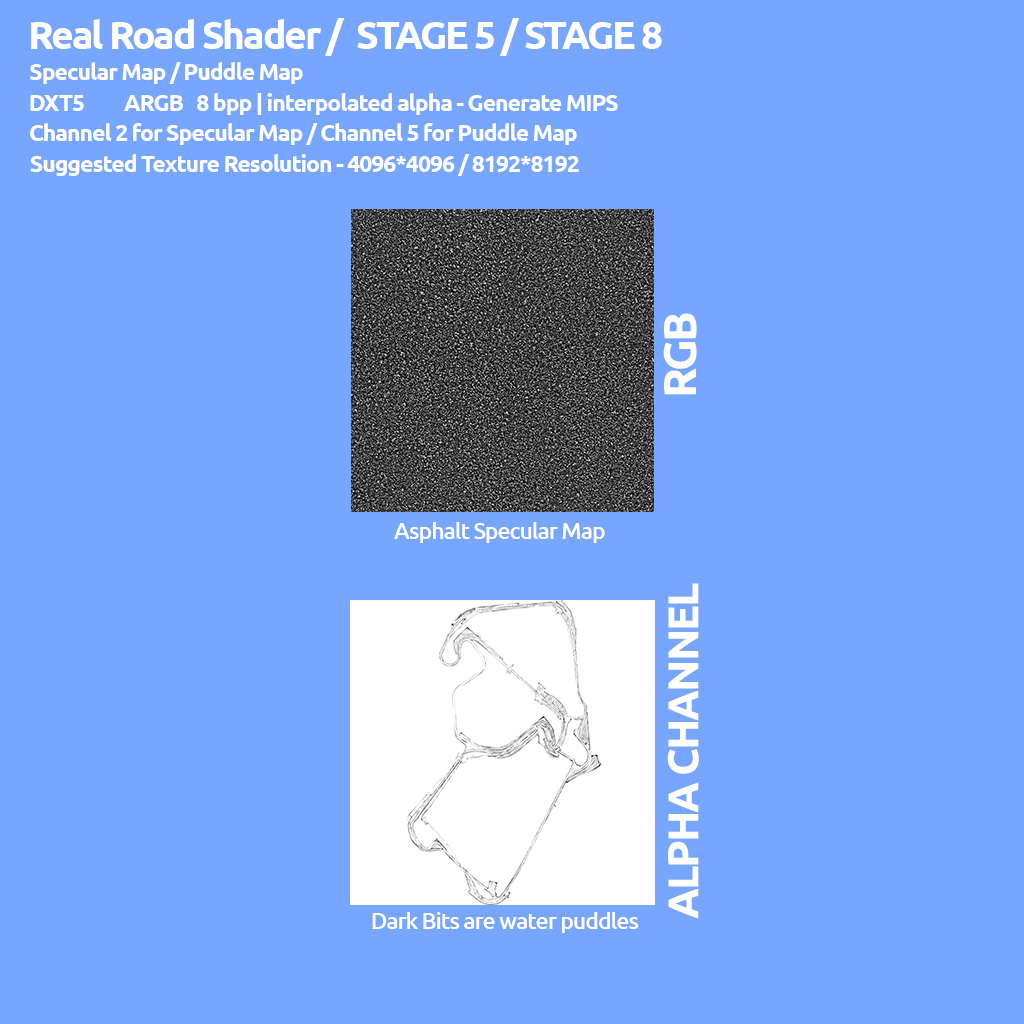
- The Puddles around the course, where we have standing water. This information is based on the Puddle Map, stored in the Specular map alpha channel. This is a mirror reflection, if the simulation is running ULTRA settings for that effect.
- The Rain Drops Ripple Waves forming on the puddles/standing water. This is totally automated by the code, and it's mapped on the UV channel of the detail maps.
How these effects are interacting with time and weather factors?
- An algorithm does take into account the rain severity and the sun occlusion, and that factor does translate into the dampness and puddles formation speed and depth.
- The puddles will be filled with water while raining, and they will dry out when it does stop raning. This is again happening dynamically, along the passing time.
- When the rain stops, driving along the course will generate a dry line, depending on how many cars are lapping in the course, this process may be more or less quick.
Step 1 - Setting Real Road and Real Kerb Shaders
1.1 - The Real Road Shader composition
| STAGE | Description | Channel |
|---|---|---|
| 1 | Road Diffuse Map (Spec/Wet Map in the Alpha channel) | 1 |
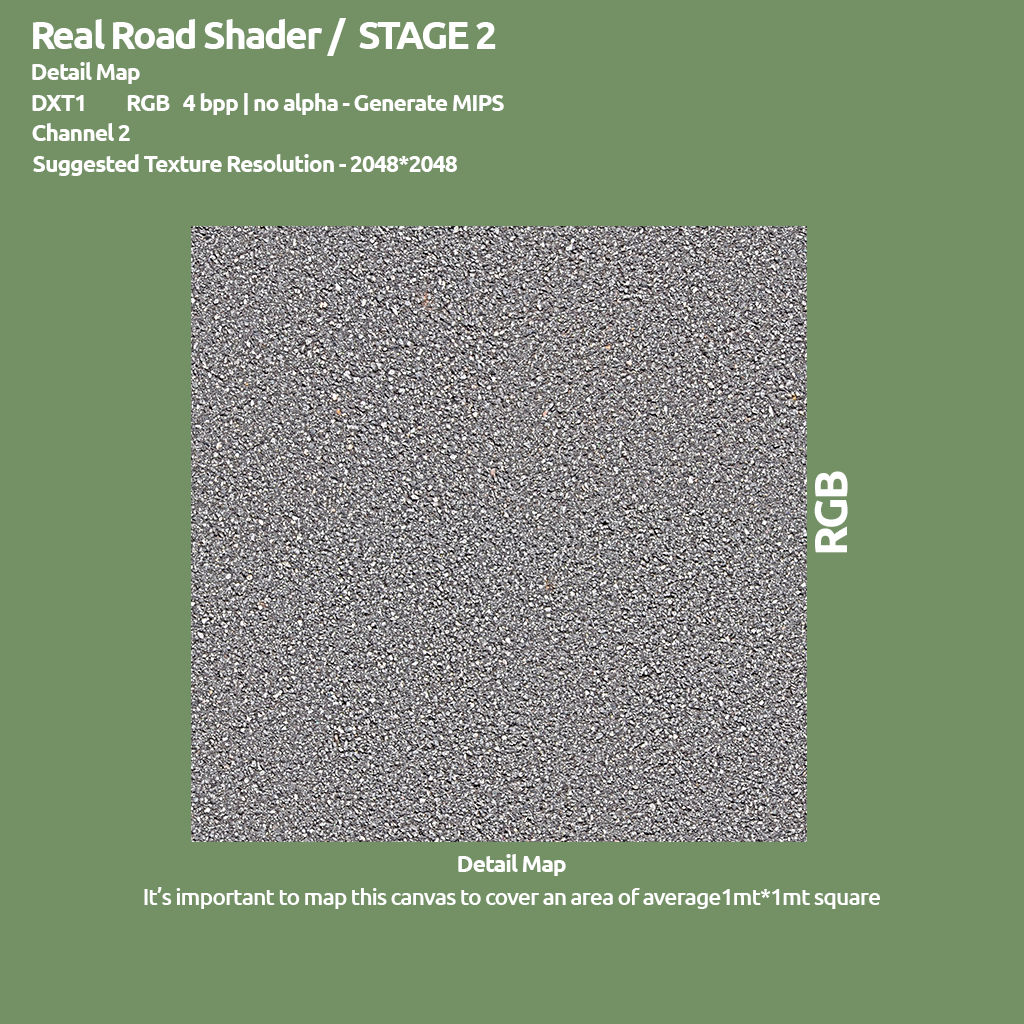
| 2 | Detail Map | 2 |
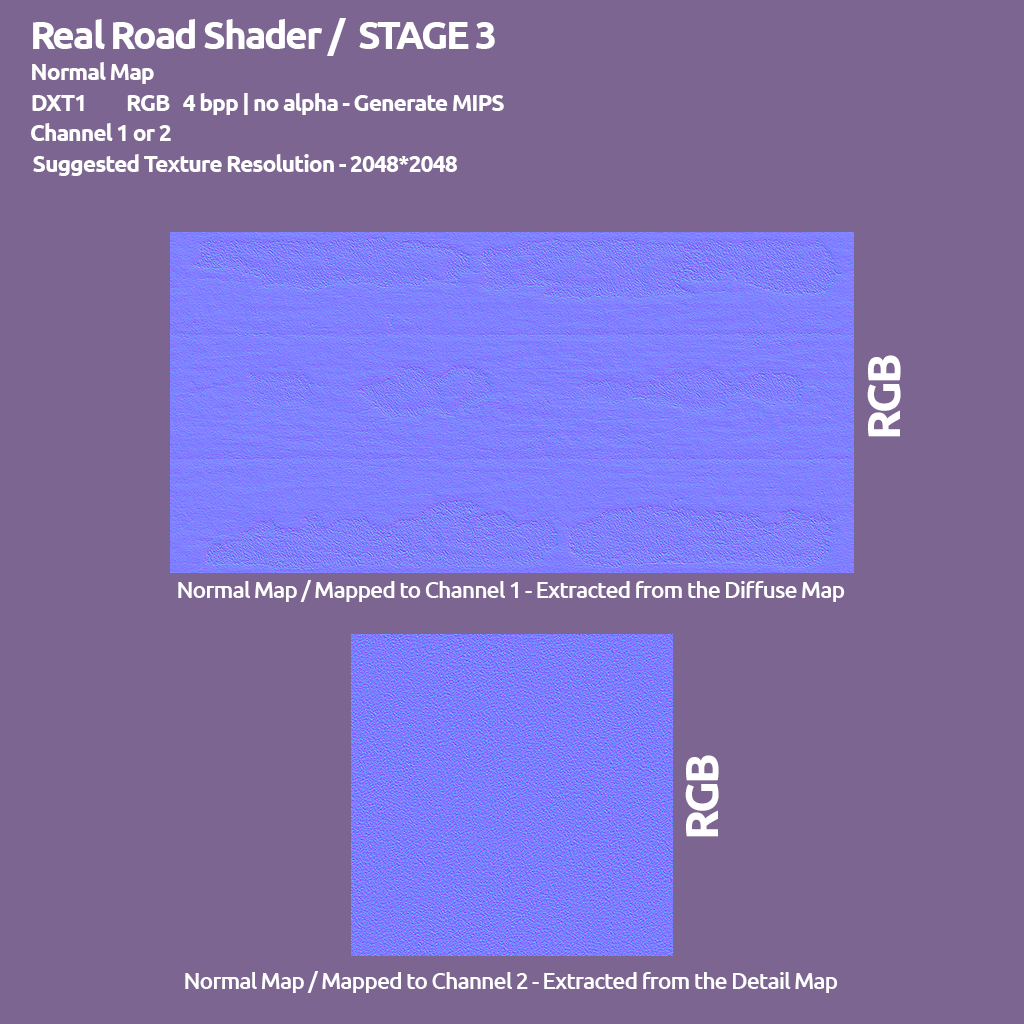
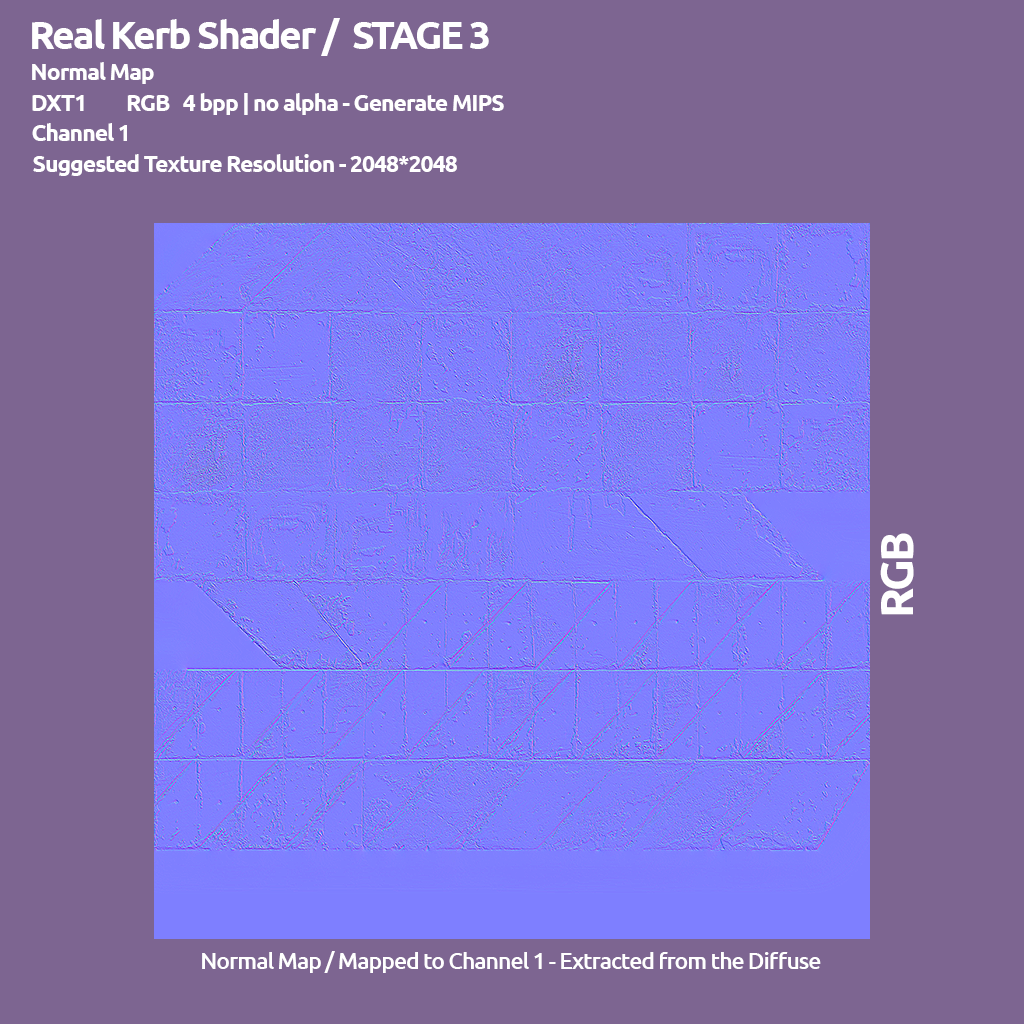
| 3 | Normal Map | 1 or 2 |
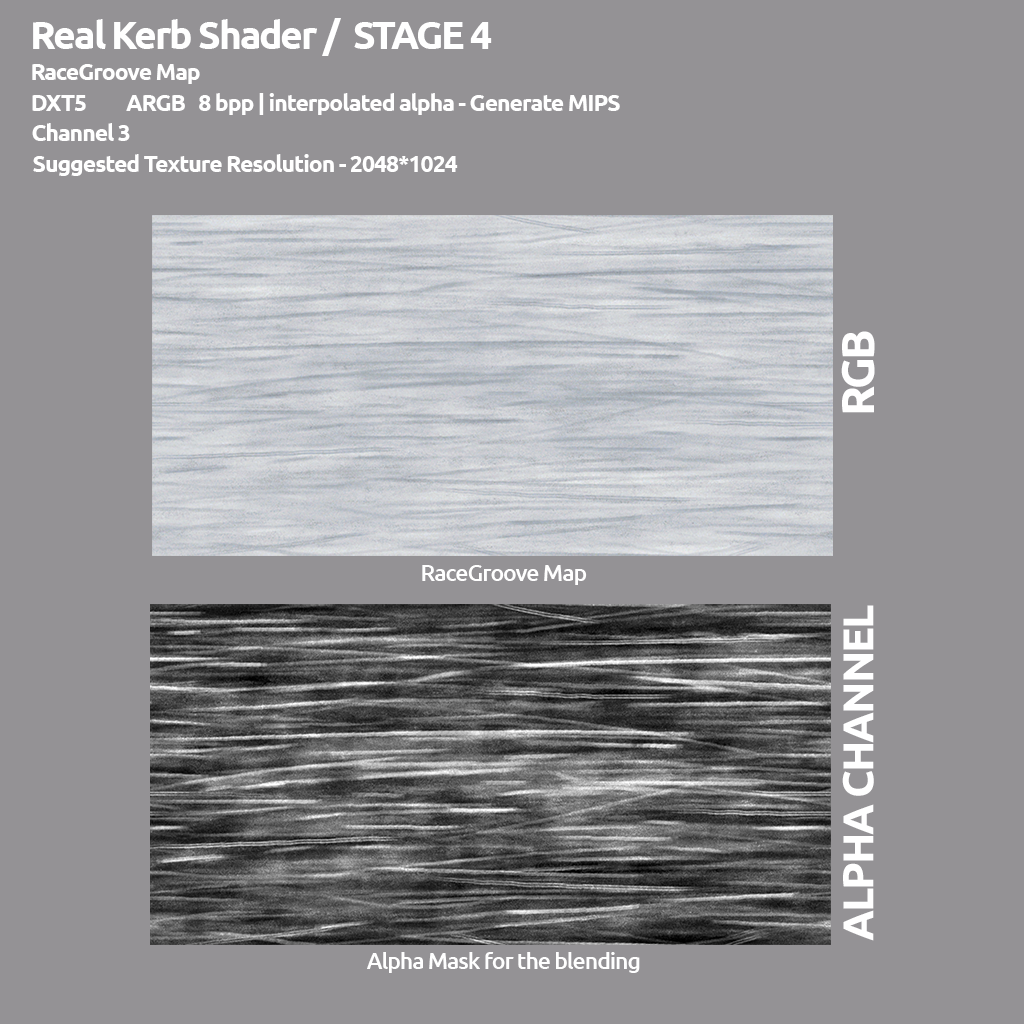
| 4 | RaceGroove Map | 3 |
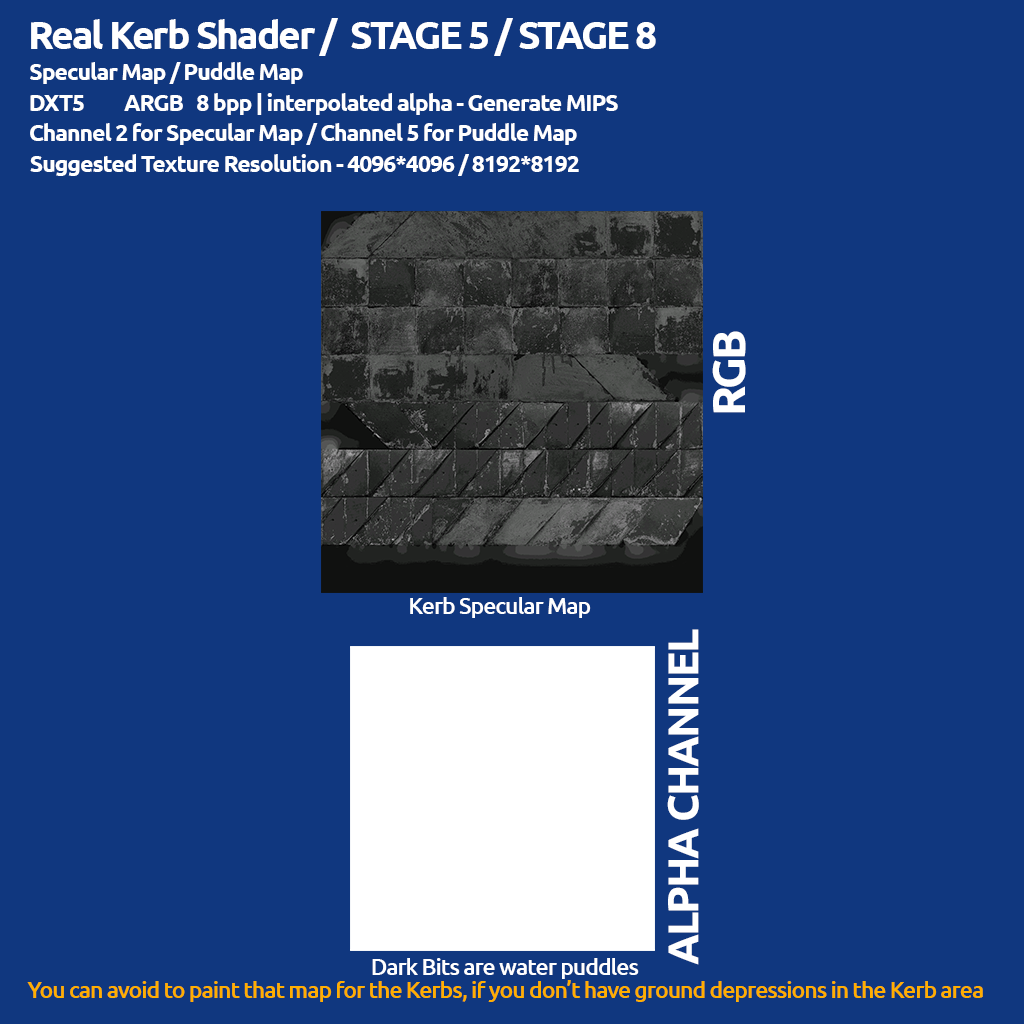
| 5 | Specular Map (Puddle Map in the Alpha Channel) | 2 |
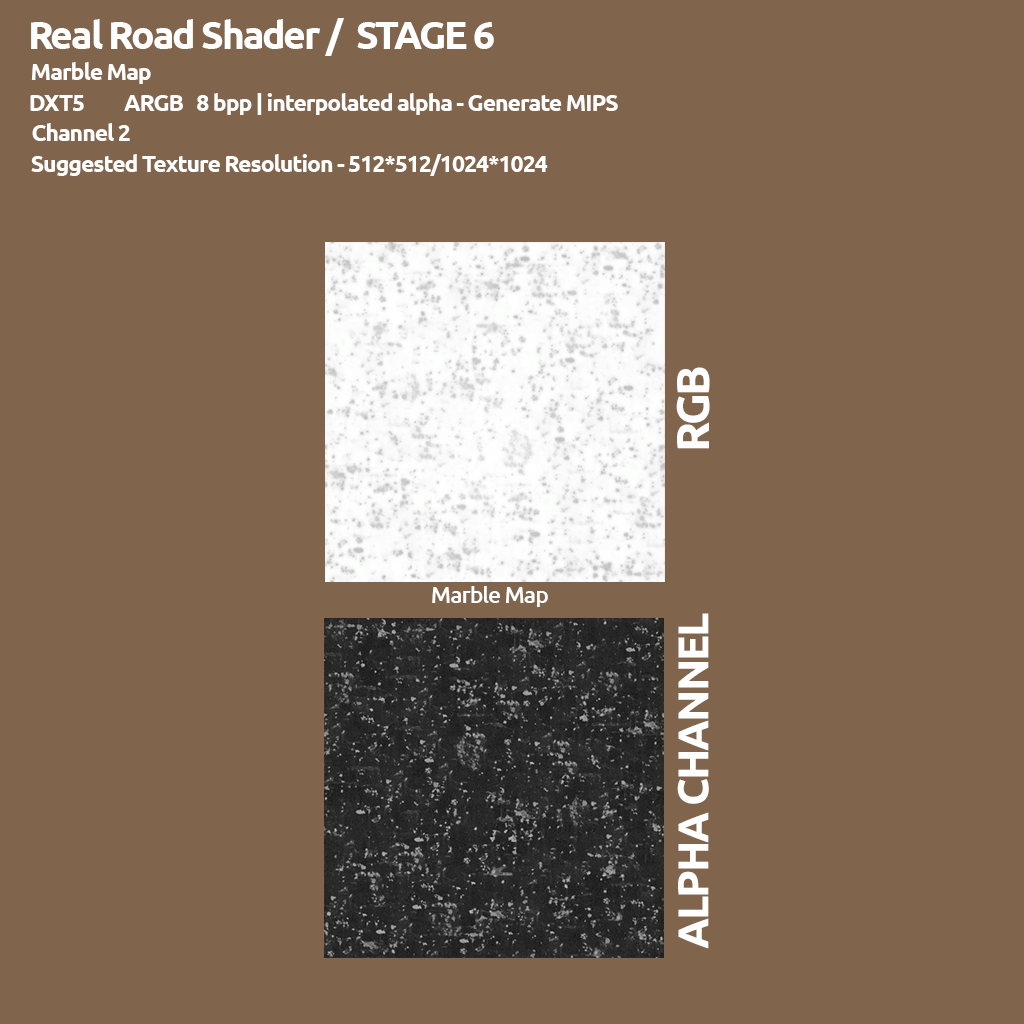
| 6 | Marble Map | 2 |
| 7 | Dummy Reflection (A dummy texture, which exist in the MAPs folder) | 3 |
| 8 | Rain Puddle Map (Specular Map with Puddle Map here) | 5 |

1.2- The Real Road Shader Settings
It's Important to respect these settings as much as possible, to achieve constancy between contents/art, and more important, to give the Shader and RainFX code the numbers that they are expecting, and produce the wanted output. Using different values/settings, might produce unexpected results and also introduce performance issues.
Main Real Road Material Settings
- Specular Color: Min 130.130.130, Max 200.200.200 (Do Not Exceed 200, as this is the Albedo floor)
- Specular Power: Min 5, Max 15
- Specular Fresnel Min: ~0.01
- Specular Fresnel Max: ~66.0
- Specular Fresnel EXP: 5.3 (Always stay in the 5.0/5.5 range)
- Reflection Mapper: REFLECTEDENV
Planar Reflection Stage Settings for Real Road (Stage 7)
- Live Mapper: Checked
- Fresnel Reflection Min: 0.1 (Do Not Use Different)
- Fresnel Reflection Max: 0.9 (Do Not Use Different)
- Fresnel Reflection EXP: 5.0 (Do Not Use Different)

1.5 - The Real Kerb Shader composition
| STAGE | Description | Channel |
|---|---|---|
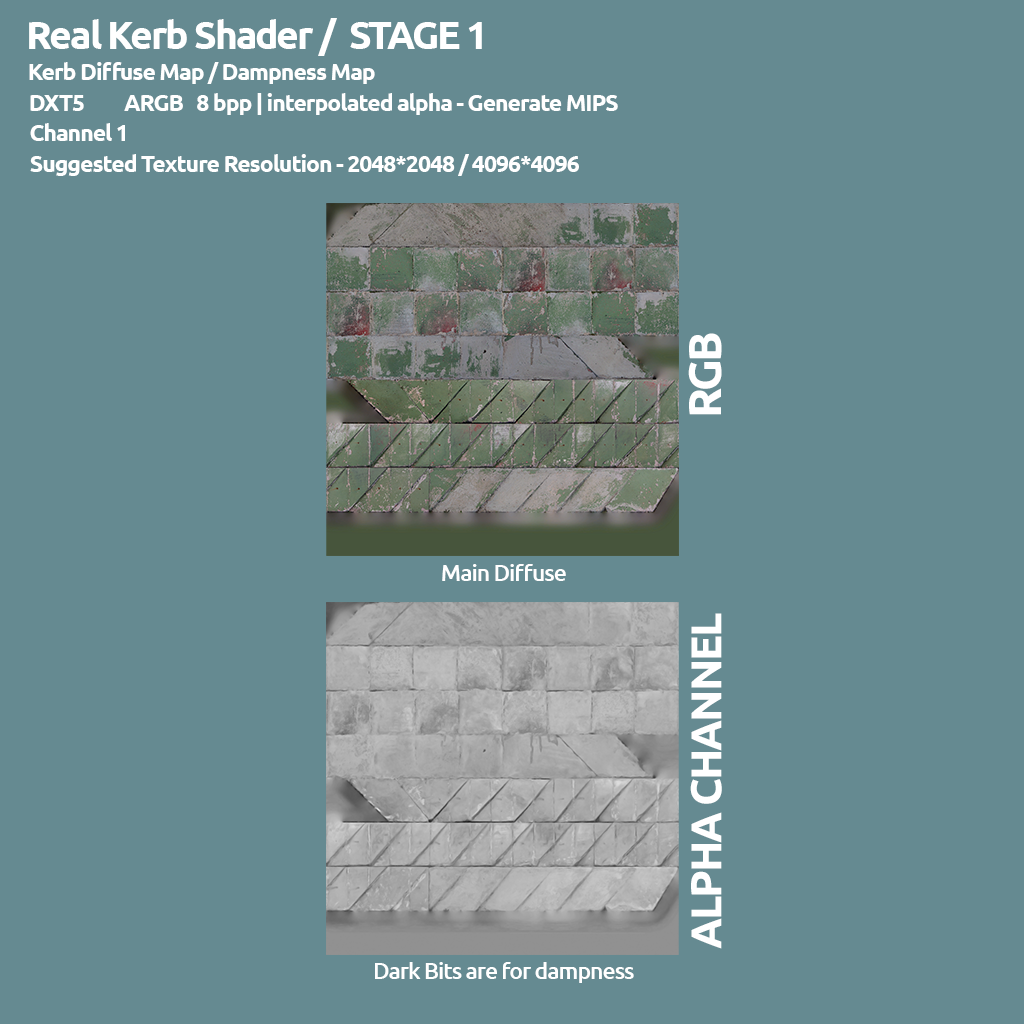
| 1 | Kerb Diffuse Map (Wet Map in the Alpha channel) | 1 |
| 2 | Detail Map (typically a Blank white map) | 2 |
| 3 | Normal Map | 1 |
| 4 | RaceGroove Map | 3 |
| 5 | Specular Map (Puddle Map in the Alpha Channel) | 2 (copy of Ch1) |
| 6 | Marble Map | 2 |
| 7 | Dummy Reflection (A dummy texture, which exist in the MAPs folder) | 3 |
| 8 | Rain Puddle Map (Specular Map with Puddle Map here) | 5 |


1.2- The Real Kerb Shader Settings
It's Important to respect these settings as much as possible, to achieve constancy between contents/art, and more important, to give the Shader and RainFX code the numbers that they are expecting, and produce the wanted output. Using different values/settings, might produce unexpected results and also introduce performance issues.
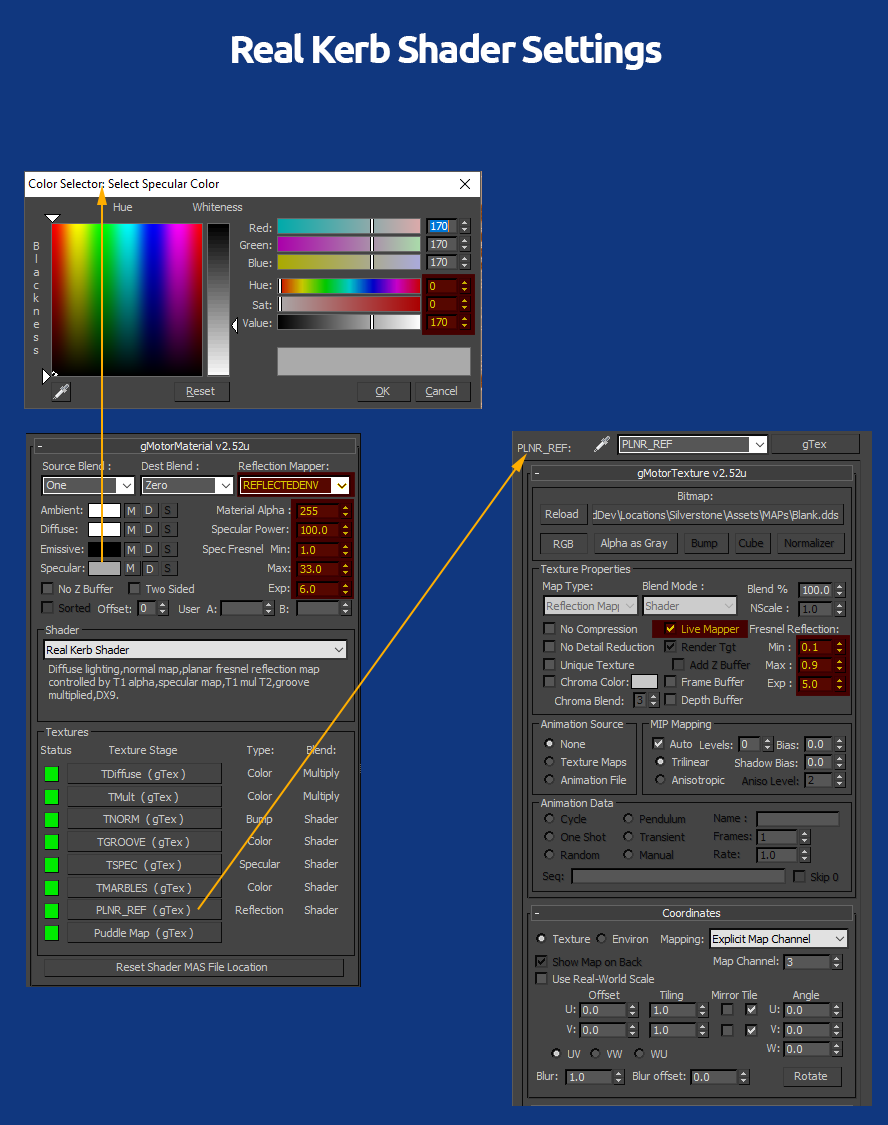
Main Real Kerb Material Settings
- Specular Color: Min 130.130.130, Max 200.200.200 (Do Not Exceed 200, as this is the Albedo floor)
- Specular Power: Min 75, Max 115 (Low side for raw/worn painting, High side for fresh/clean painting)
- Specular Fresnel Min: ~1.00
- Specular Fresnel Max: ~33.0
- Specular Fresnel EXP: 6.0 (Always stay in the 5.0/6.0 range)
- Reflection Mapper: REFLECTEDENV
Planar Reflection Stage Settings for Real Kerb (Stage 7)
- Live Mapper: Checked
- Fresnel Reflection Min: 0.1 (Do Not Use Different)
- Fresnel Reflection Max: 0.9 (Do Not Use Different)
- Fresnel Reflection EXP: 5.0 (Do Not Use Different)
Step 2 - Mapping for Rain Puddles
Mapping for the Rain puddles is pretty simple and straight. The important task here is to be 100% sure you are mapping all the Real Road and Real Kerb mesh, at the same time, so that you get a single mapping for all of them.
Let's see an example, showing how to proceed in general;
Isolate and select all your mesh that are using the Real Road and Real Kerb shader;
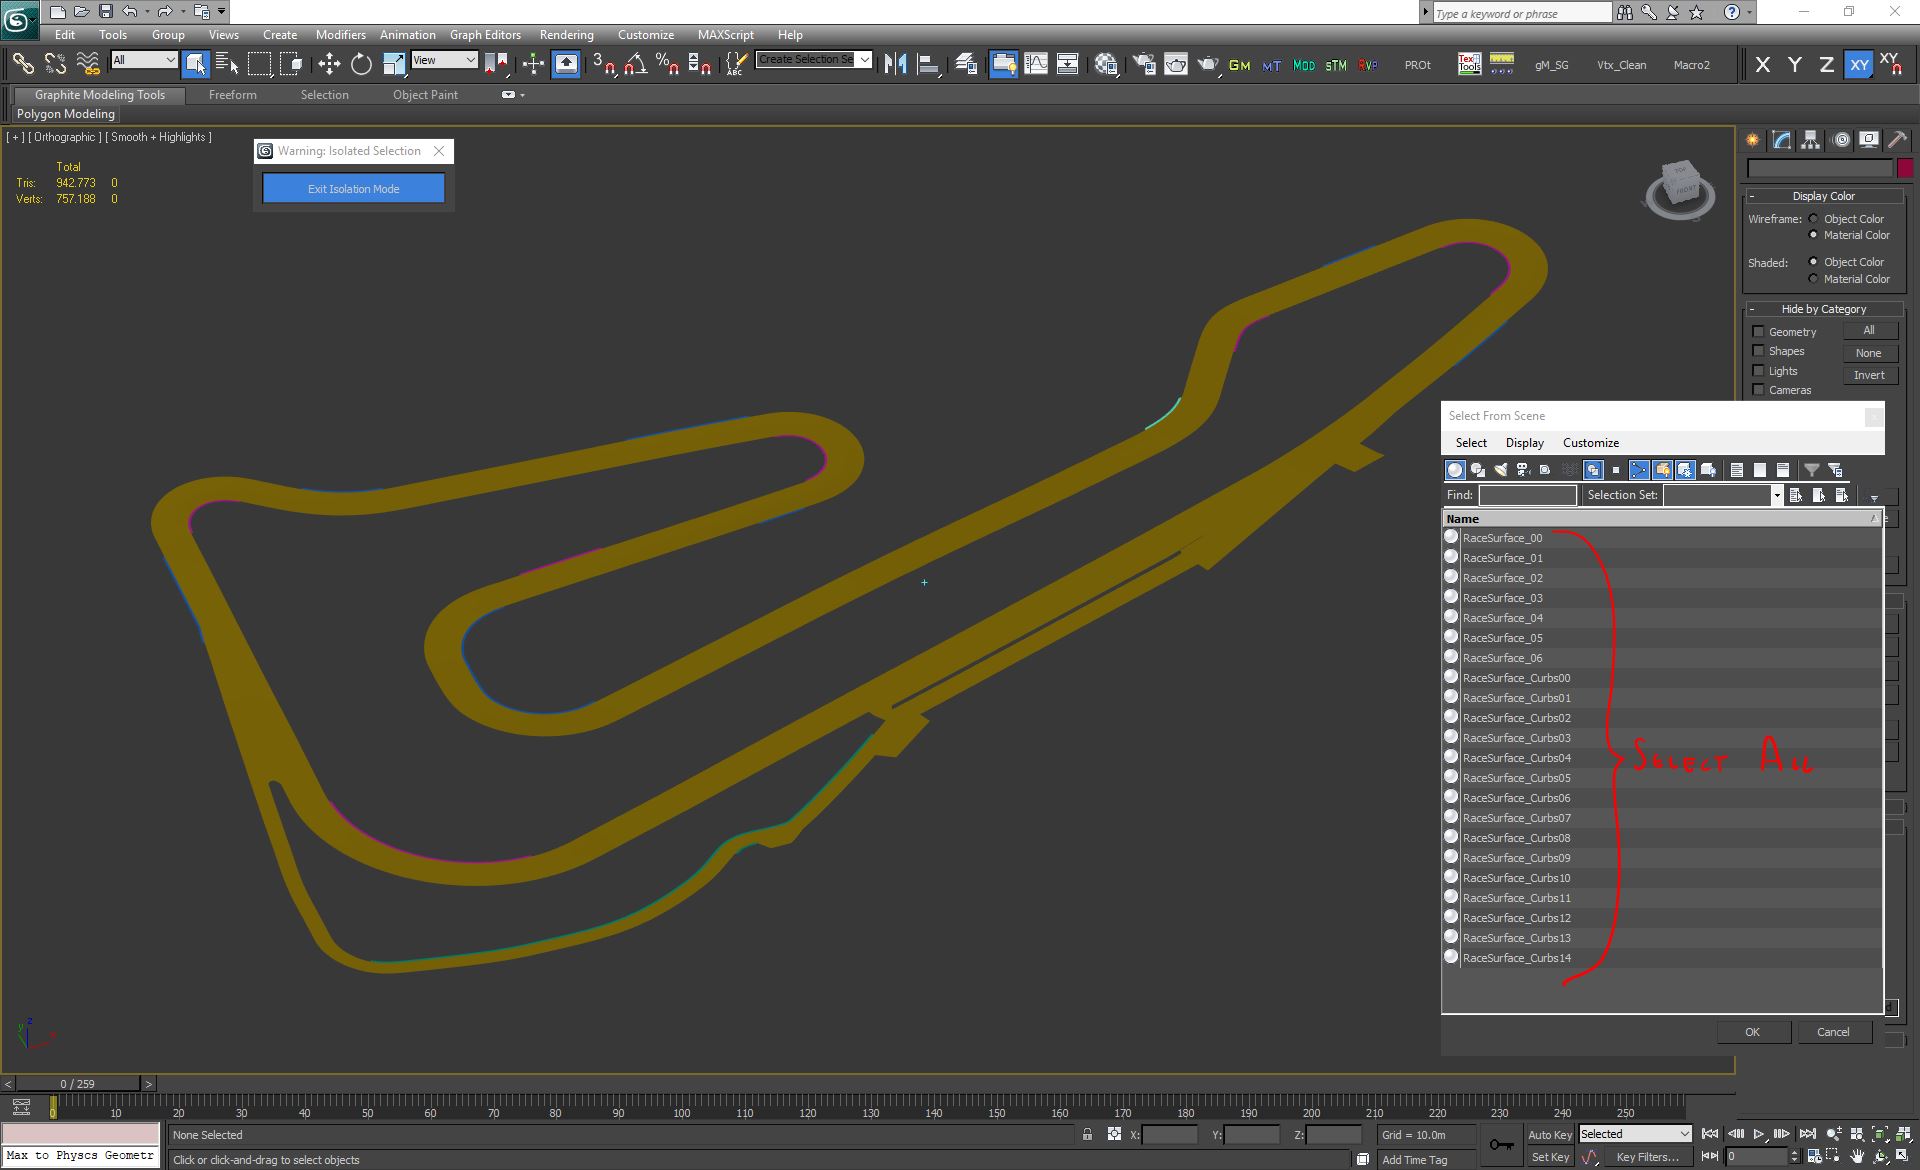
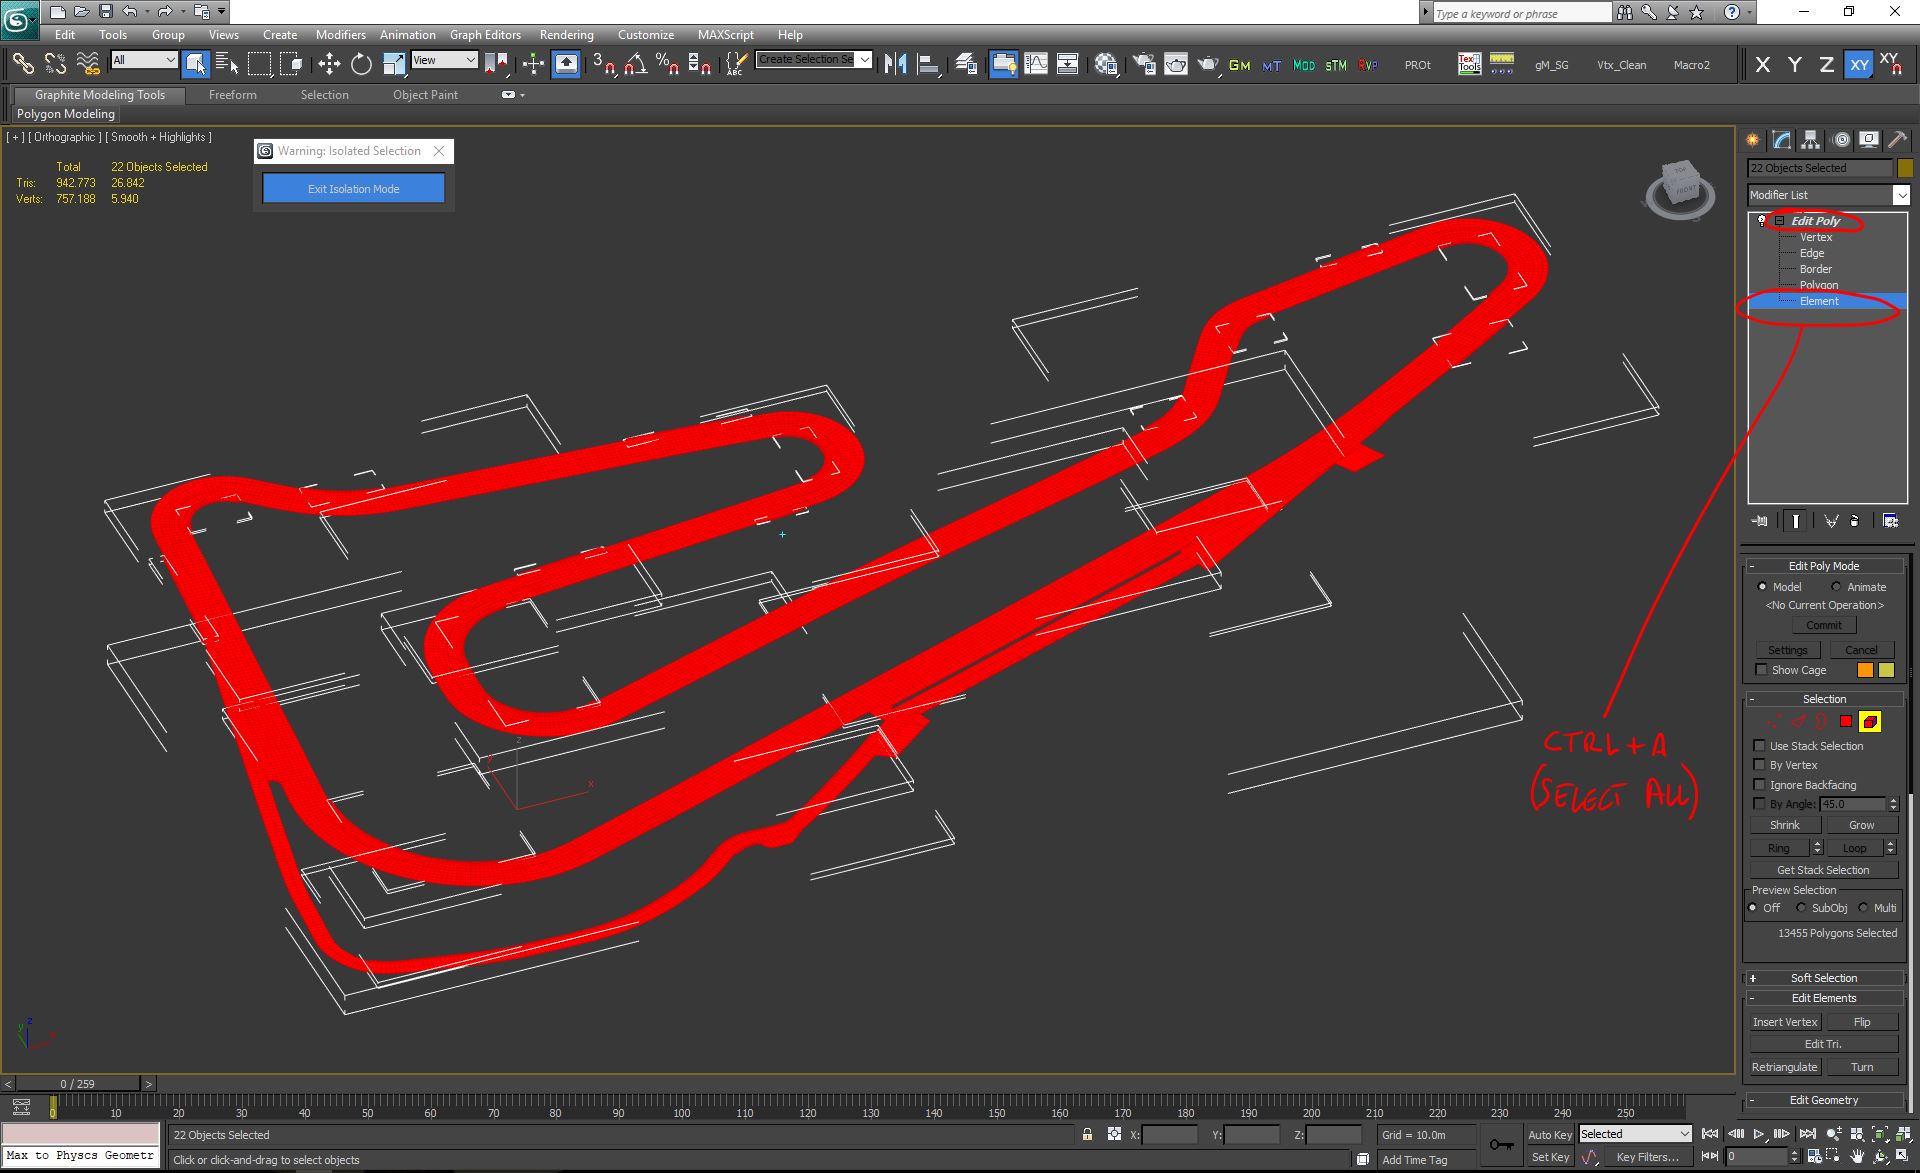
Add an Edit Poly modifier to the stack, and go to poly or element mode, then select all the polygons/elements;
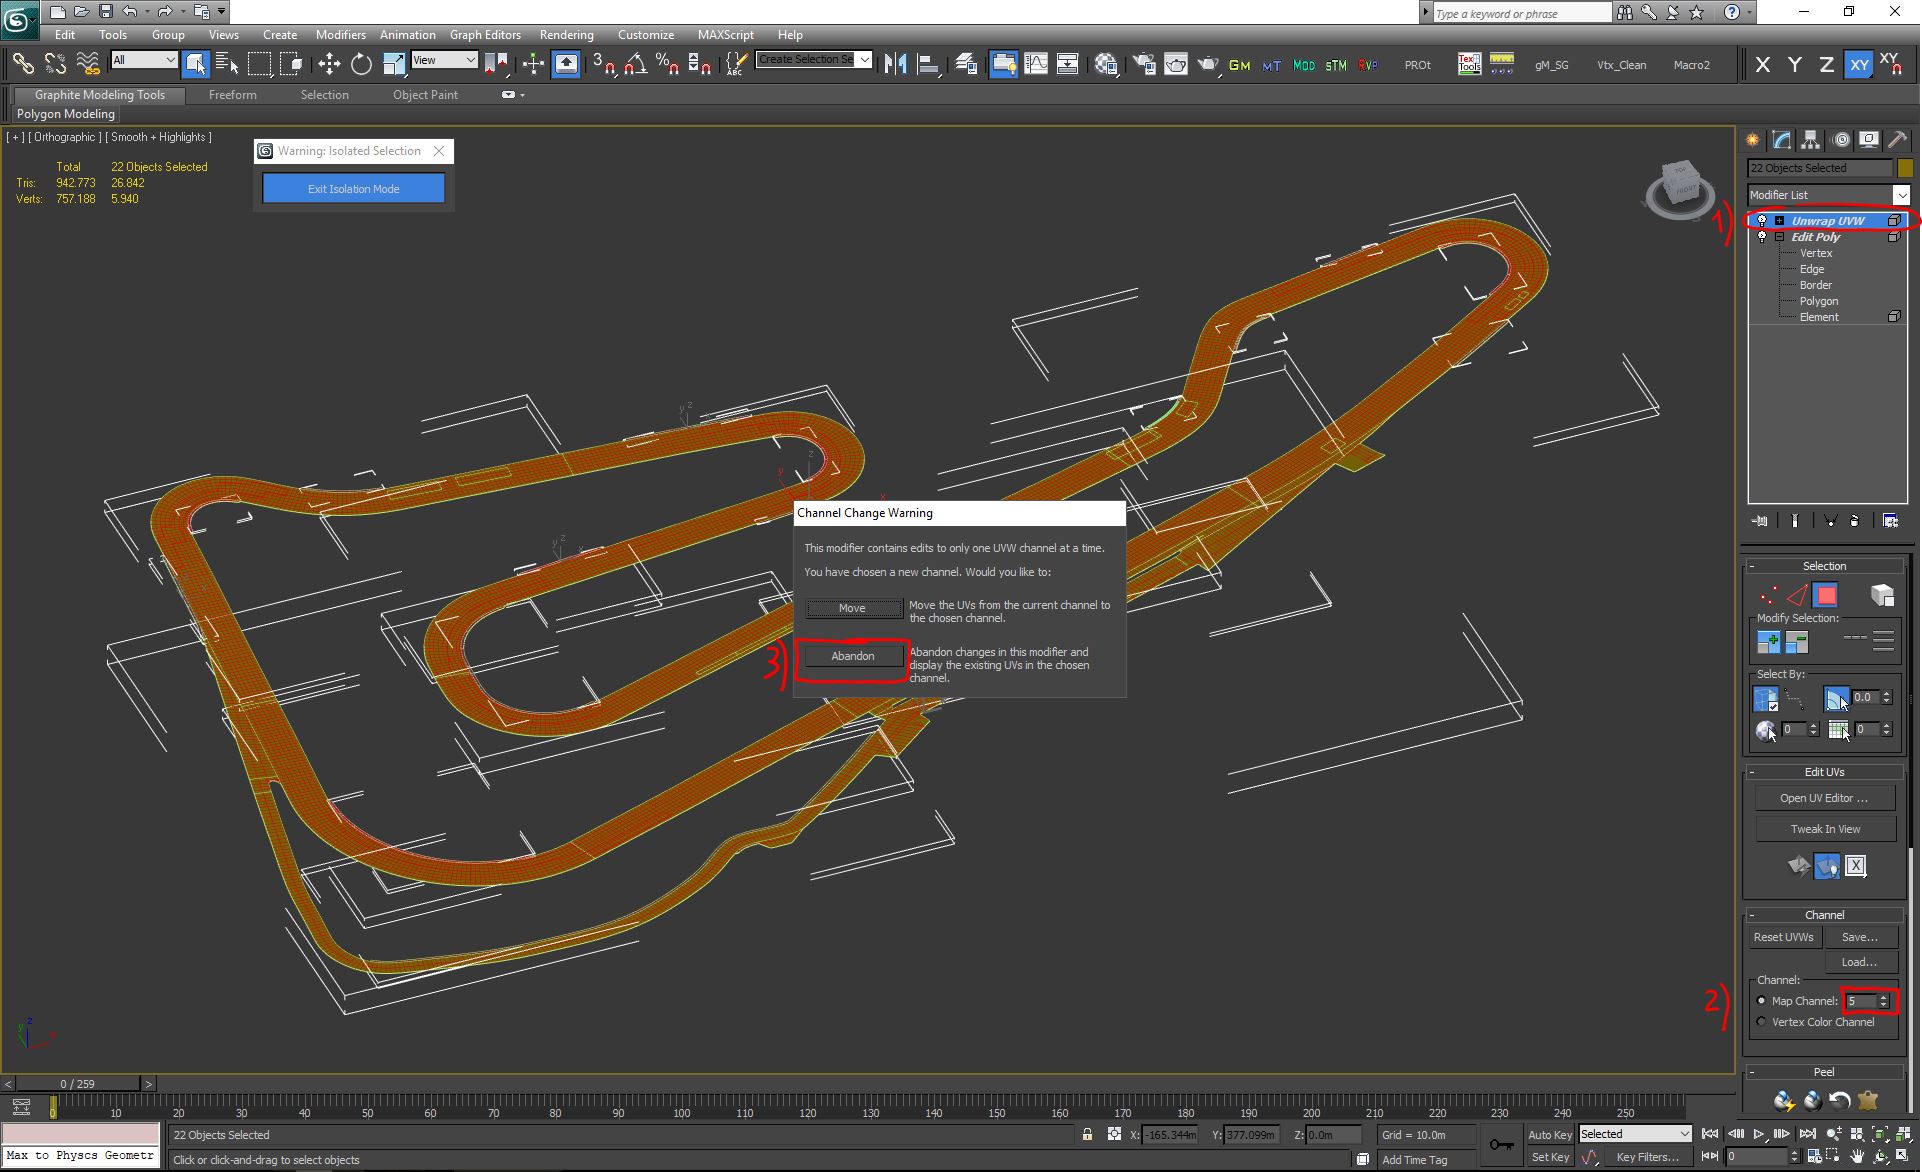
Now add an Unrwap UVW modifier in the stack, and (IMPORTANT) set the UV channel to 5. When you'll be asked what to do with the current UV, click on abandon (we don't want to port CH1 to CH2);
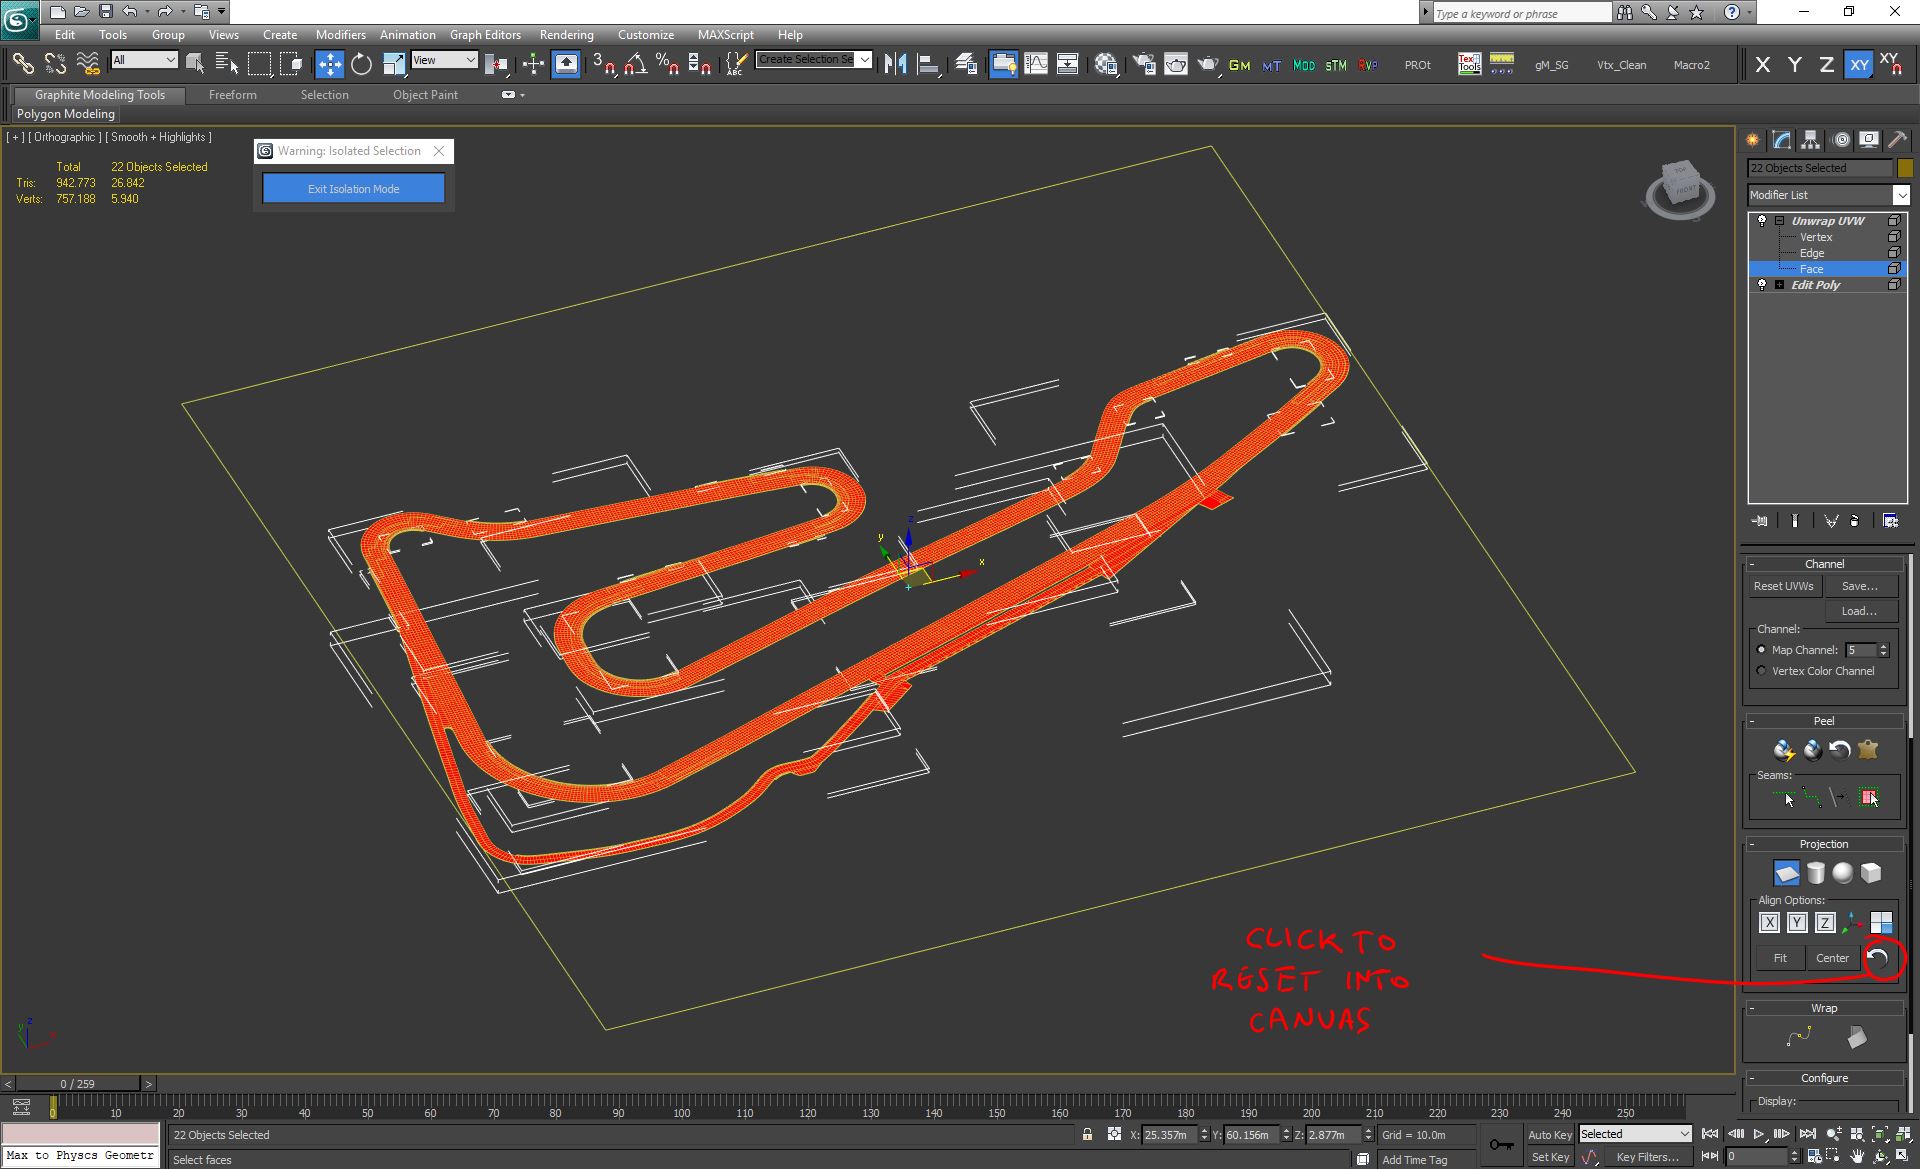
Now, while in the Unrwap UVW modifier, go into Face mode and select all faces. With all faces selected, press the Planar Map icon. This will map the entire selection (all roads and all kerbs) to a planar map;

Press now on the Reset icon, to rest the planar mapping inside the square 1:1 canvas;
You can now open the Editor (Open UV Editor button), to check the mapping;
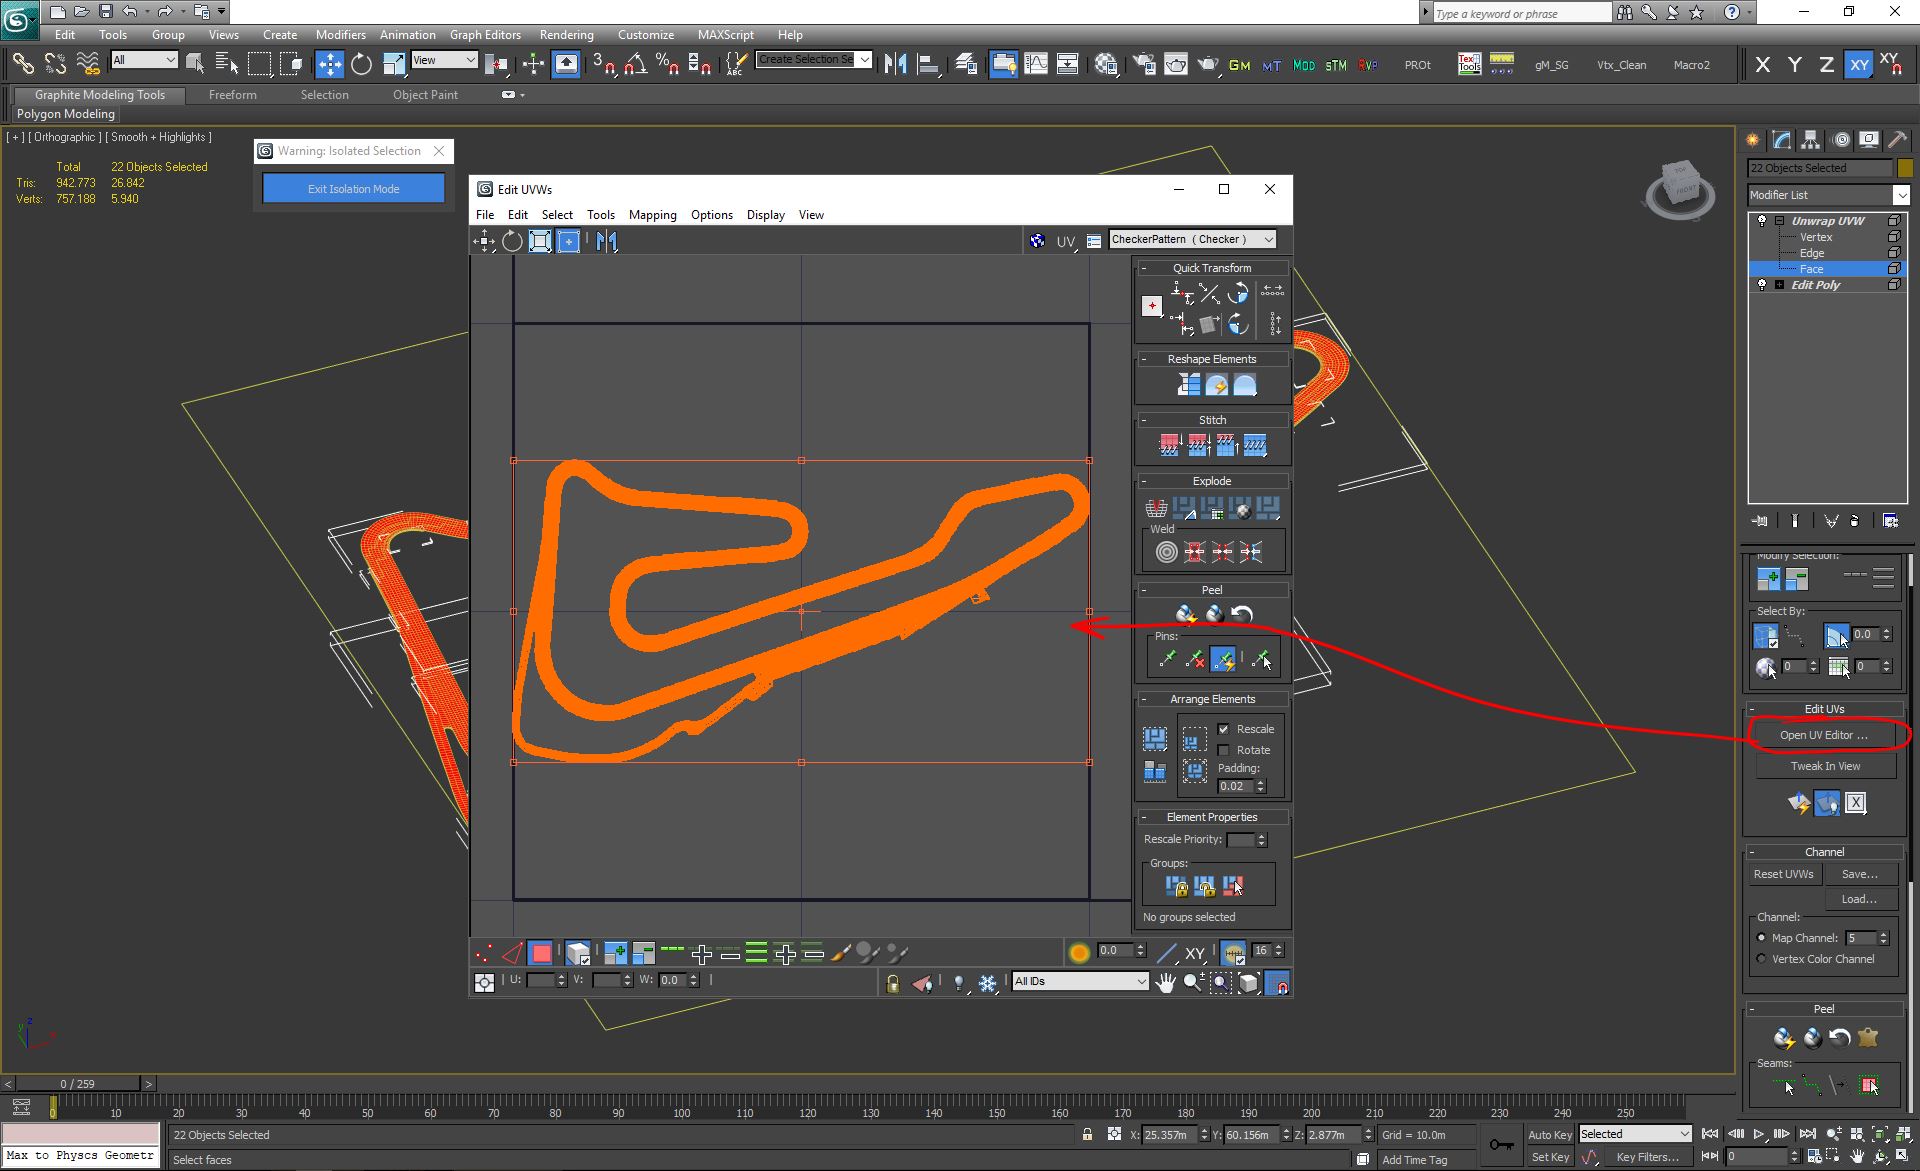
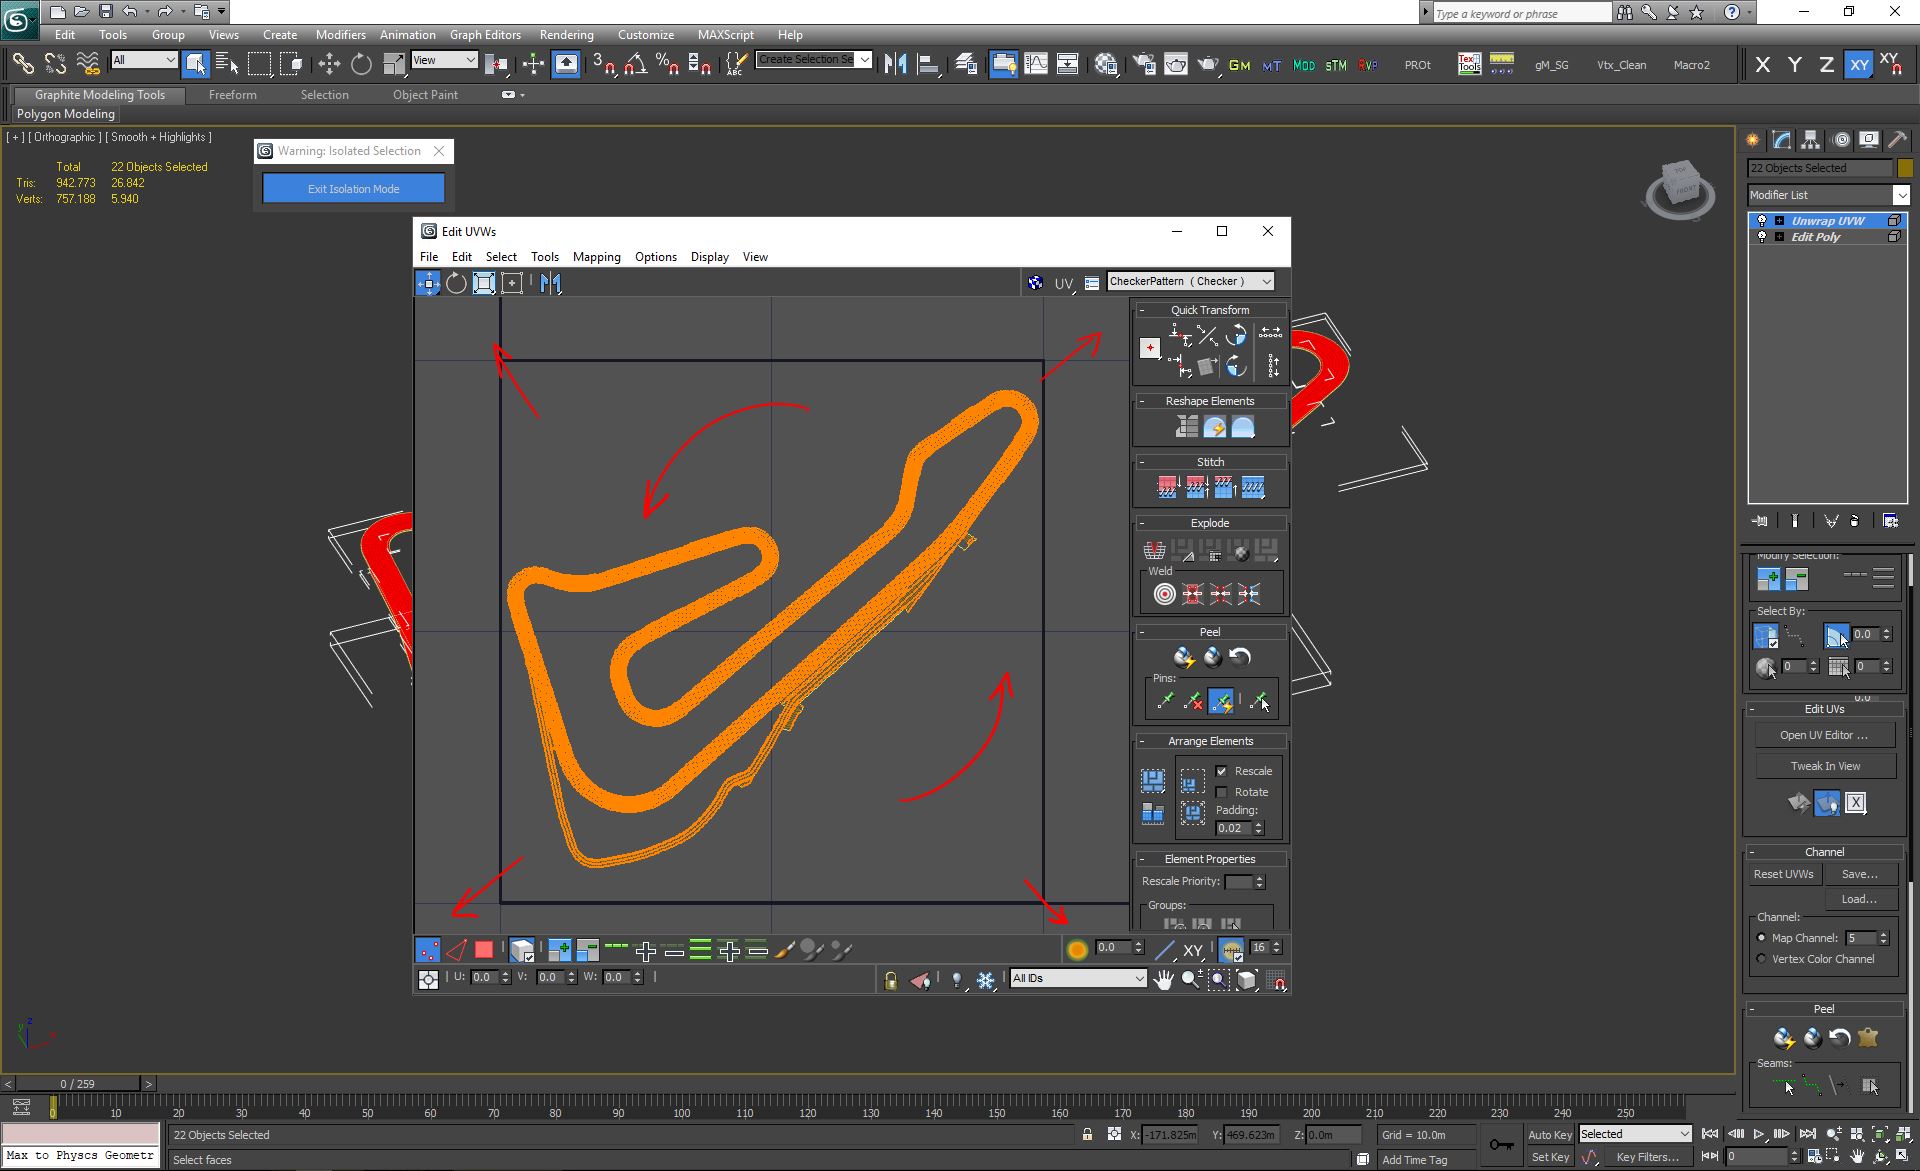
At this point, not mandatory, you can rotate and rescale the mapping to optimize the available canvas. Sometimes it's possible to get a bit more pixel/meter resolution from that move, sometimes the stock Planar mapping is good enough. Your call here.
Now we will export two maps, that we will use in our main puddle map .PSD file.
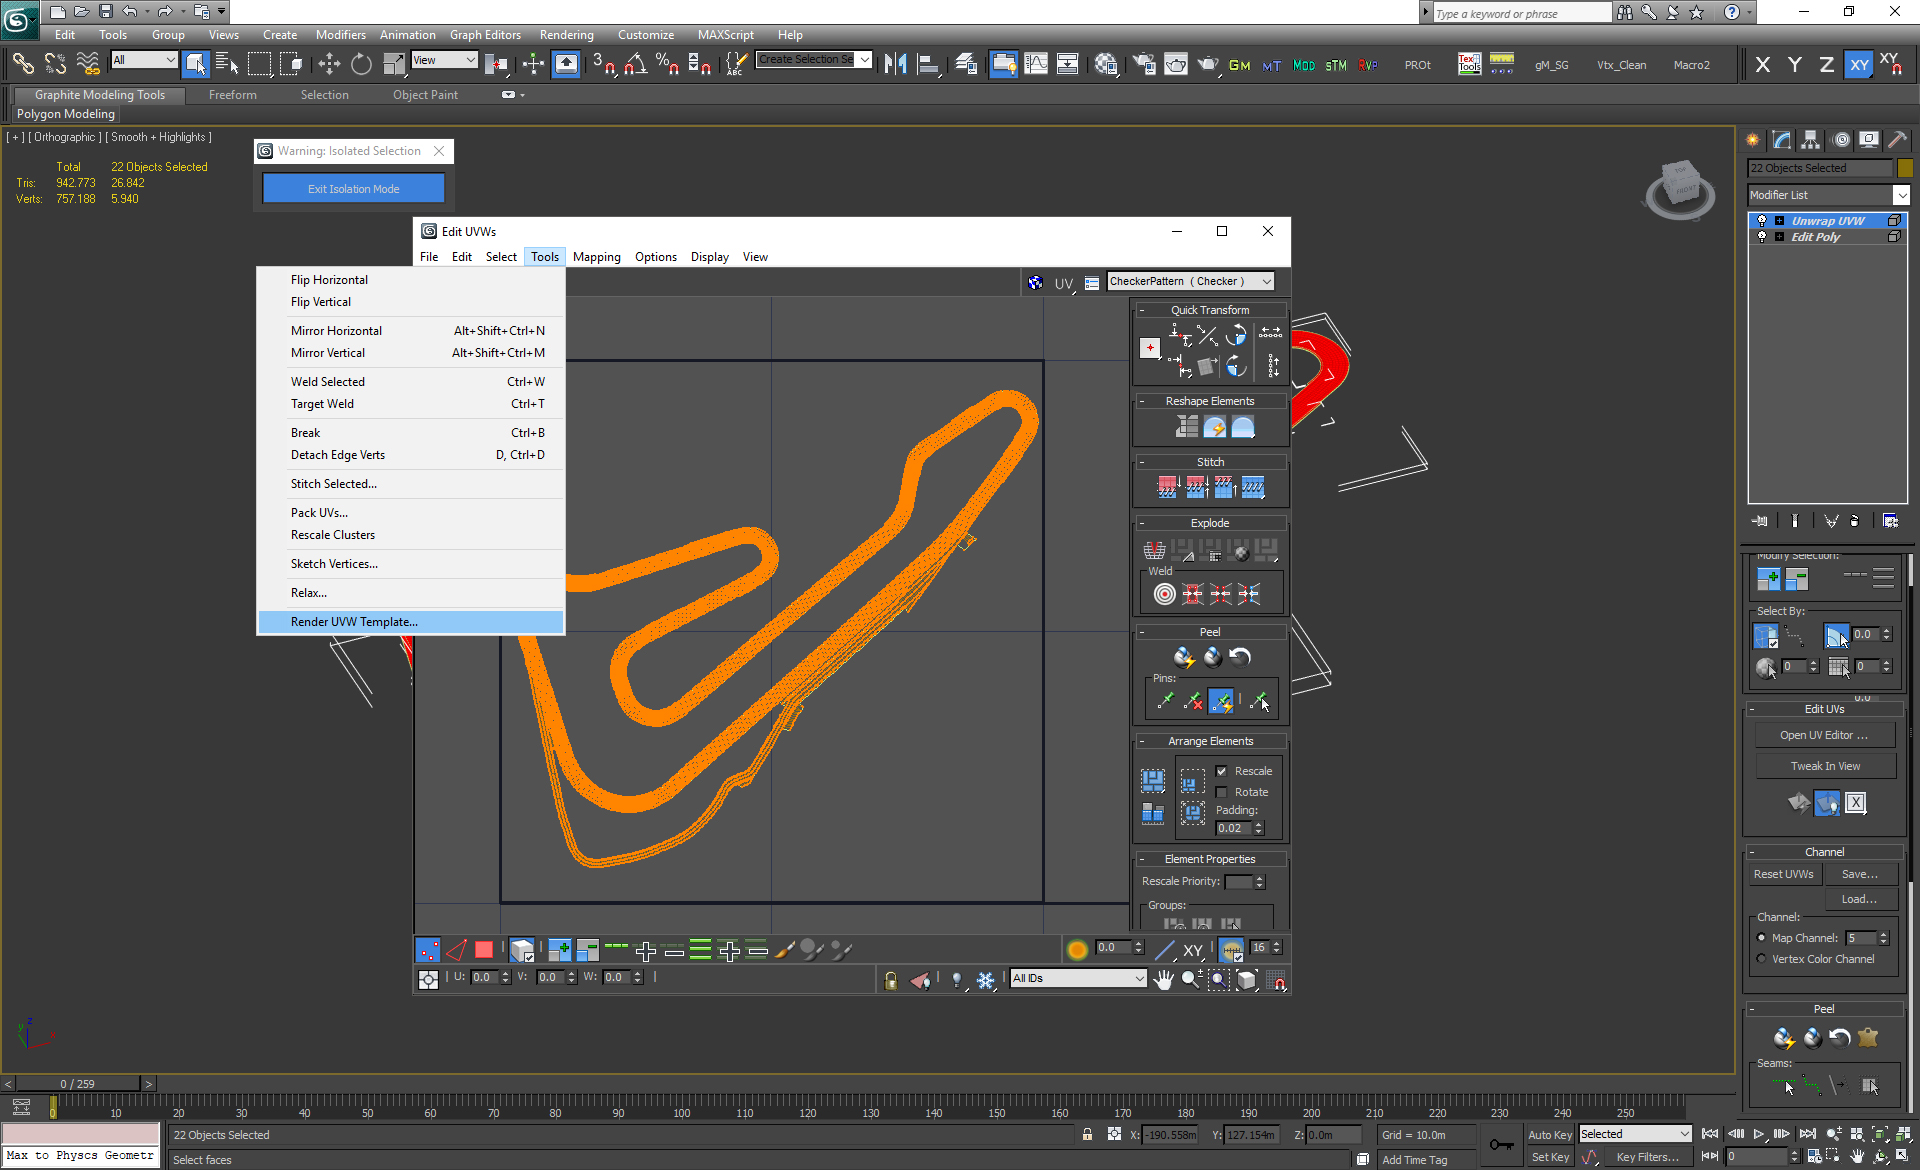
First map we need is the UVW wireframe, with alpha channel, so that we have a visual reference for the paint.
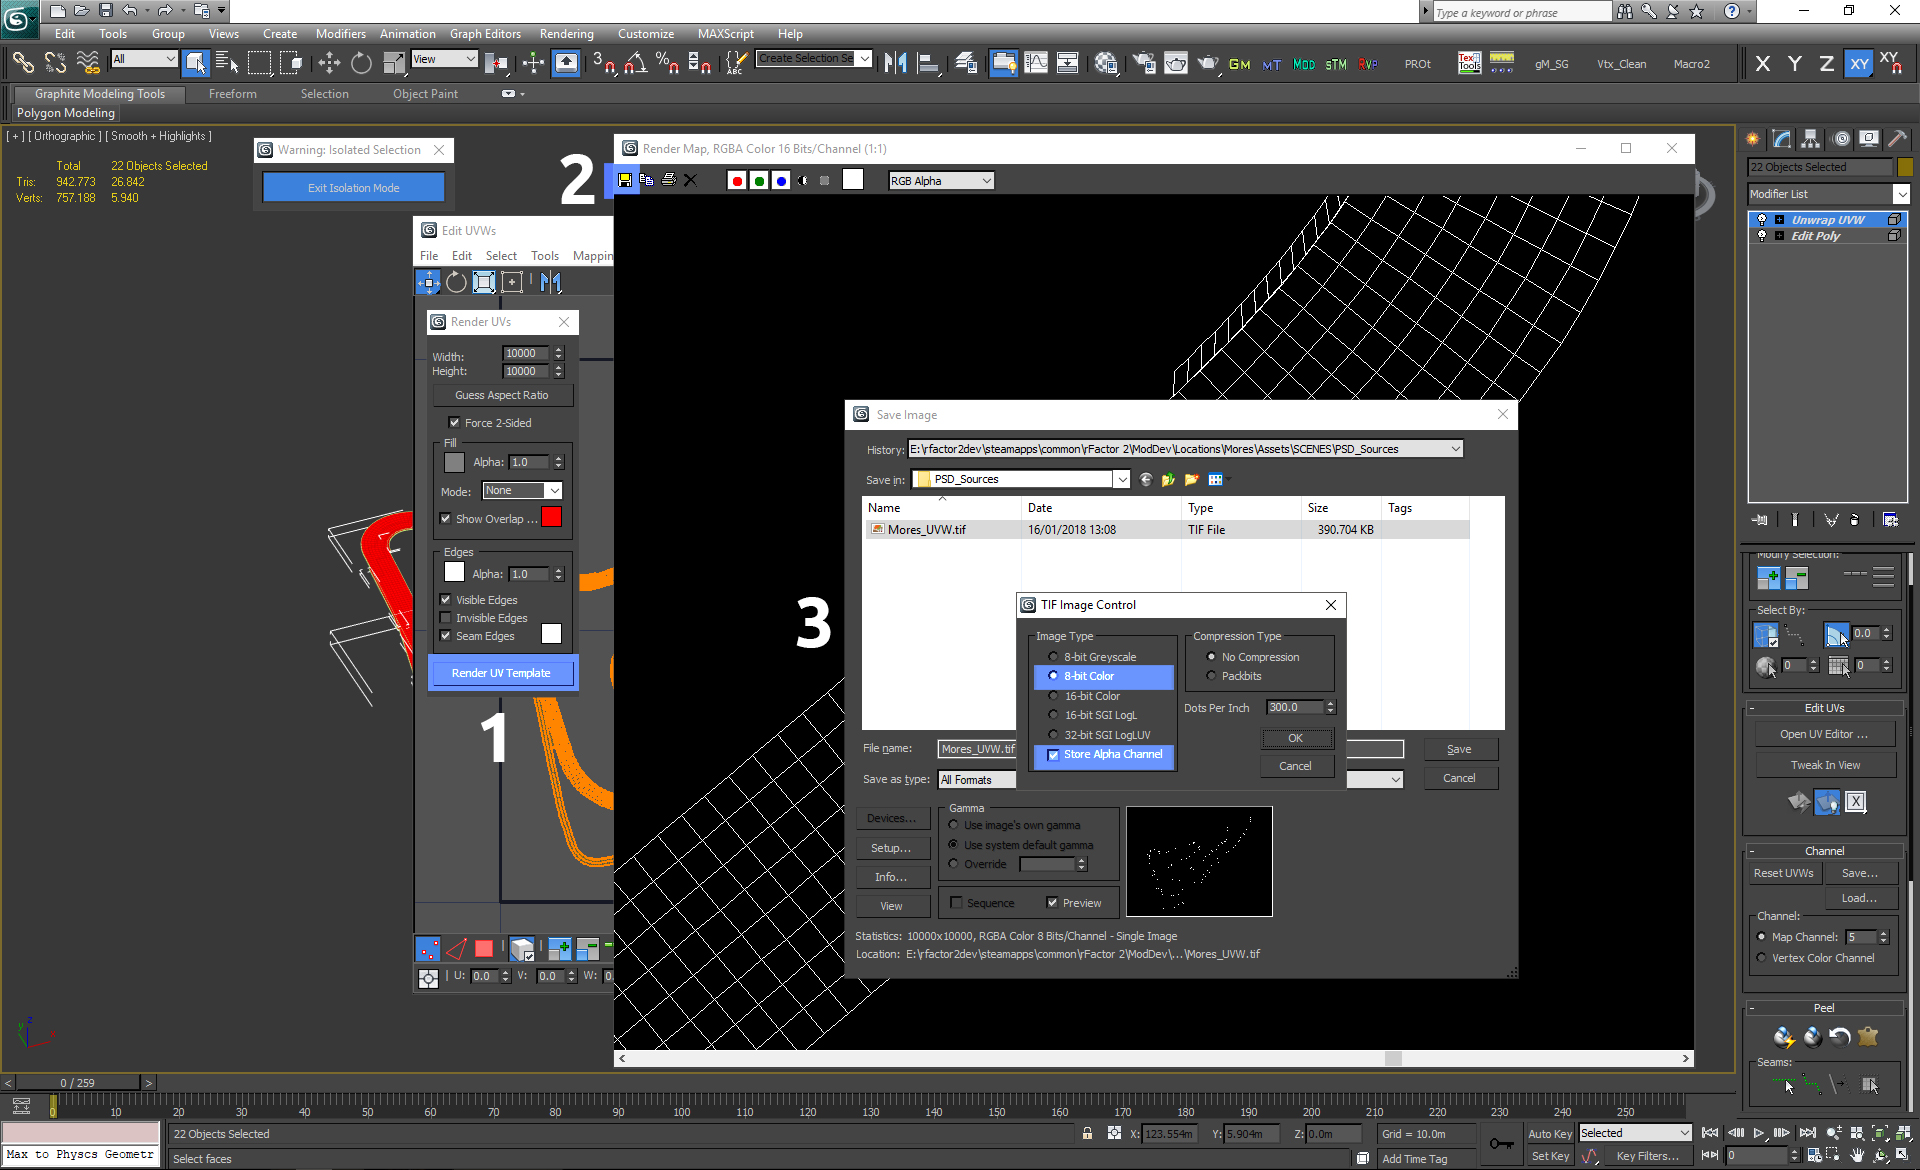
To do so, in the Edit UVW, go to Tools------→Render UVW Template;
We need very high resolution for these maps, since our PSD will be a 16384px*16384px canvas. Since max 2012 has a capped resolution to 10000+10000, this is the res that we set the dialog box, we'll be resizing later to match our PSD canvas.
Set the dialog box as the picture, and Render the UVW template;
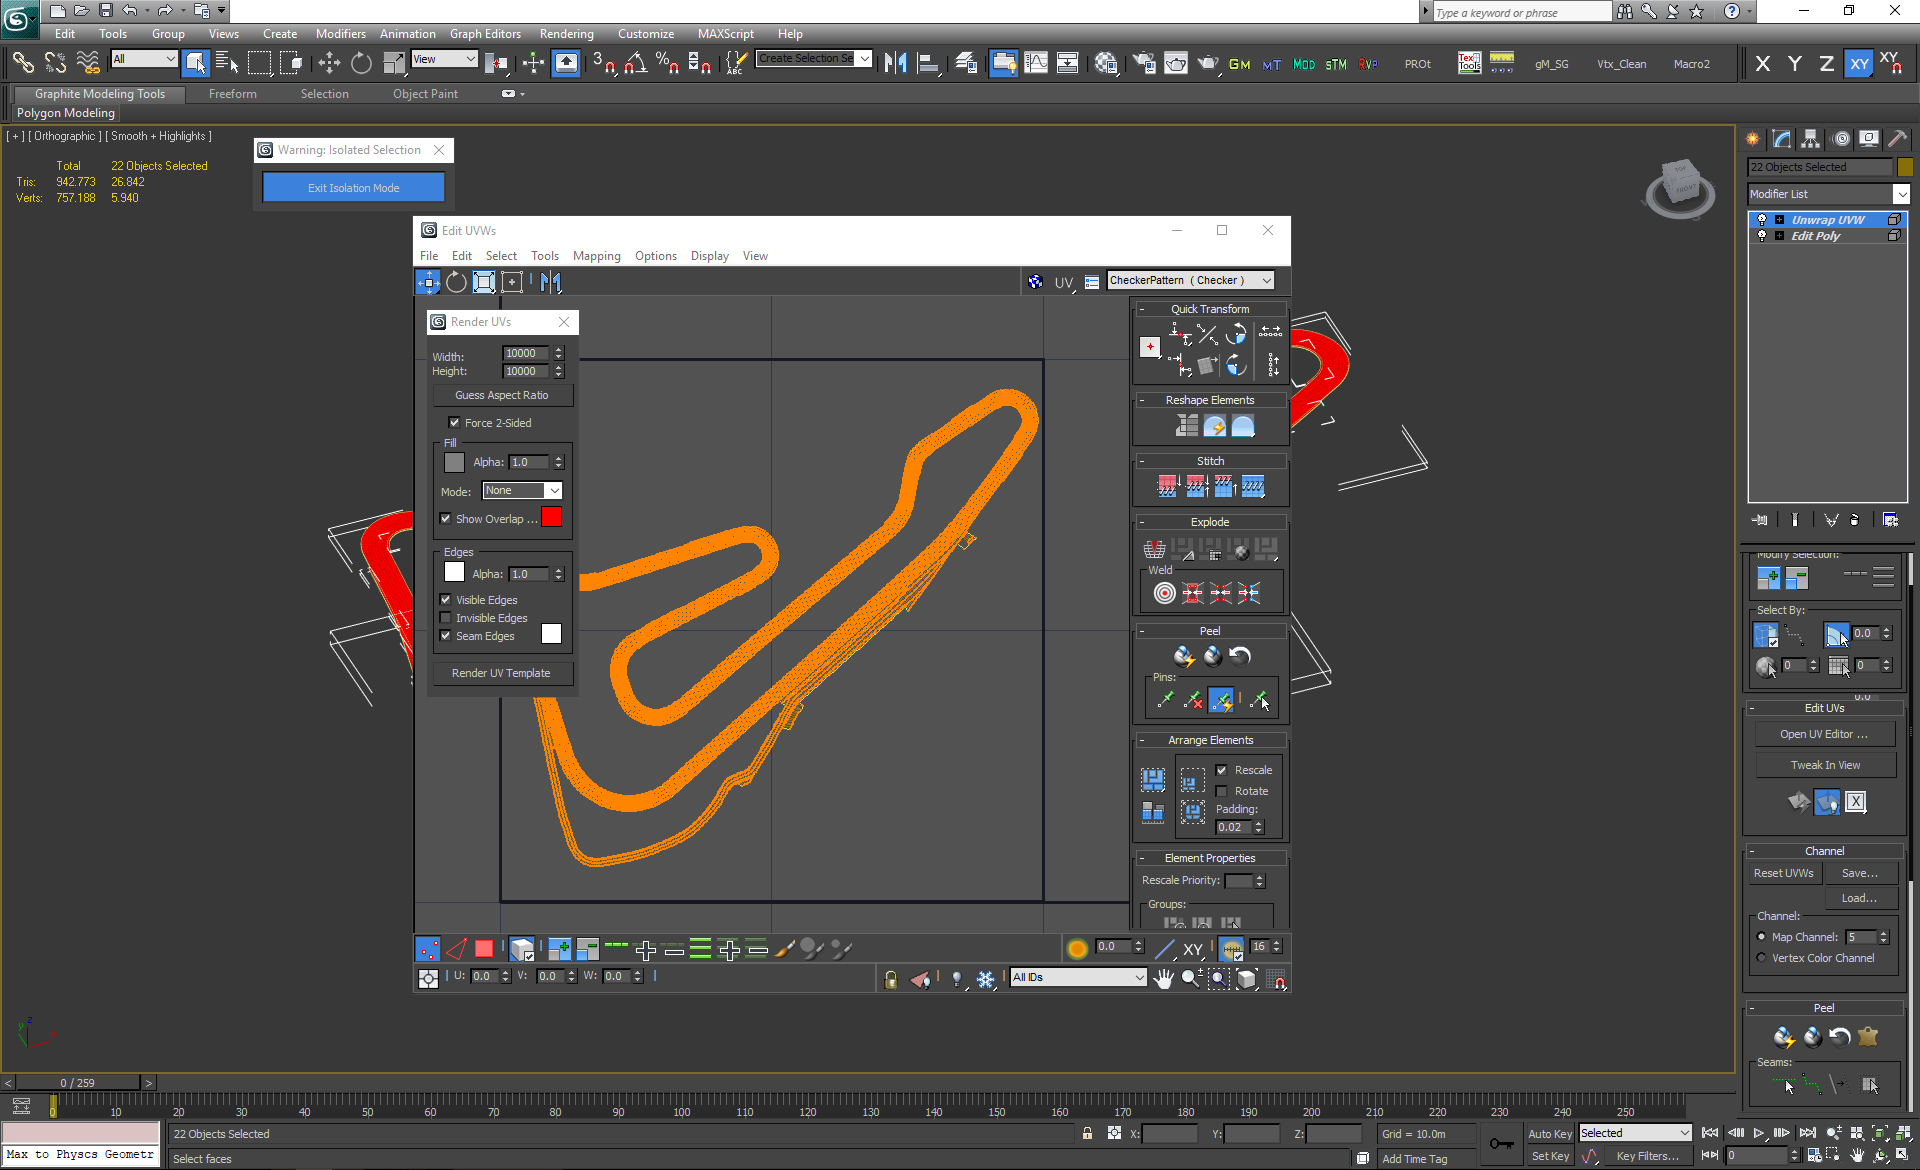
Set your file location, set .TIF as image format, and set the file to be an 8bpp + alpha, as in the picture
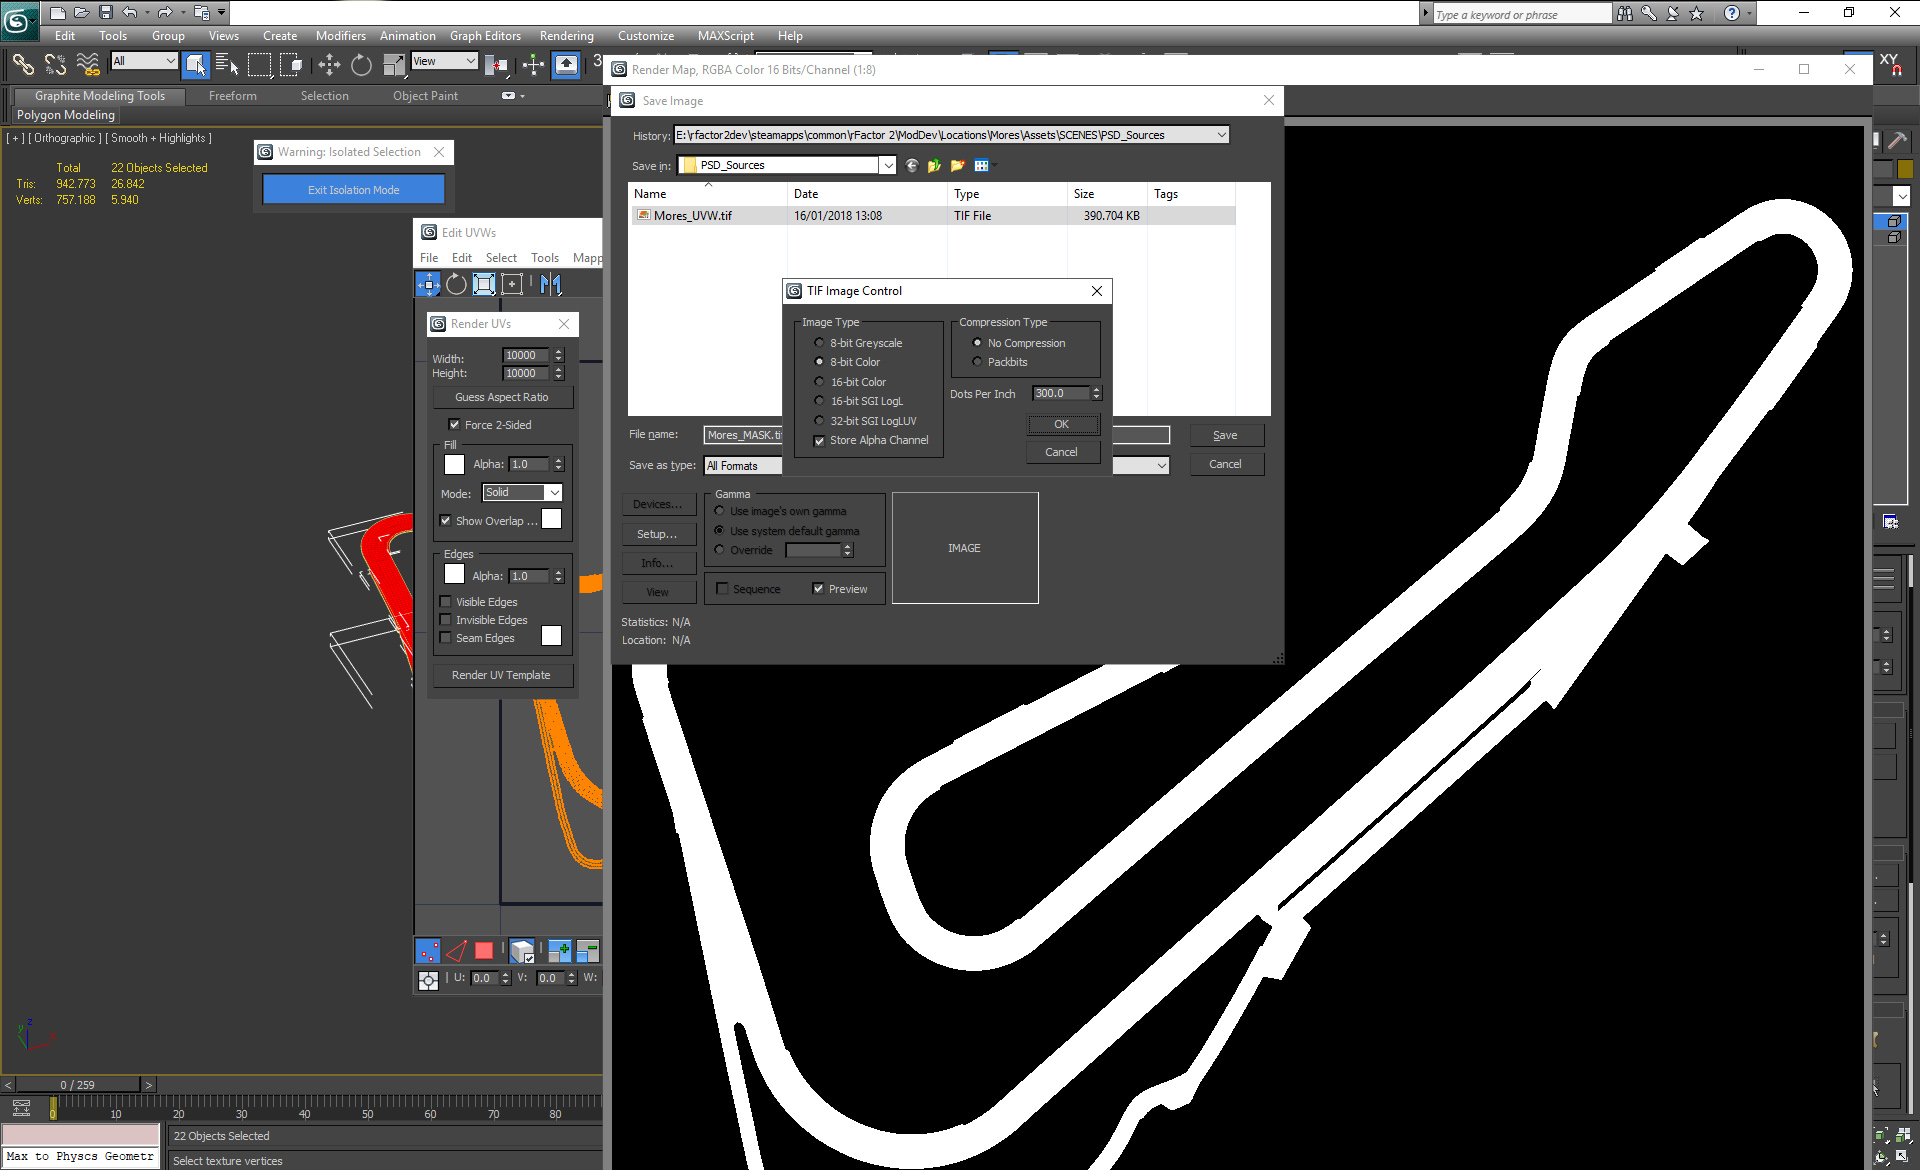
Now that we have the wireframe template, we need a mask of the track, to isolate our painting in the map.
To do so, just redo the above procedure, but this time using these settings in the template dialog;

Time to save your new template file, same as before, set your file location, TIF format, 8bpp, store alpha channel;
Now, before moving to Photoshop for the painting, we need to export all these selected mesh, to the track GMTs folder.
Remember that the plugin does not allow to export any mesh into GMT, if one of the textures does exceed the 4096*4096 size. This is why it's better to export BEFORE resizing the Asphalt_SPEC texture, that does host our PuddleMap, otherwise the plugin won't export.
In the case you need to re-export, with that Asphalt_SPEC 8096*8096 in place, you can rename that texture and then you can use a dummy 1024*1024 Asphalt_SPEC.dds that you can just for this operation.
We now have the two reference maps, so we can exit 3Ds Max and launch Photoshop CC
Step 3 - Creating the PuddleMap in Photoshop
I know that at this point you probably have a question; why working with a 16384px*16384px huge photoshop file, if the final texture will be 8192*8192px?
Well, this is what we do suggest, since we are painting a map that does represent the entire cuircuit, our pixel/meter ratio is pretty low end, so painting on a 16K canvas, give us more brush and paint precision, other than a good dynamic when working with a wacom pen, especially for smaller events in the map. Again, this is what we suggest and what we do internally, but you are free to work straight in a 8K canvas, if your system isn't that great managing big photoshop files, big chunks of RAM and disk Cache.
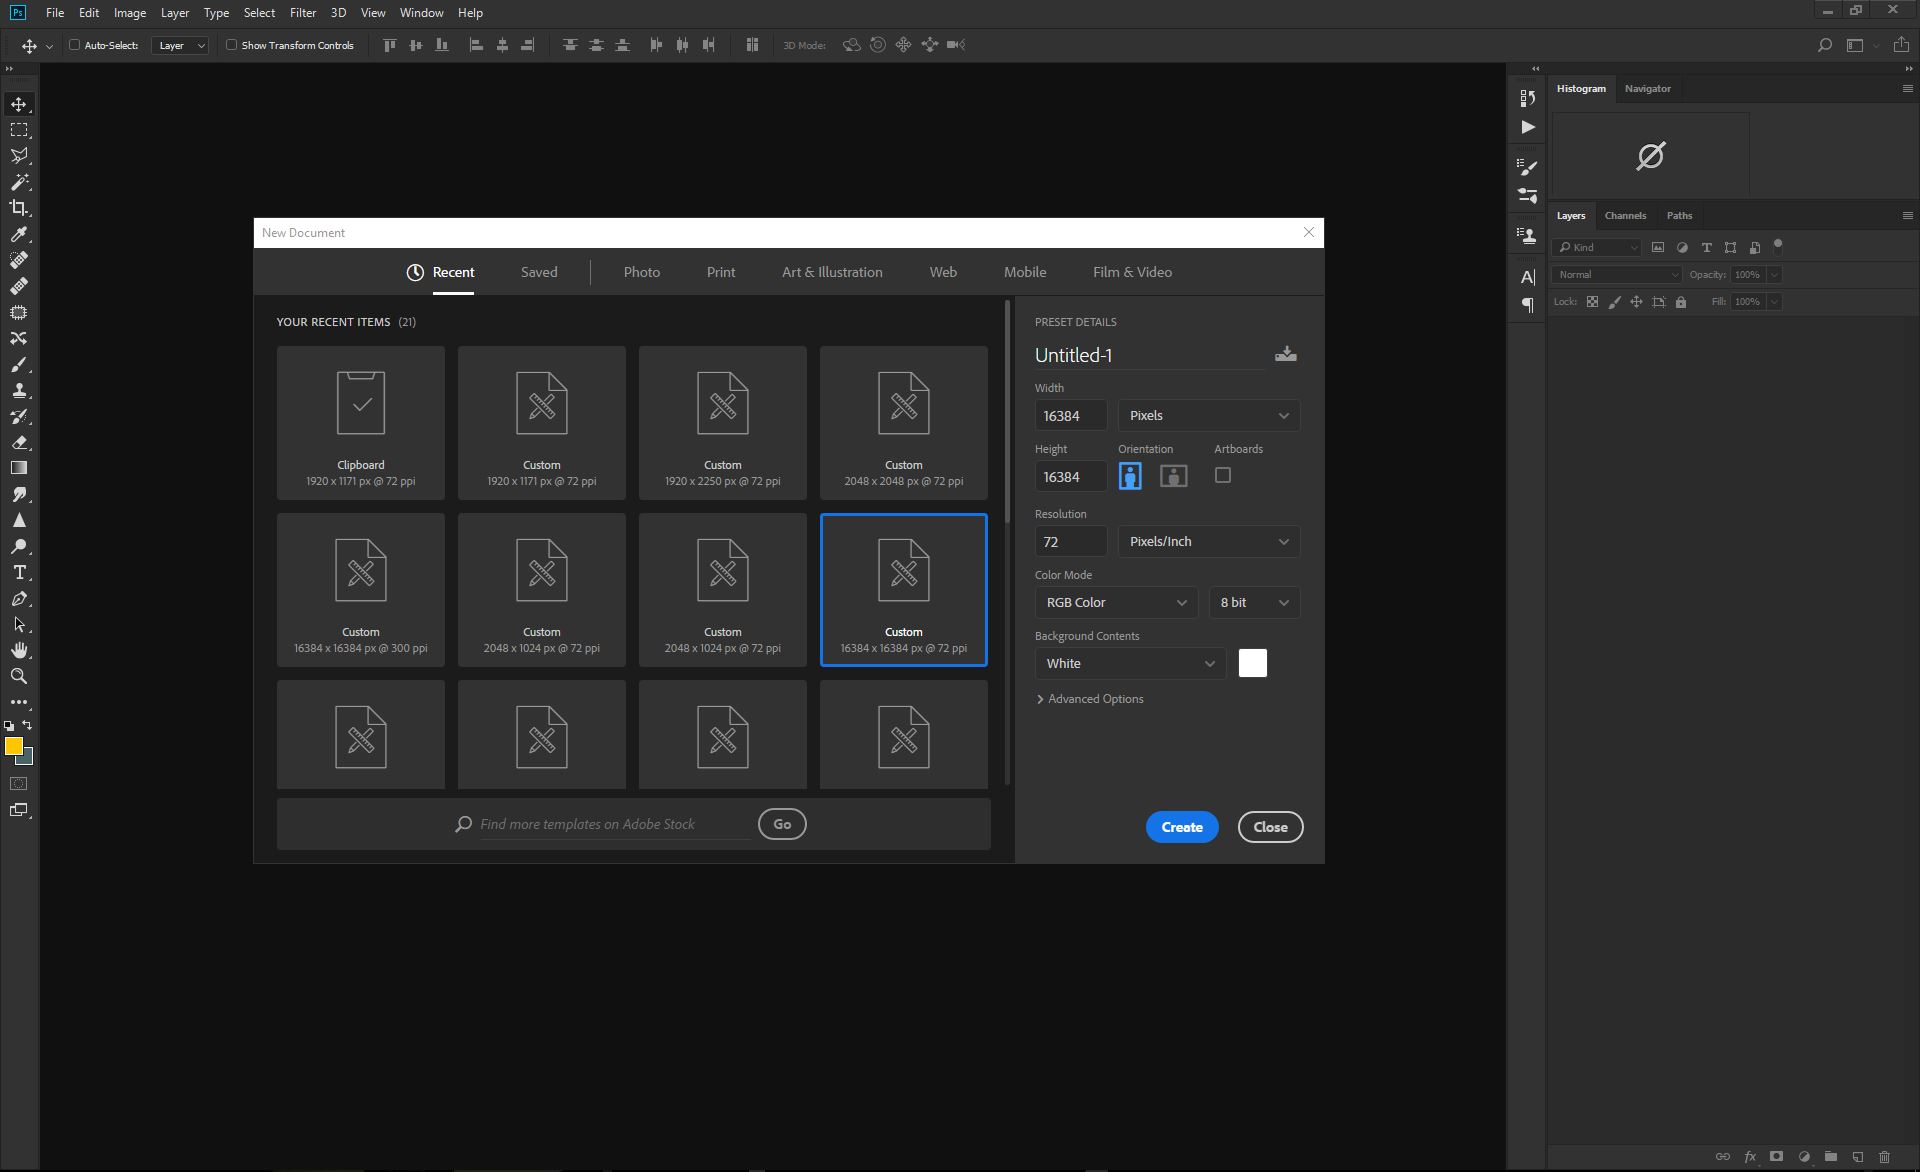
Let's start a new project, with the wanted resolution. In this case we will go for our internal standards, creating a 16384px*16384px canvas;
Now, this is also NOT mandatory operations for modders. This is how we do internally, with our artists, since we think this is a good streamlined process for the task.
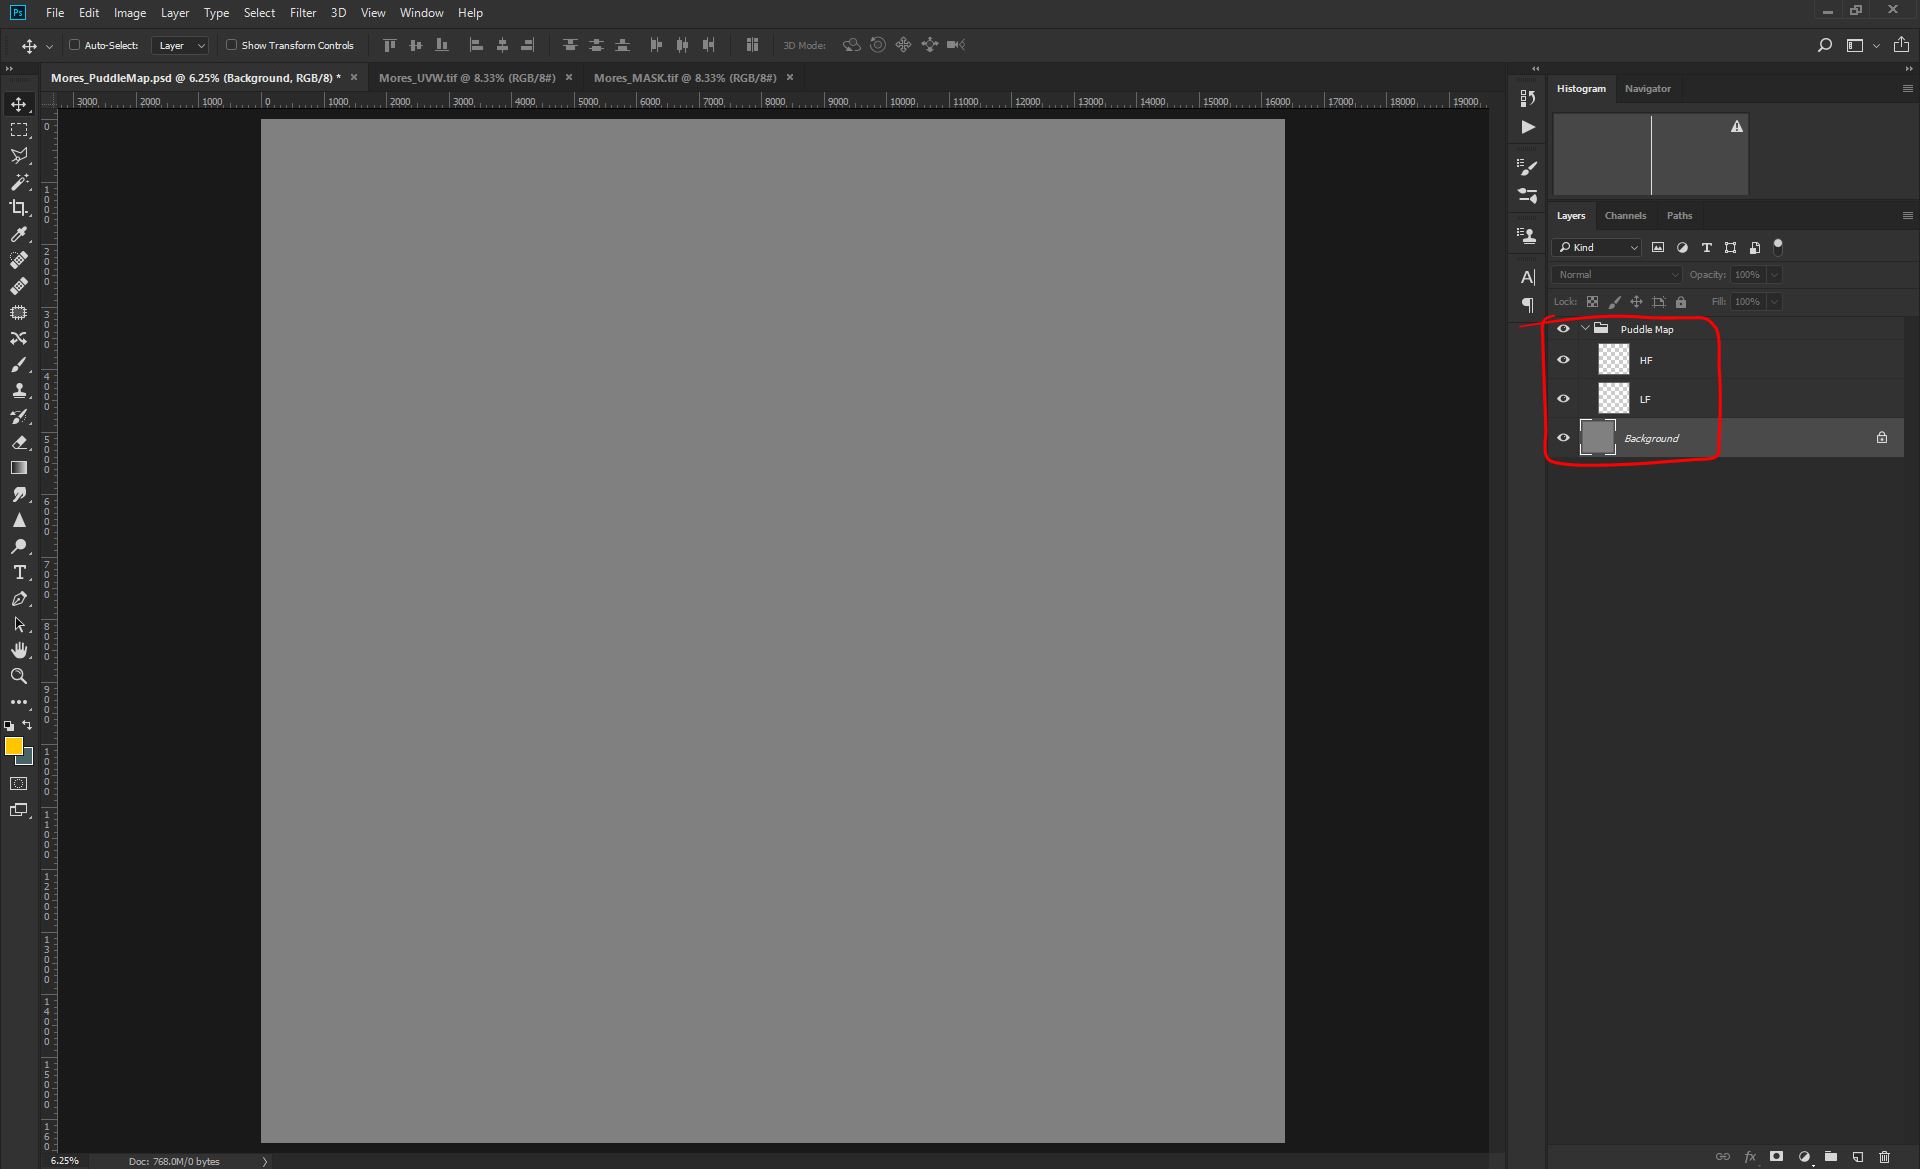
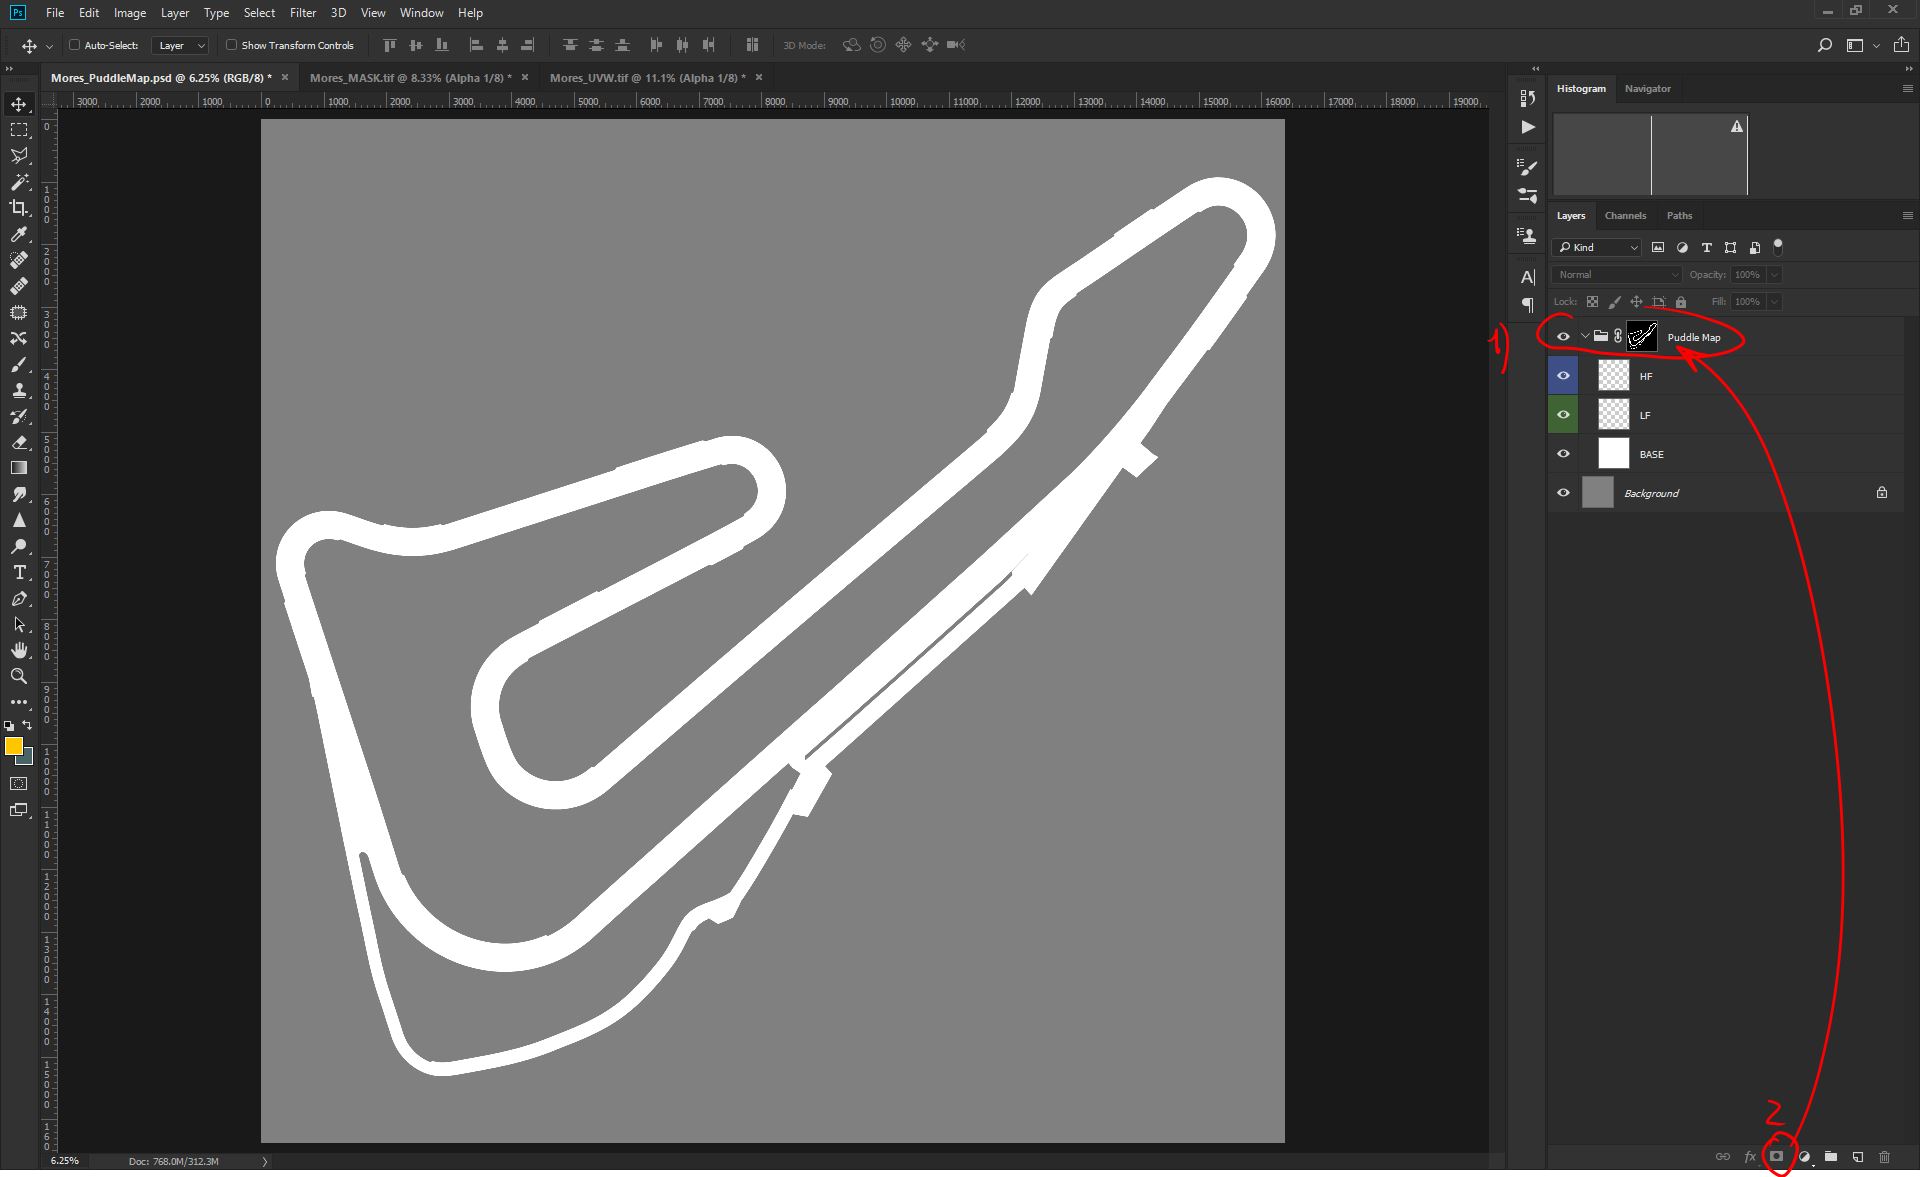
We do create a layer group, called Puddle Map, and we do create two main layers for the paint;
HF, where we'll be painting the high frequency events, like deep small puddles, and everything we want to be filled with standing water. We do set this layer opacity to 80/100%.
LF, where we'll be paiting major depression, with a faint intensity. This is where we put, for example, the extra thick dampness that does build up around the puddles. We do set this layer opacity to 30/45%
Let's save the document as PSD;
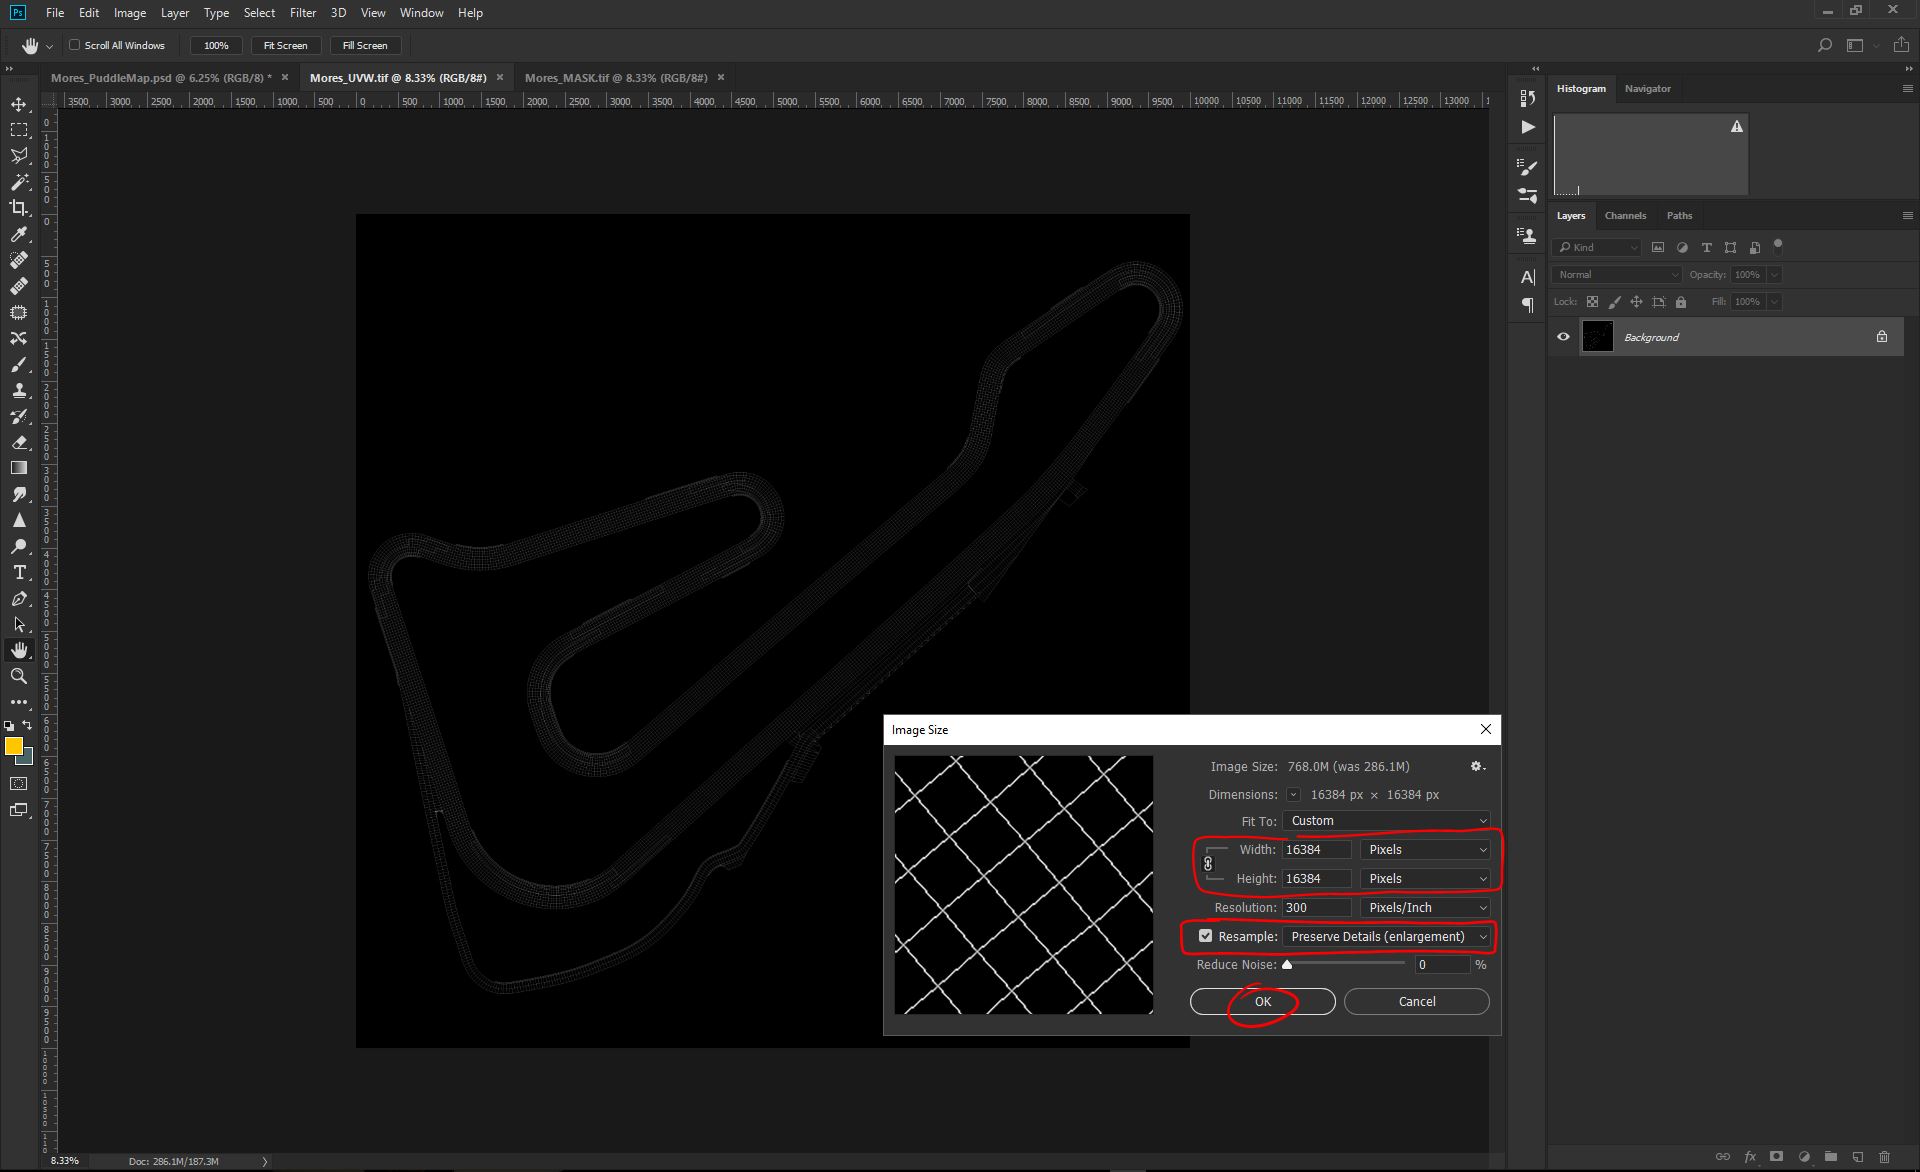
Now let's open both templates we exported from 3Ds Max, for the wire UVW and the track mask. After that, we'll be upscaling both to our actual PuddleMap canvas resolution, as in this picture;
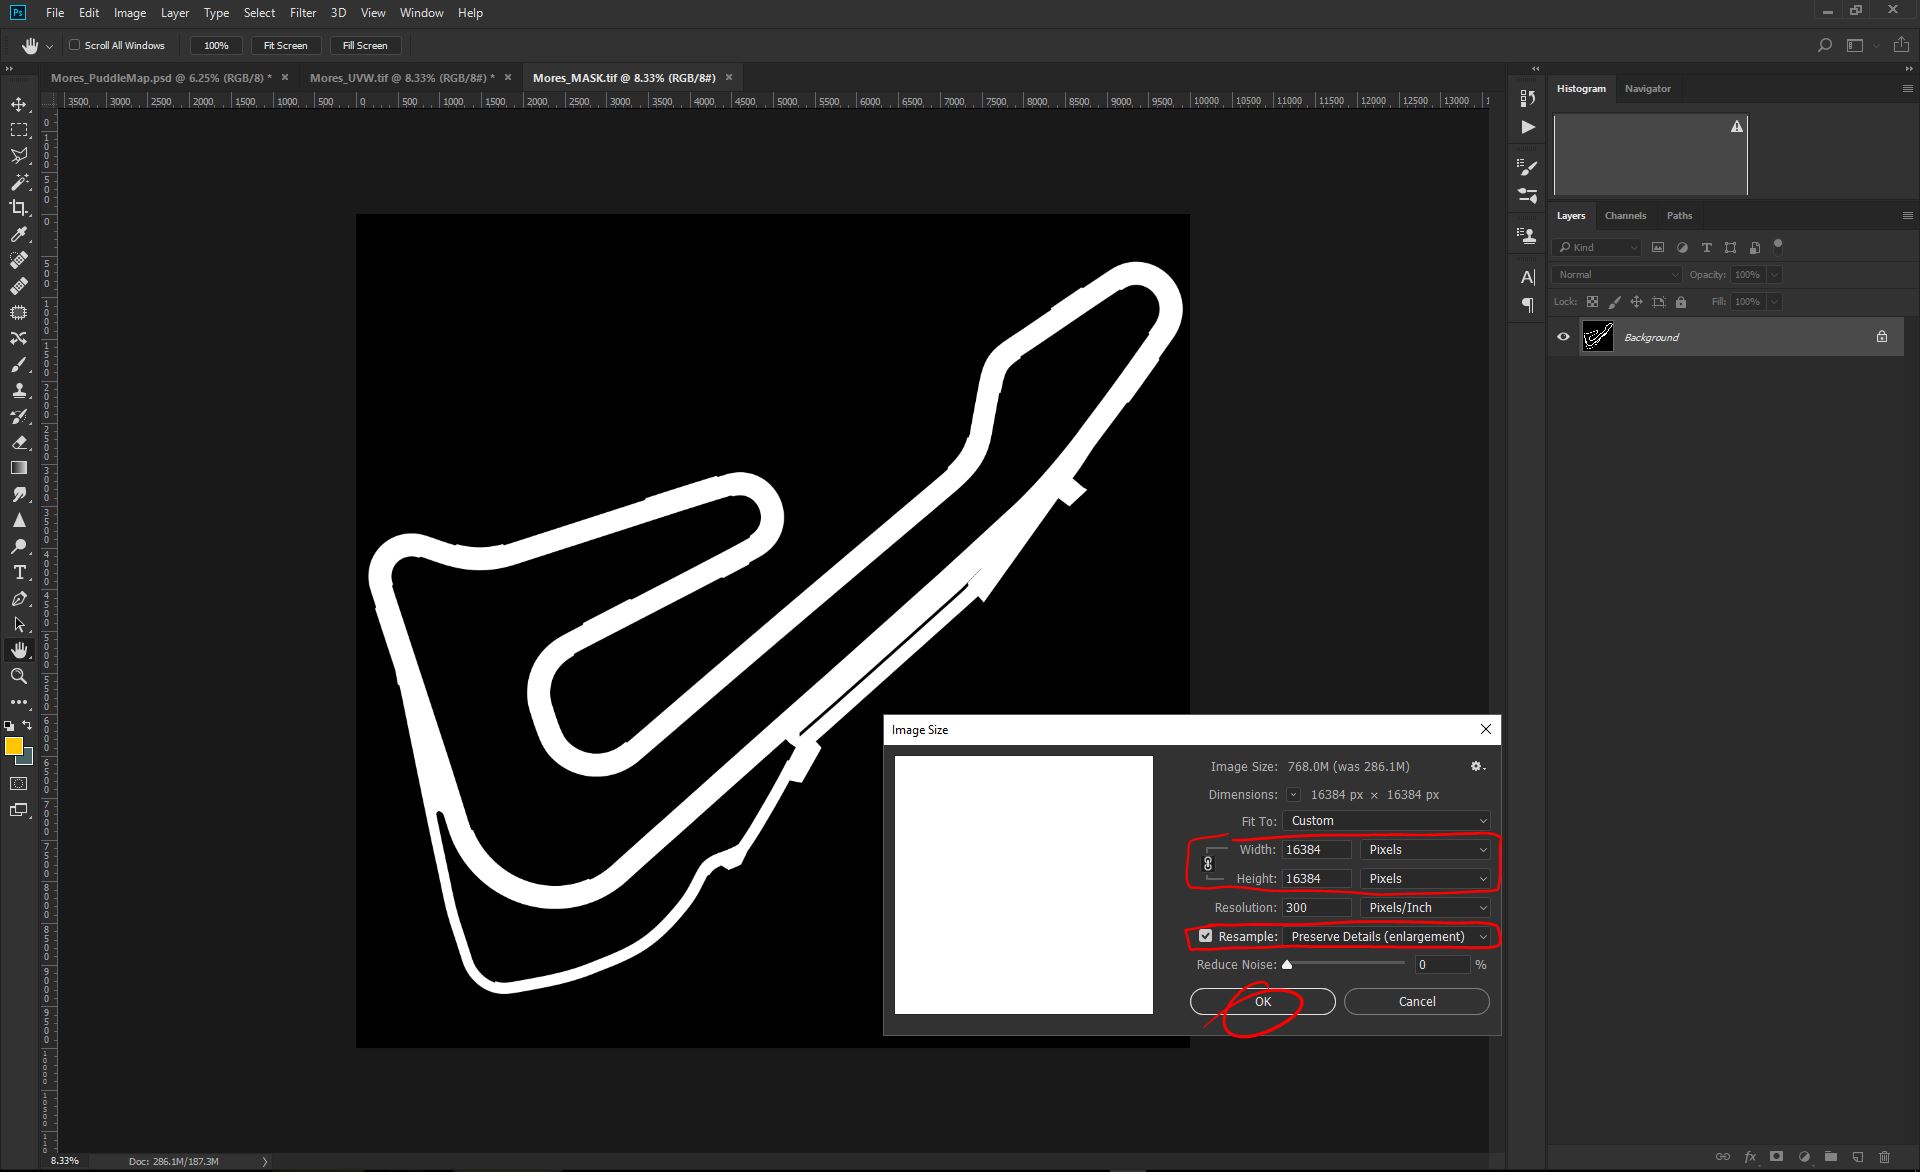
Let's do the same for the UVW template;
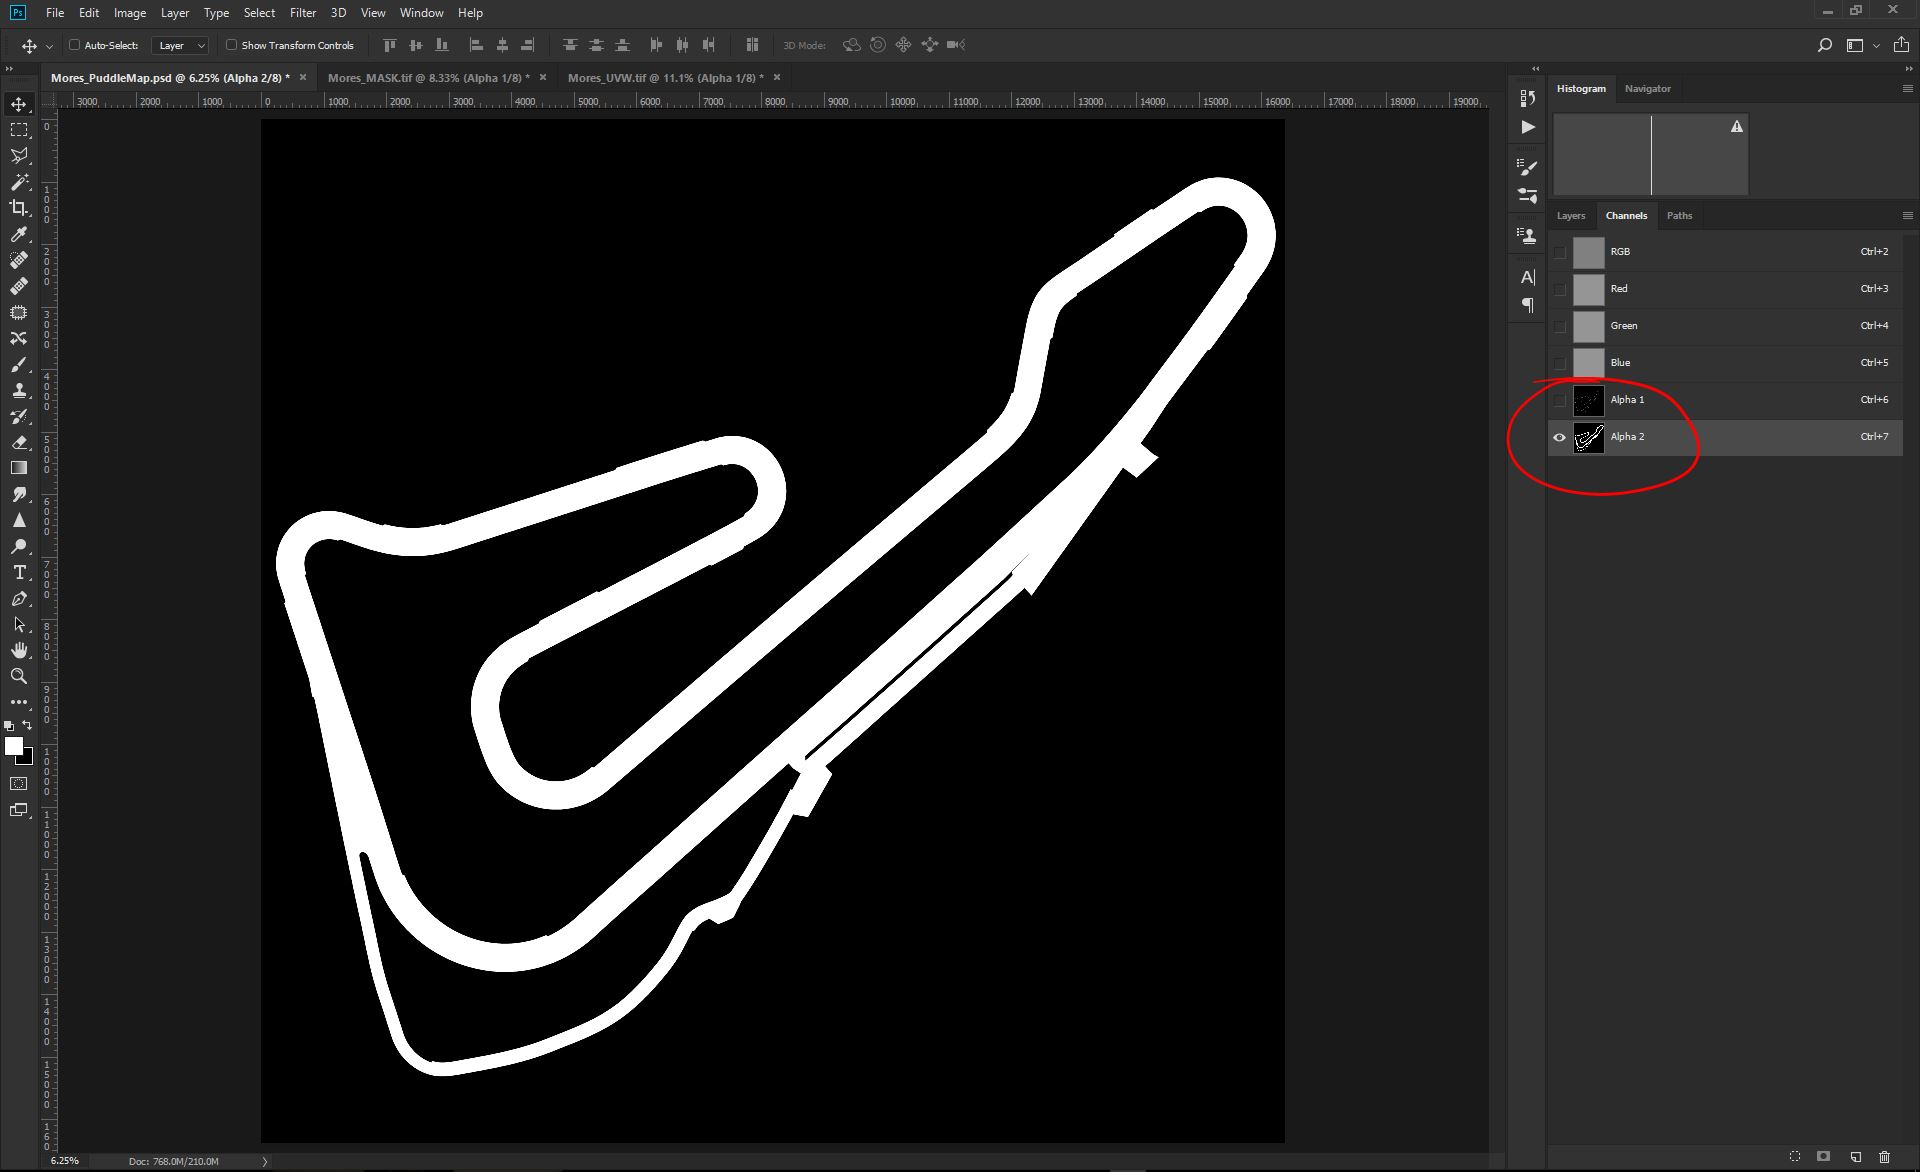
Now that we have the two template of the same size as the Puddle file, we need to copy/paste the alpha channels from both 3Ds Max templates, into the puddle map file. At that point those two templates are not needed anymore and they can be closed.
In this pictures, we dropped the UVW template alpha into our main Puddle PSD, this will give it the name of Alpha 1. Same with the Mask template, we dropped its alpha channel in the main Puddle PSD, and this layer have been named Alpha 2.
Let's save our PuddleMap.PSD before to proceed.
Now, our task is to use the mask alpha, to mask the Layer group we did before, so that what we will paint, will be automatcally masked. This is mostly to give you a clean output, so you don't get lost after couple of minutes of painting.
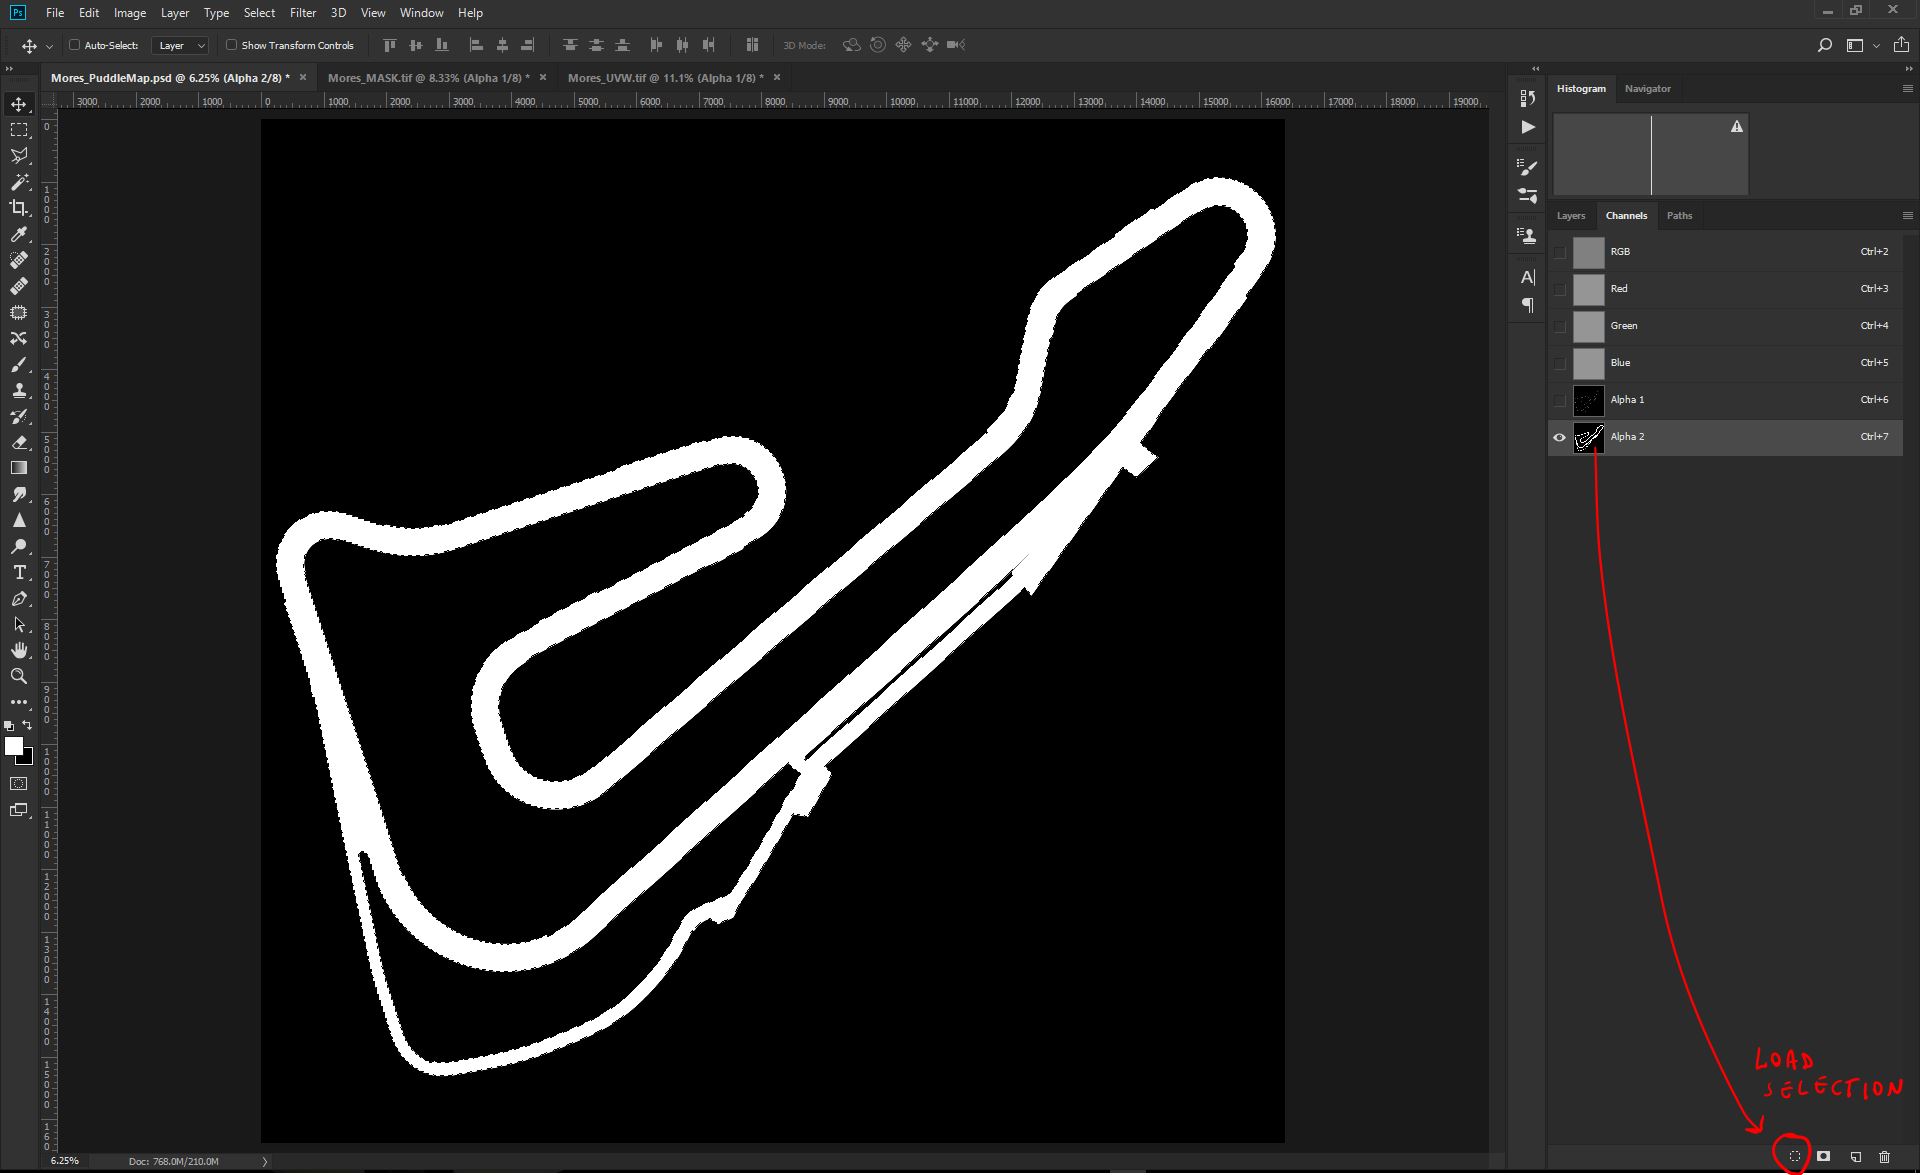
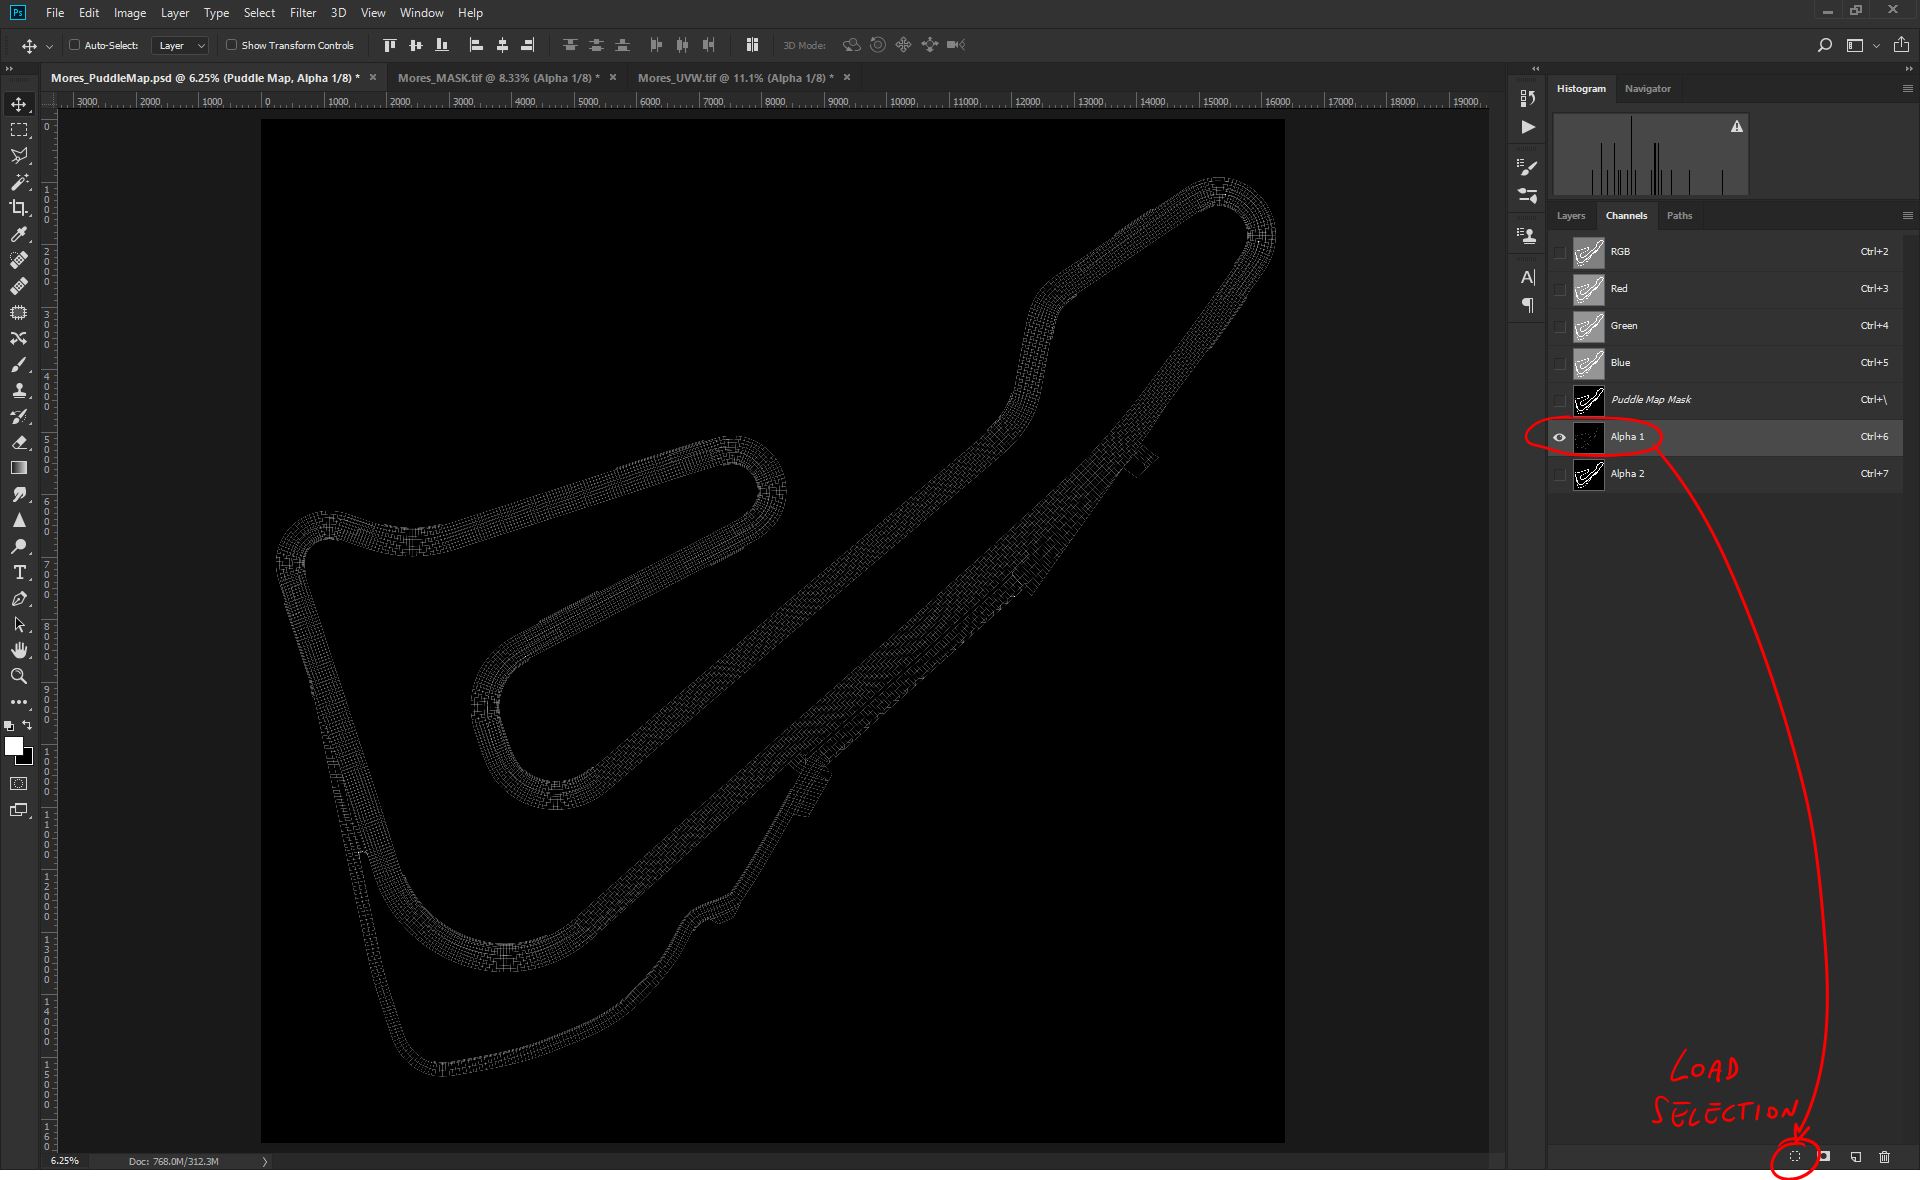
To do so, we can just go Channels, select the Alpha 2 (which is the Mask we need), and click in the small Selection icon, at the bottom of the Channels panel. You can do the same operation just clicking on the Alpha layer, while pressing the CTRL key;
Now that we have the mask selection loaded, we just select the Puddle Map Layer Group, and we do apply the mask, clicking on the small Mask icon at the bottom of the Layer panel.
We also need a Base layer at the bottom of that Layer Group, filled with 100% white, to be used as base for our Puddle Map. This is what you should get;
Now we need the UVW template reference, and to create one we can just go in the Channels panel, select the Alpha 1 (which is our UVW template from 3Ds Max), and create a selection, through the small button at the bottom of the panel, or just clicking on the Alpha layer while pressing the CTRL key;
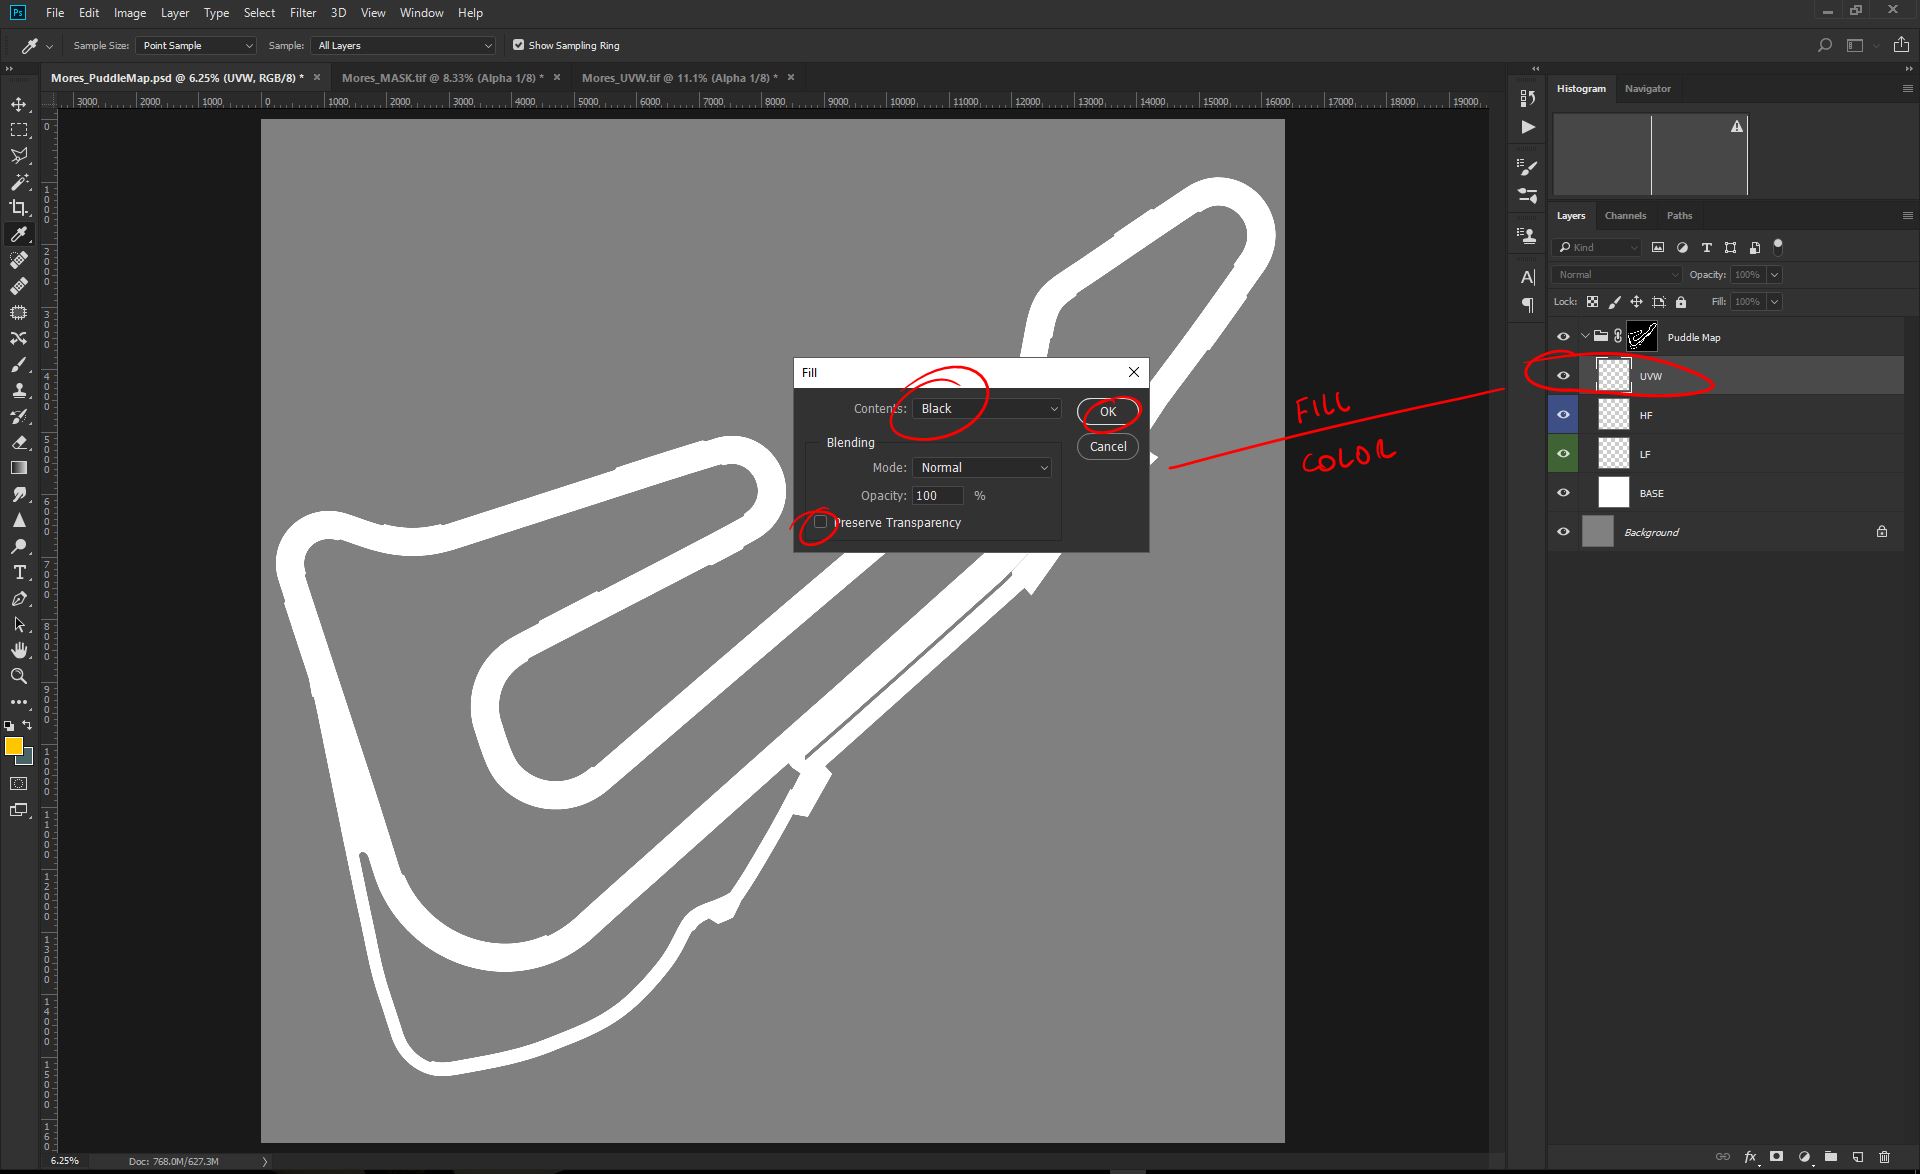
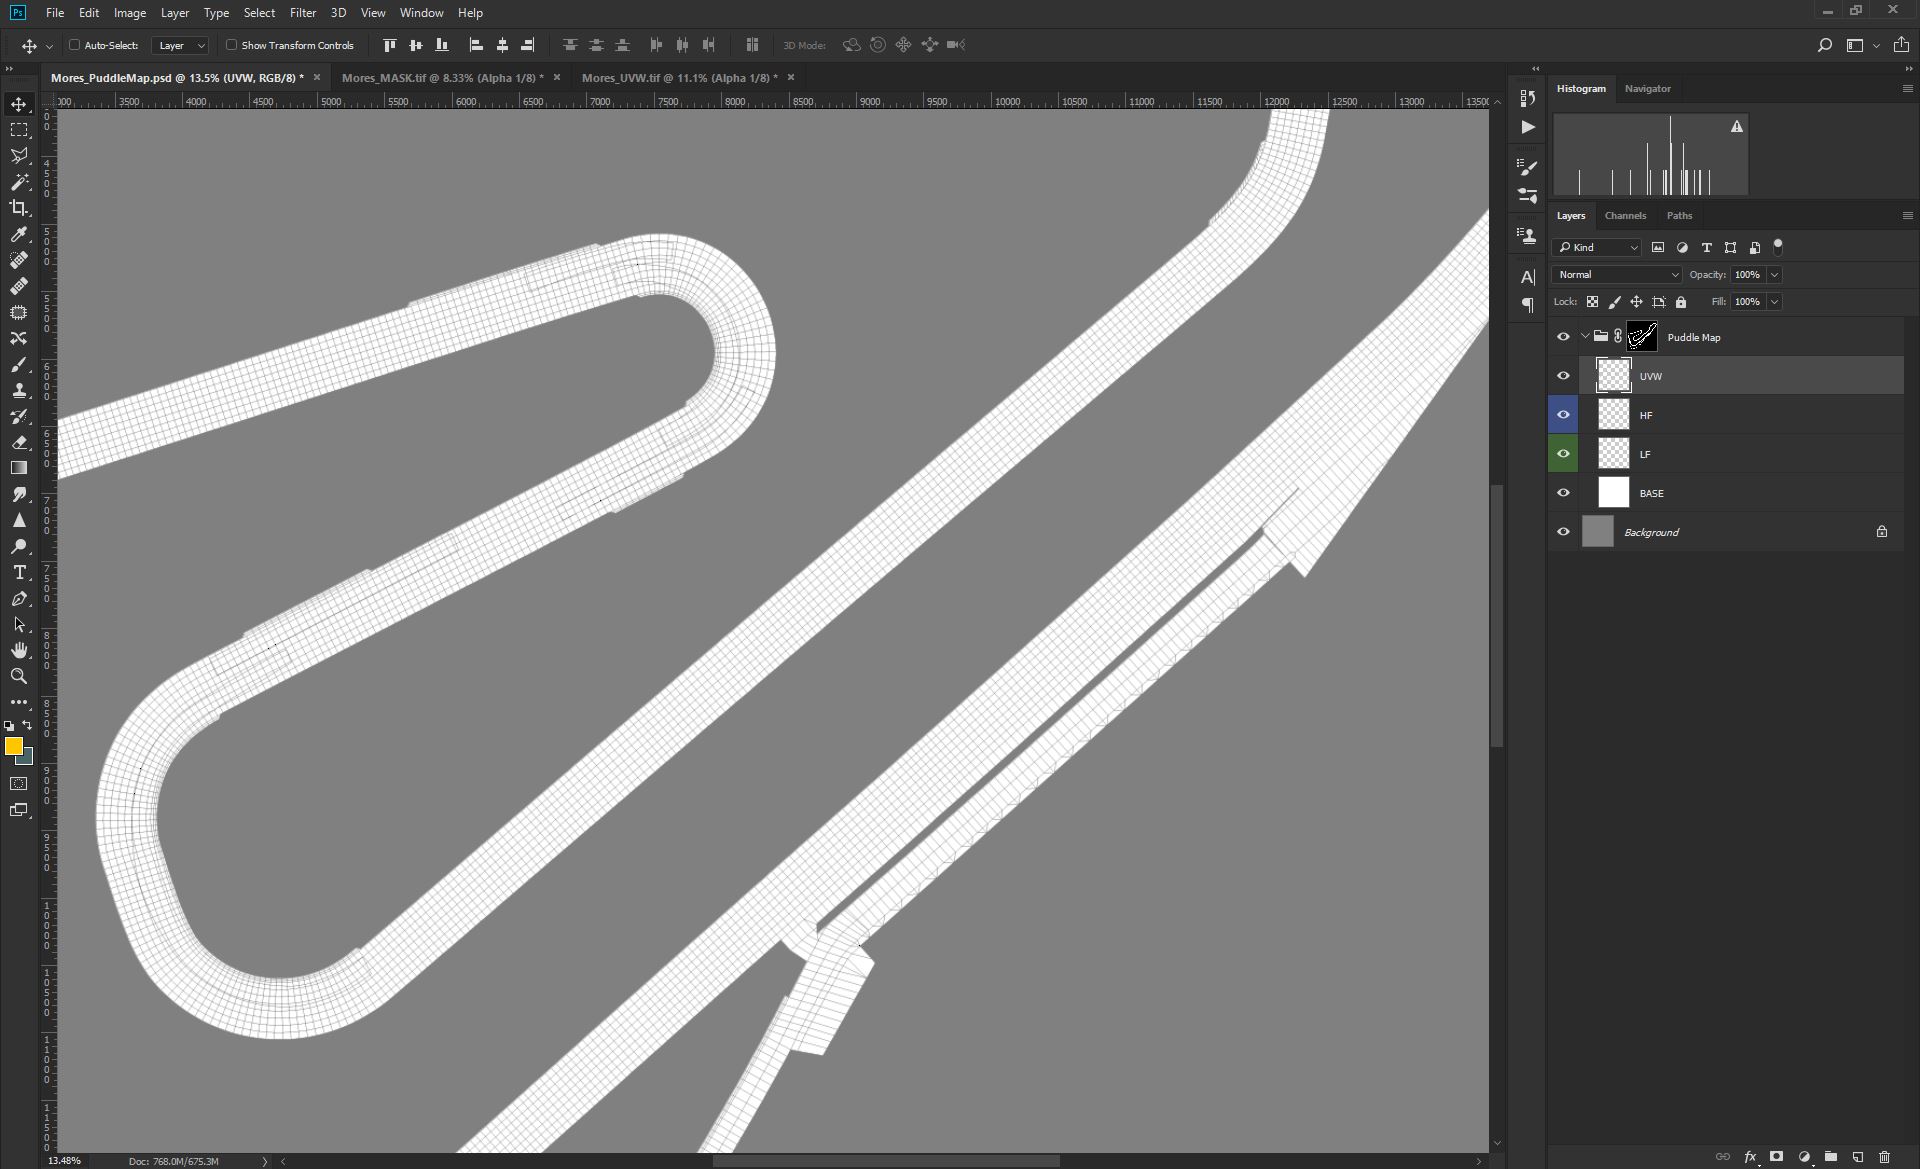
Now, again, let's go back to the Layers panel, create a new layer on top of the stack (call it UVW), and Fill it with Black color. This will produce our UVW wireframe reference layer;
Now we have everything in place, and our PuddleMap.PSD is ready for the paint job;
The PuddleMap, if possible, should be based on reference materials from the real place, and possibly that have been recorded in the same years that our Sim Track is representing.
For this specific case, Mores 2012 in Sardinia, we've used many wet onboard videos recorded in between 2012 and 2014, to be used as visual reference to map our PuddleMap.
Always remember that there is always a random/chaos factor when it comes to dampness, as there are so many variables playing in that area, that mean you don't have to go nuts to achieve extreme accuracy in the painting, especially in the low frequency side. Just do your best to make it looking as much similar as the real one, in similar conditions.
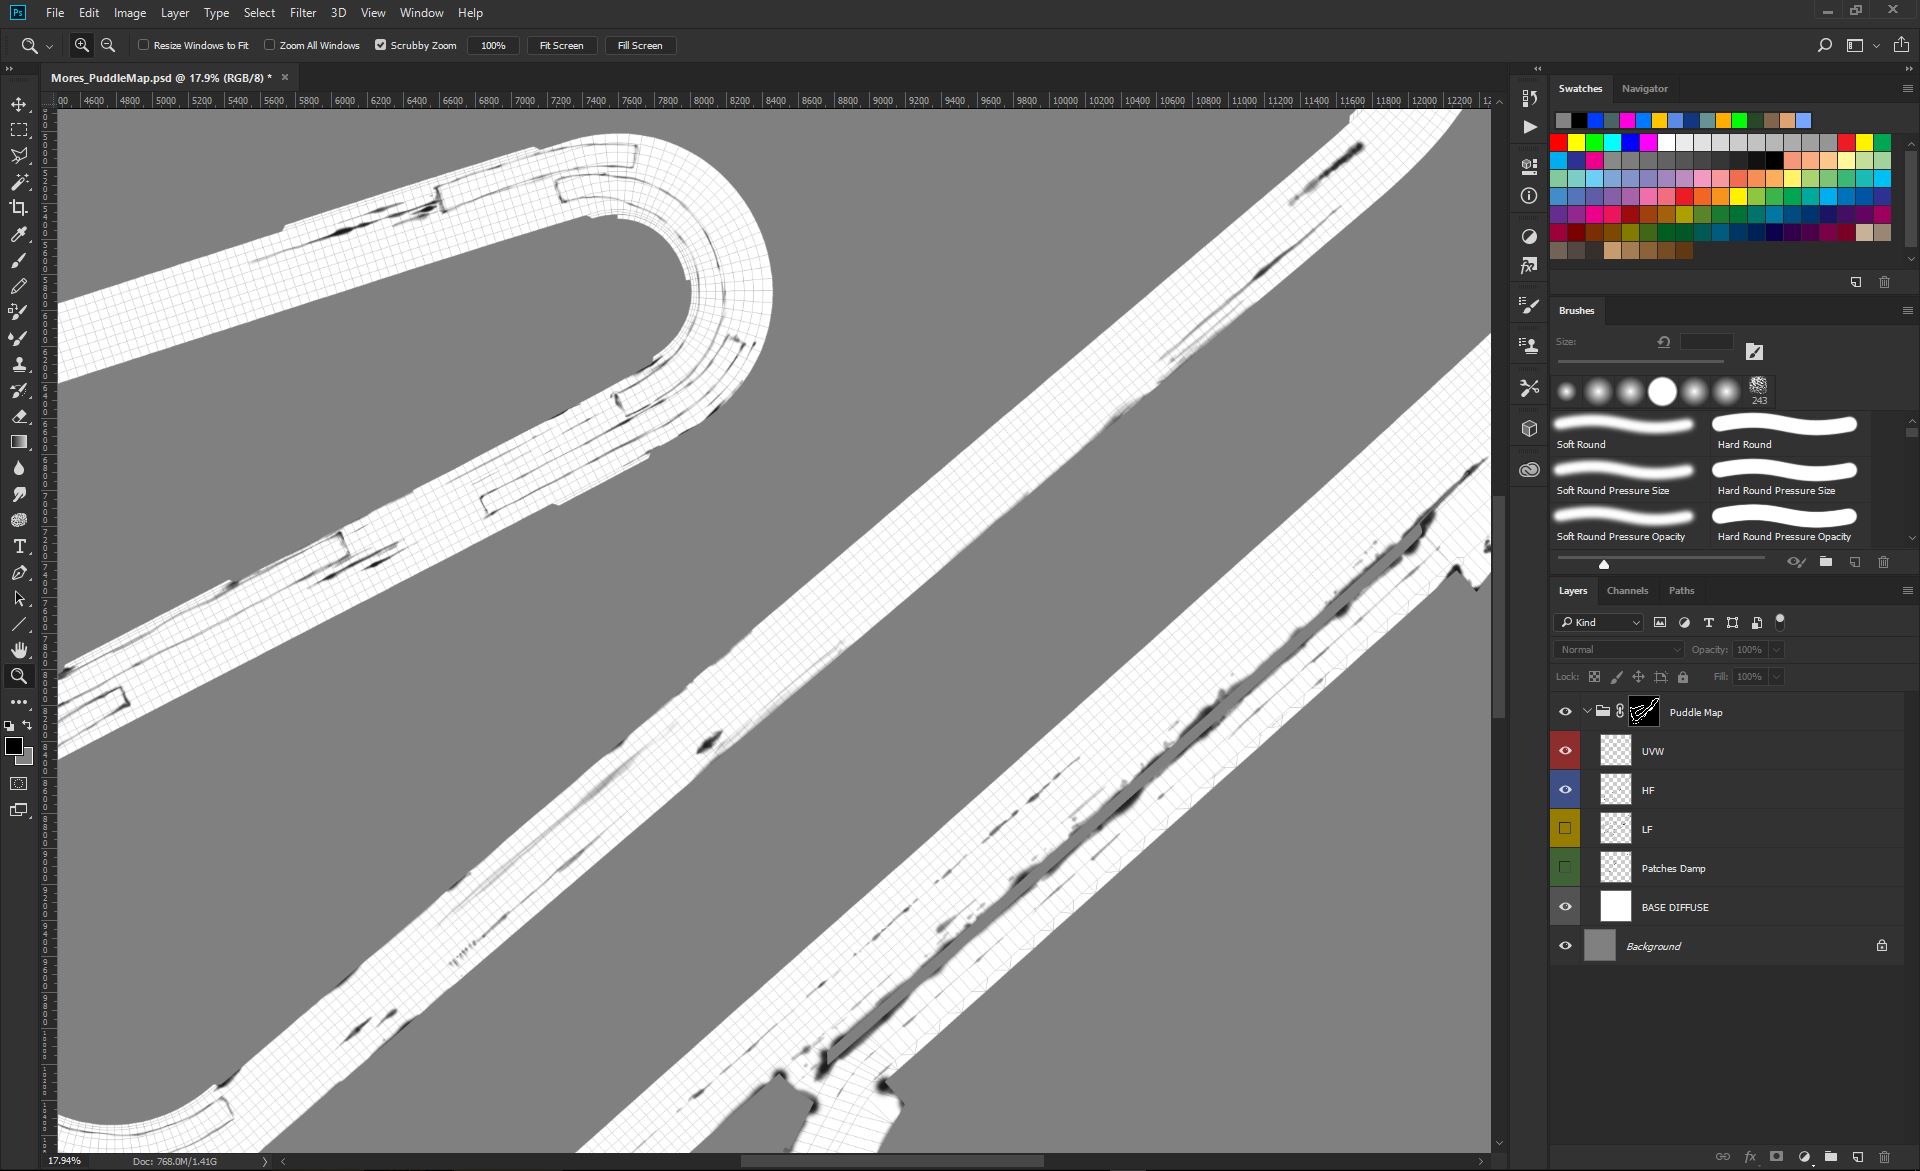
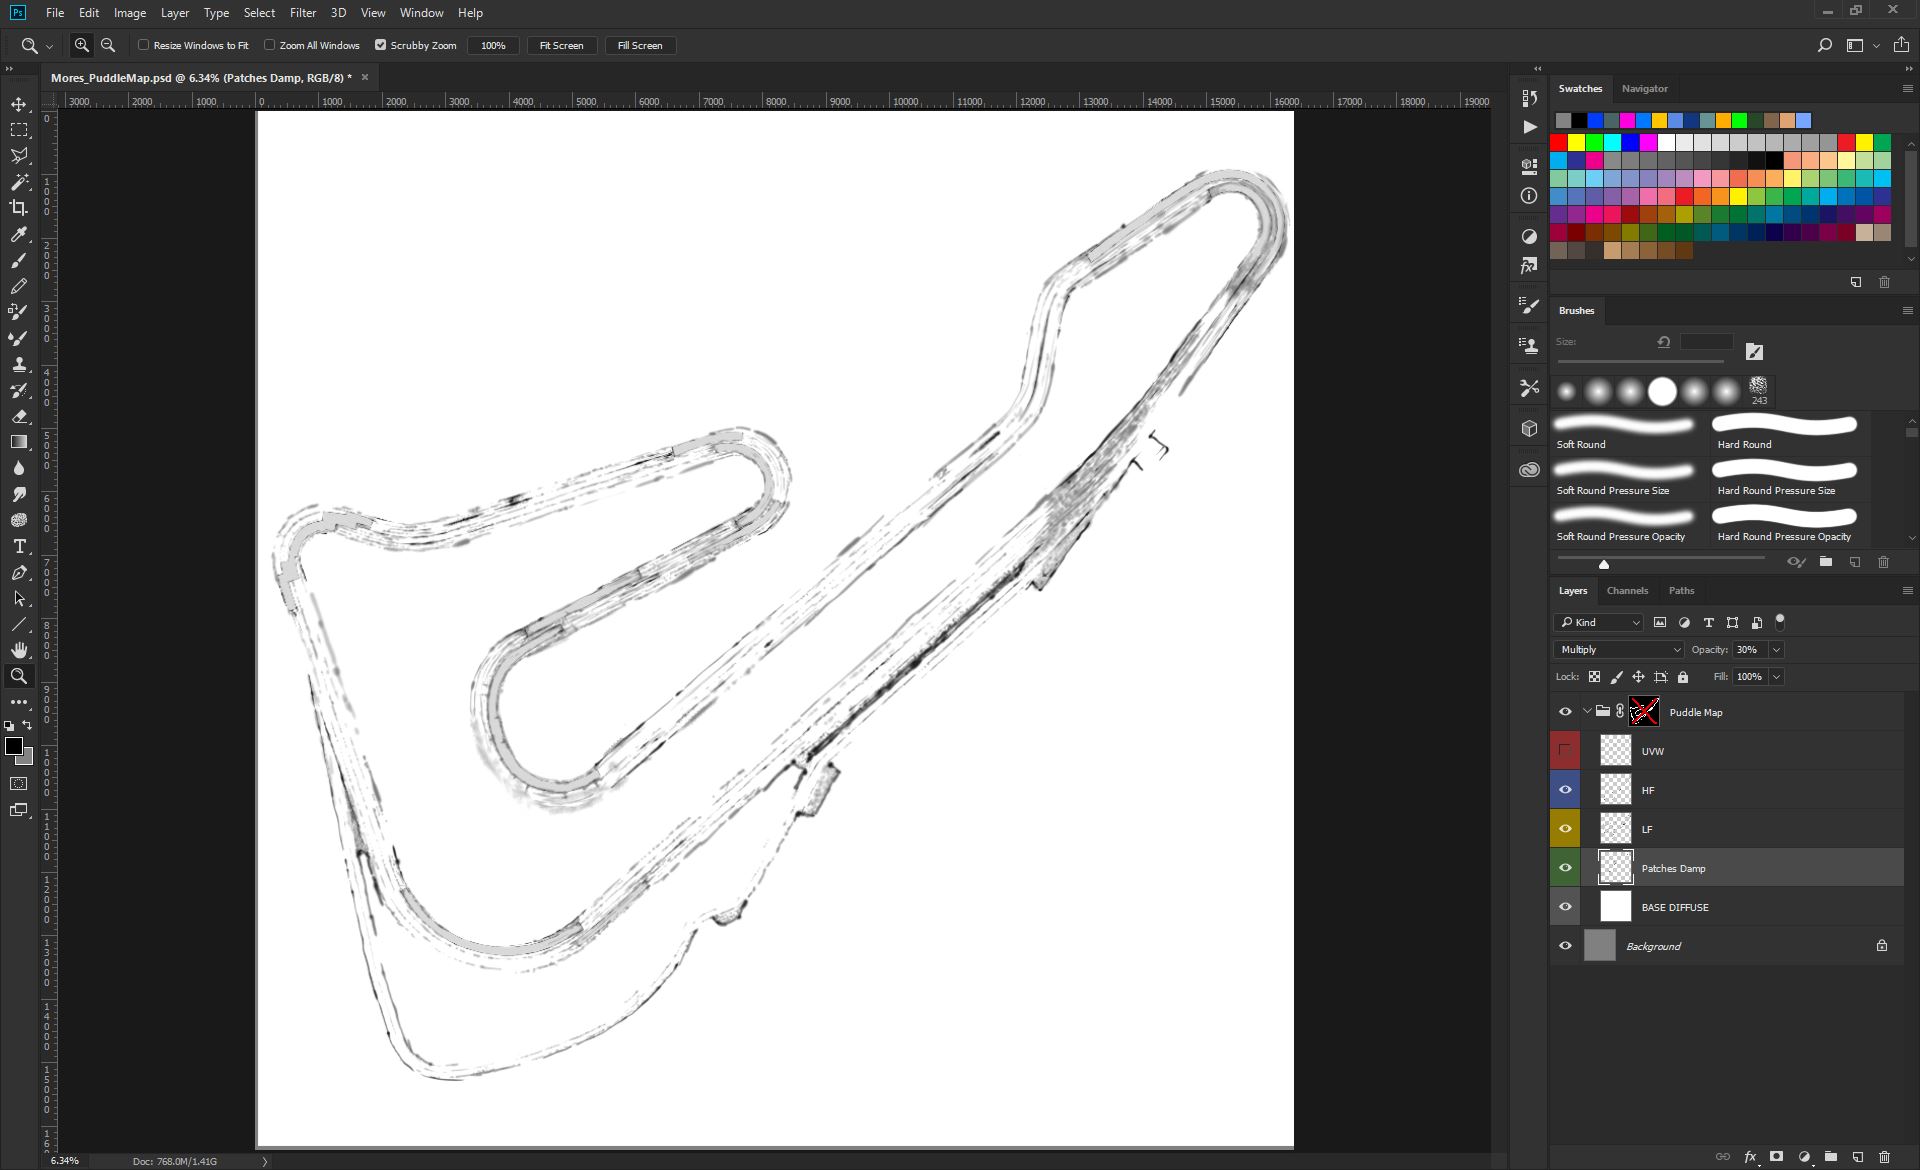
This is the HF layer, with all the puddle maps, and every place where we want standing water. You recognize these are using the darker ink in the scale. More darker means more depth in the dip/hole so use that ink where we want standing water building up.
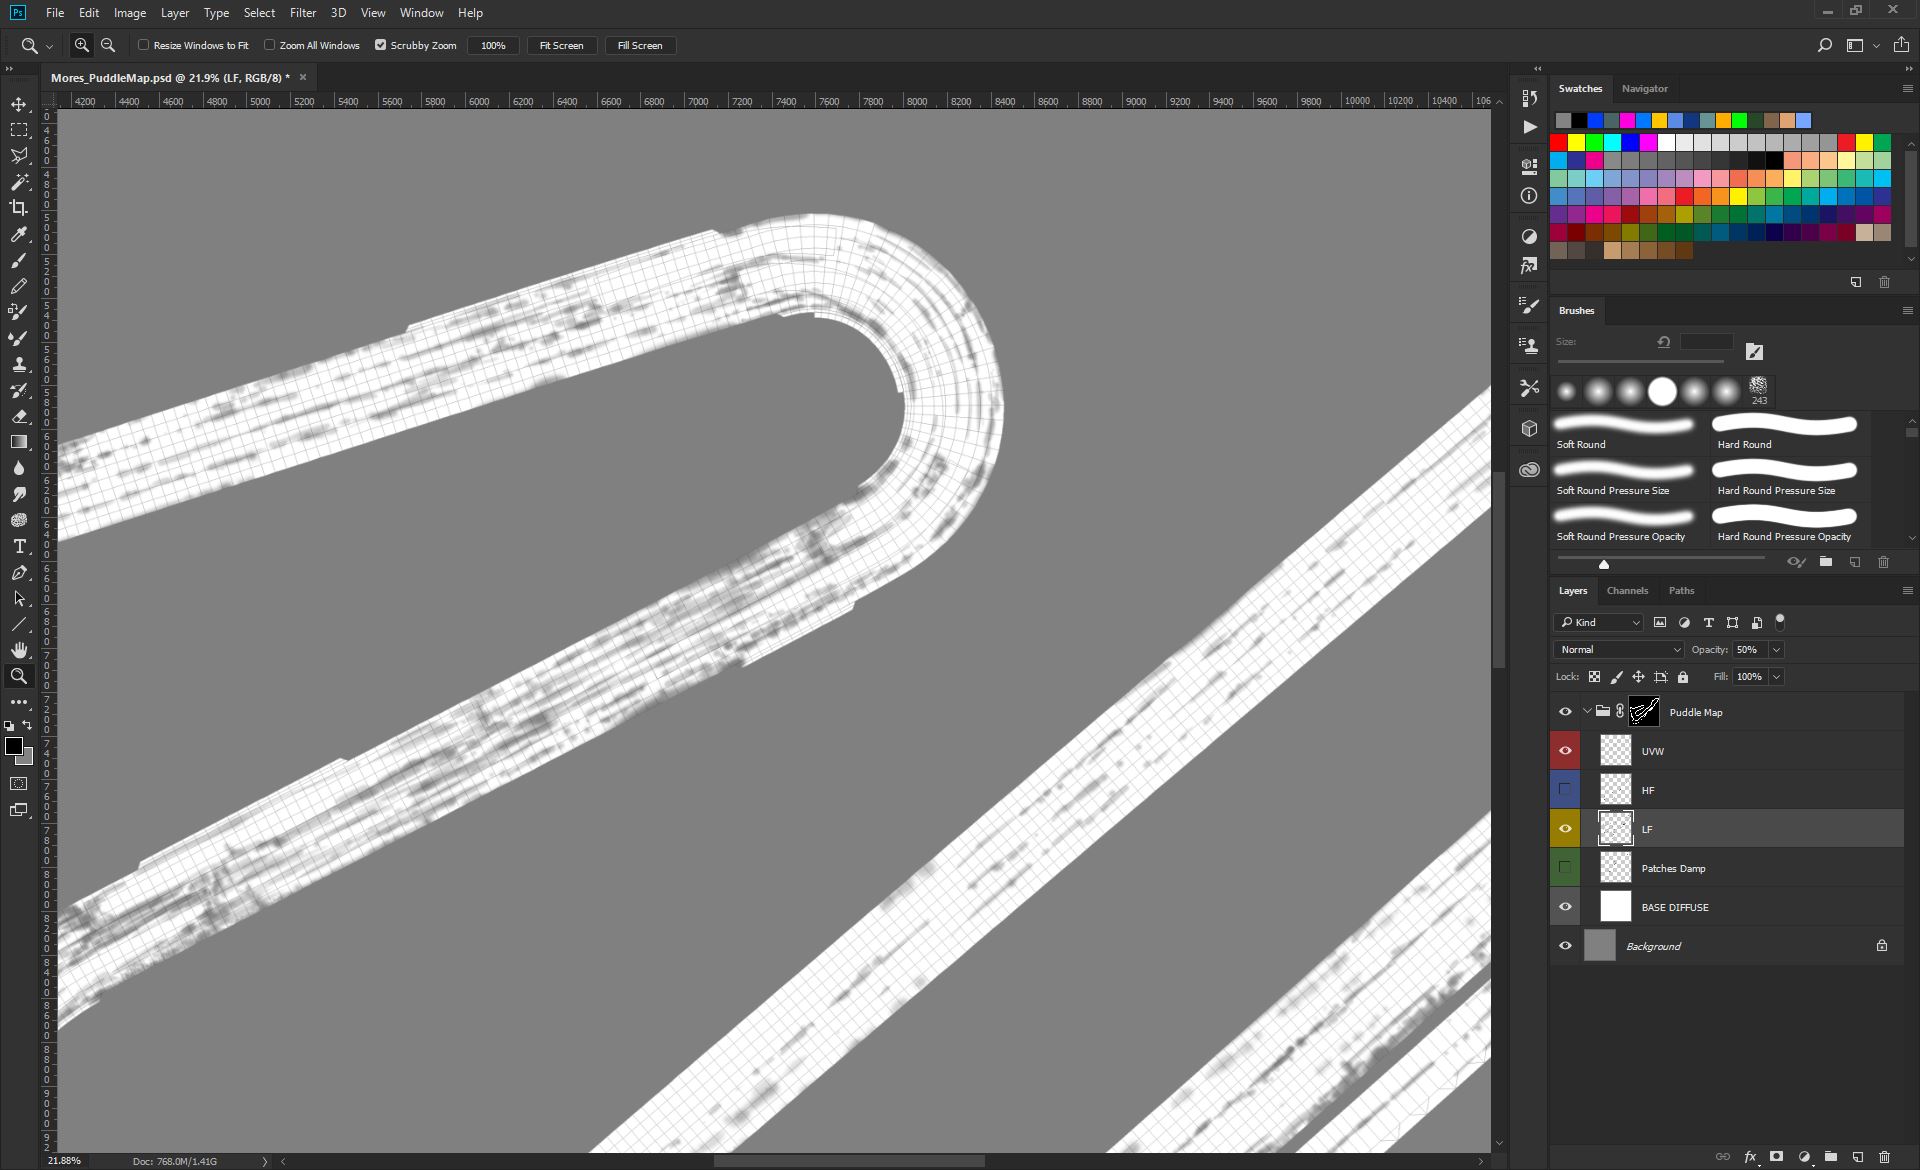
This is the LF layer, with high dampness patches;
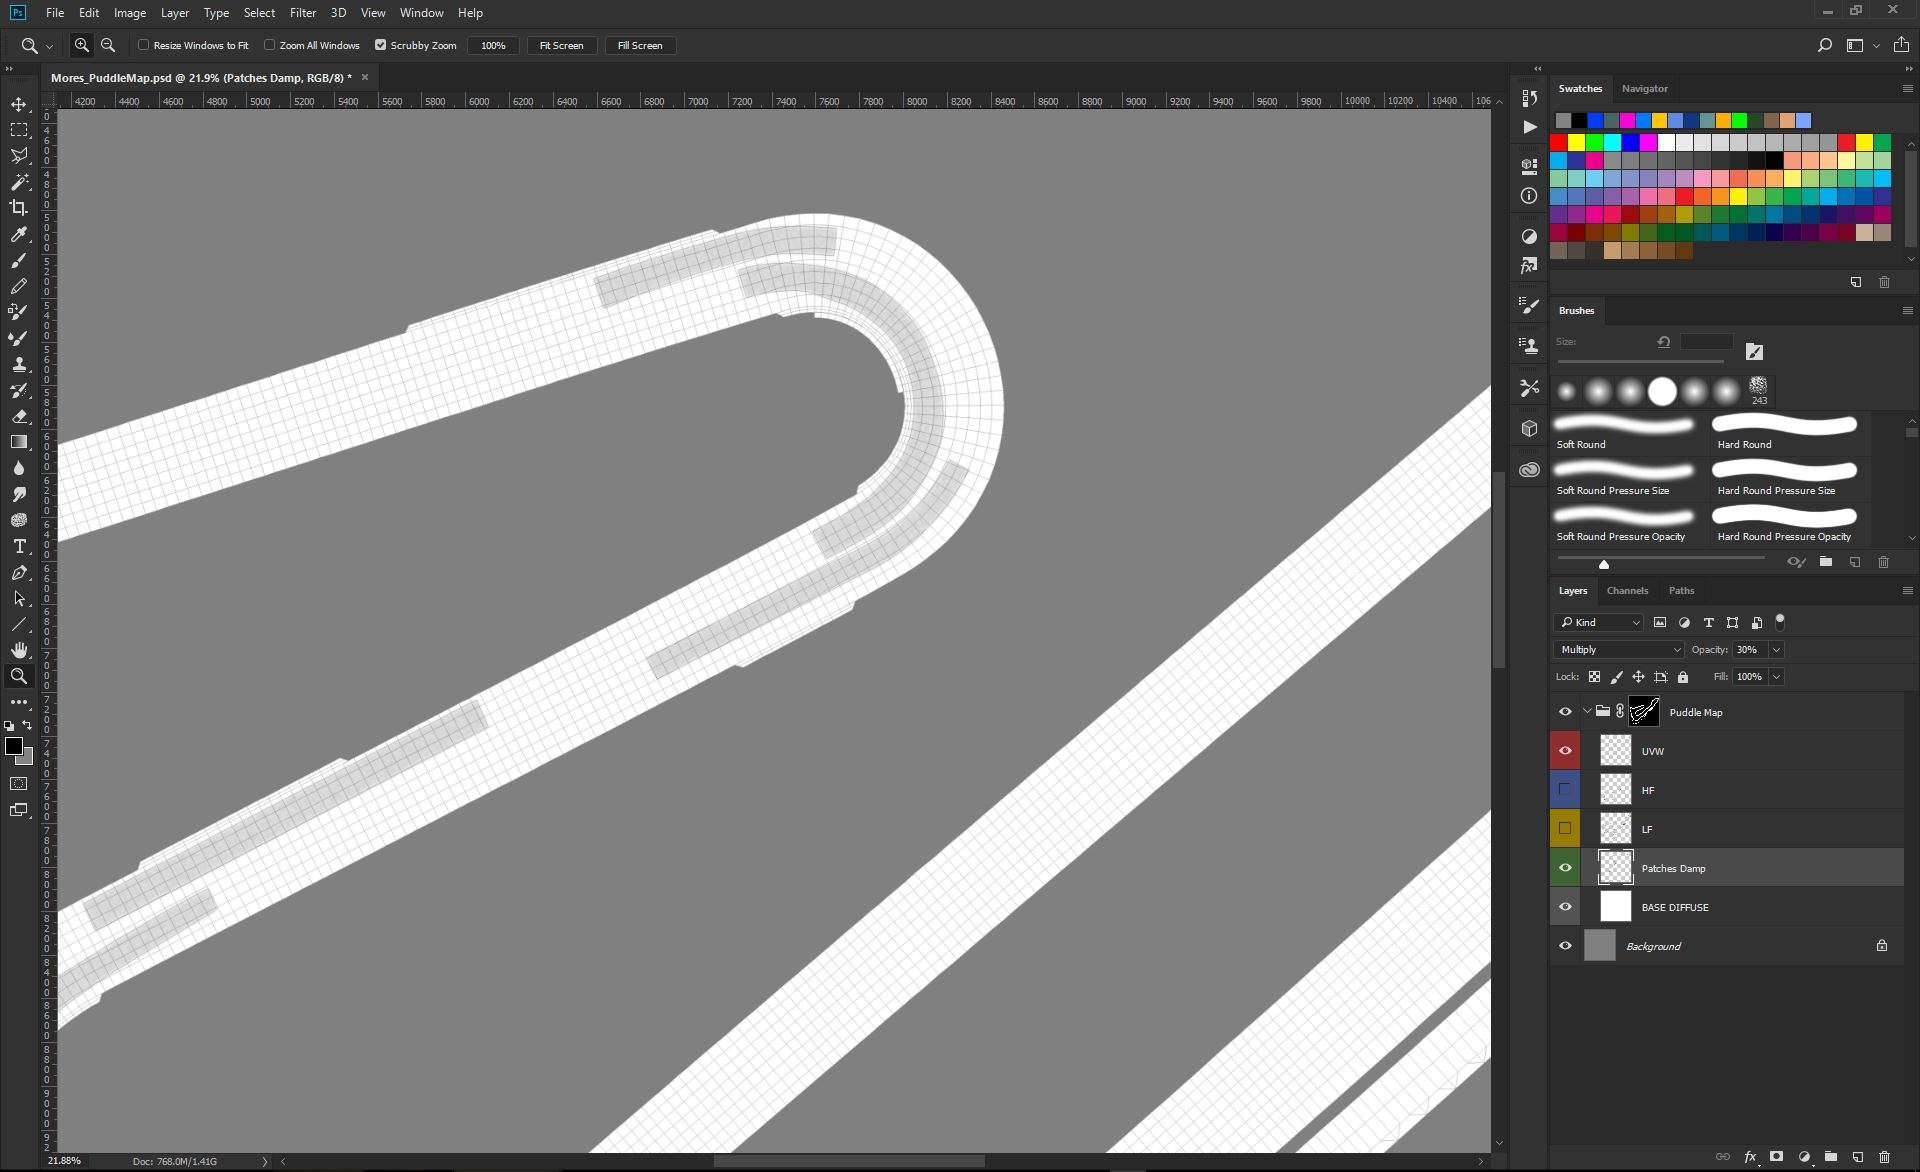
And, in this specific case for Mores, we have added and extra layer to give those low drainage patches, more dampness than the rest of the tarmac;
This is all layers composed together;
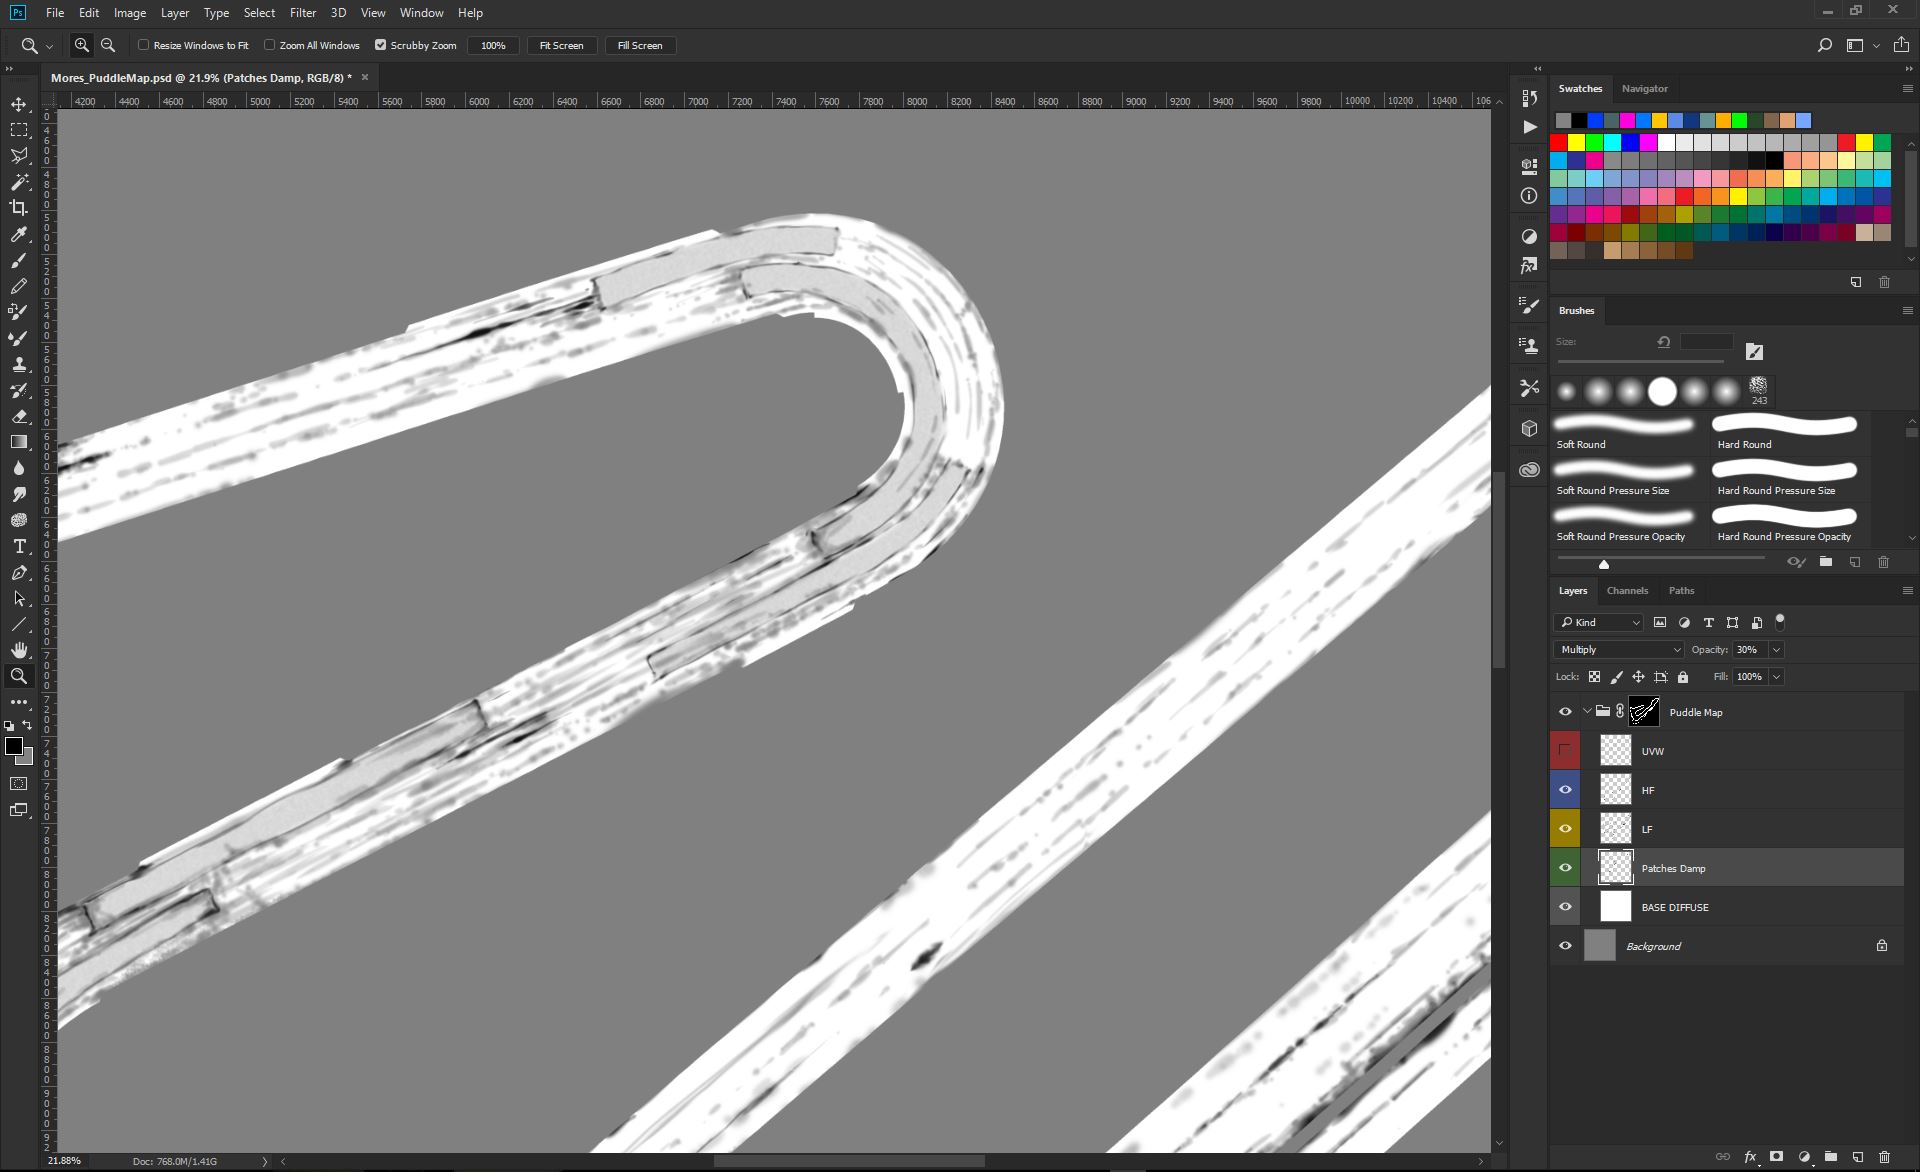
And this is the final composition, ready to be downscaled, and pasted in the Asphalt_Spec.dds DXT5 texture.
Don't be scared by the look of it. This is the extreme condition (storm) of a very worn out road surface, as Mores had (and still have), at the time of the survey. The RainFX code and Shaders, will build up dampness and fill up the puddles, along the time, and depending on the rain severity. The puddle map does represent the dips and other ground depressions, completely filled of water. BTW, you may have much less puddles and patches, in a more clean tarmac track. Every track, tells a different story. ![]() ;
;
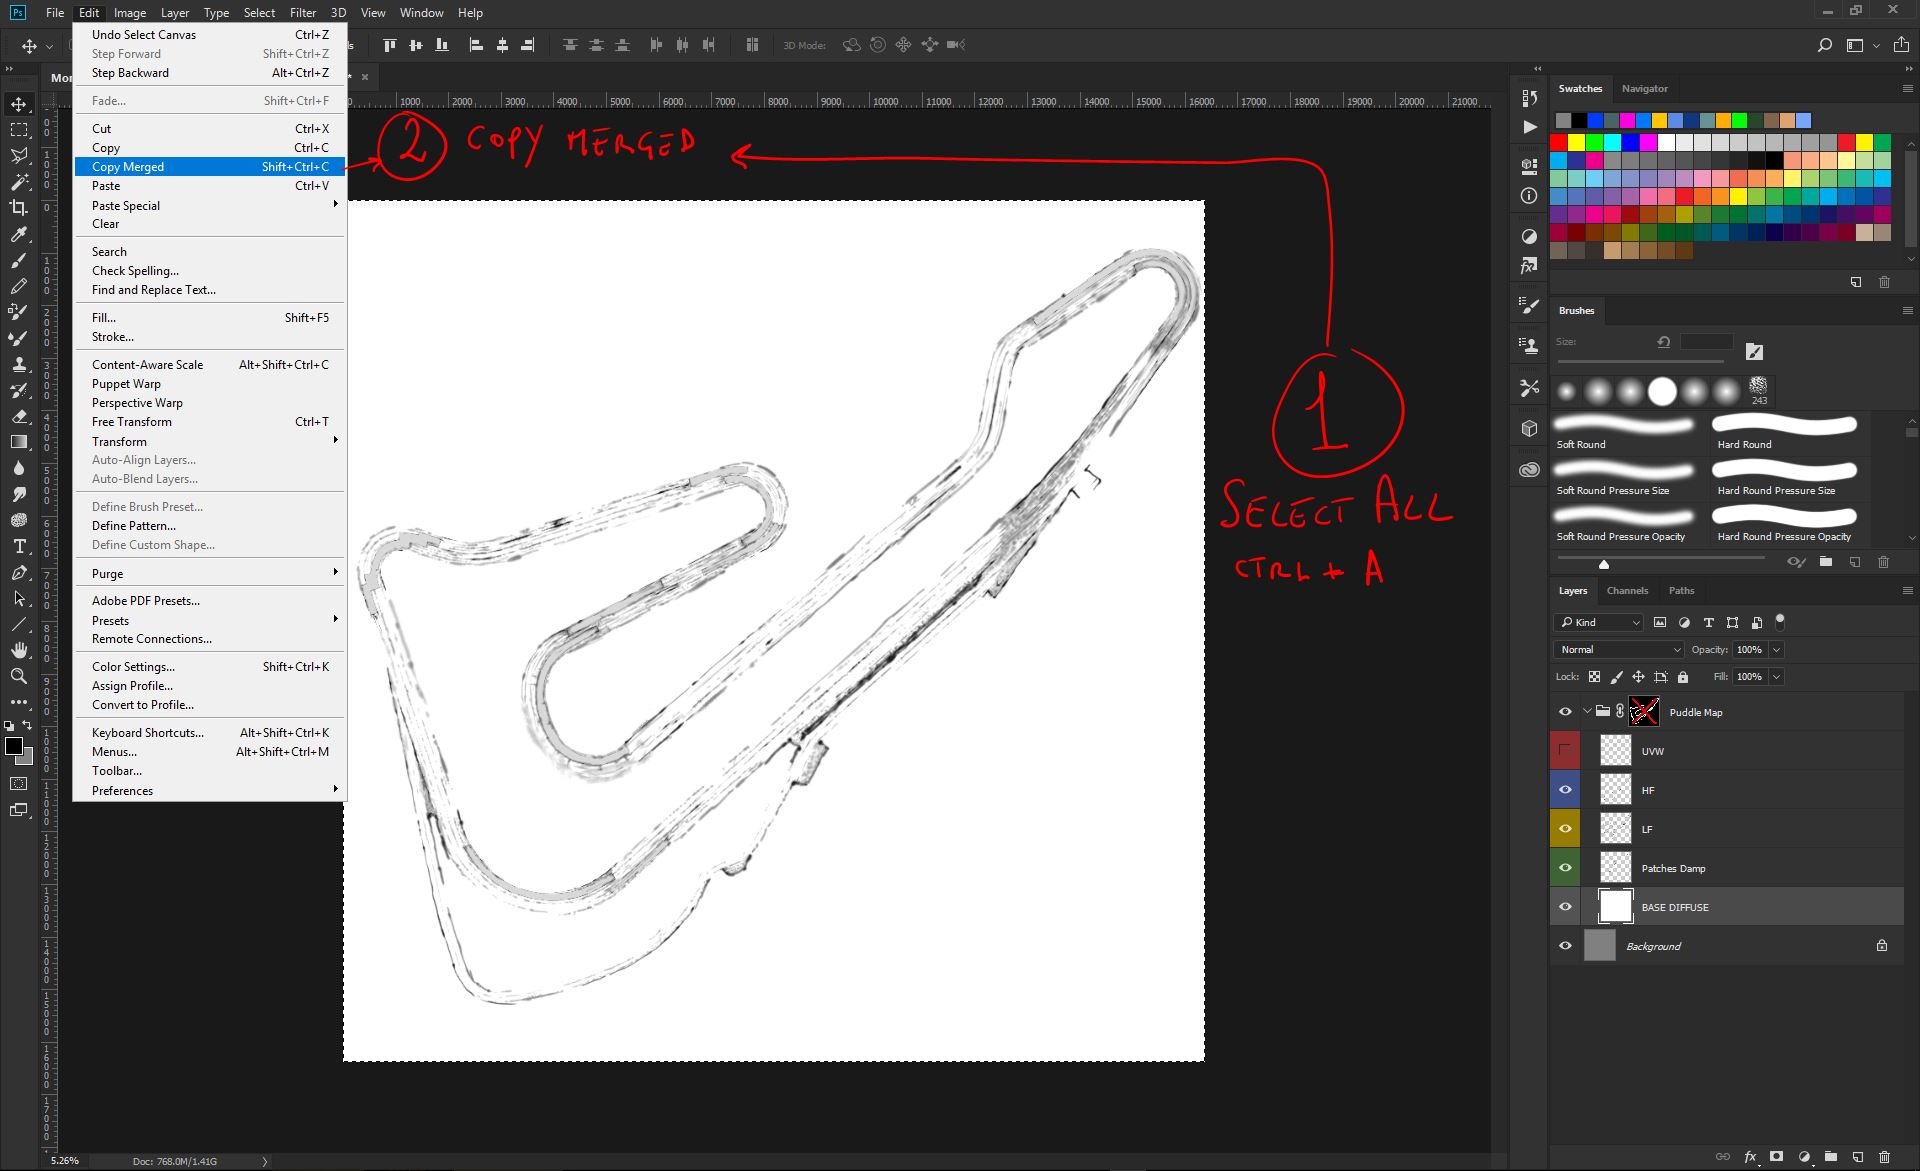
Final steps now.
Select all and Copy Merged (this way you are copying the visible status, not the single selected layer);
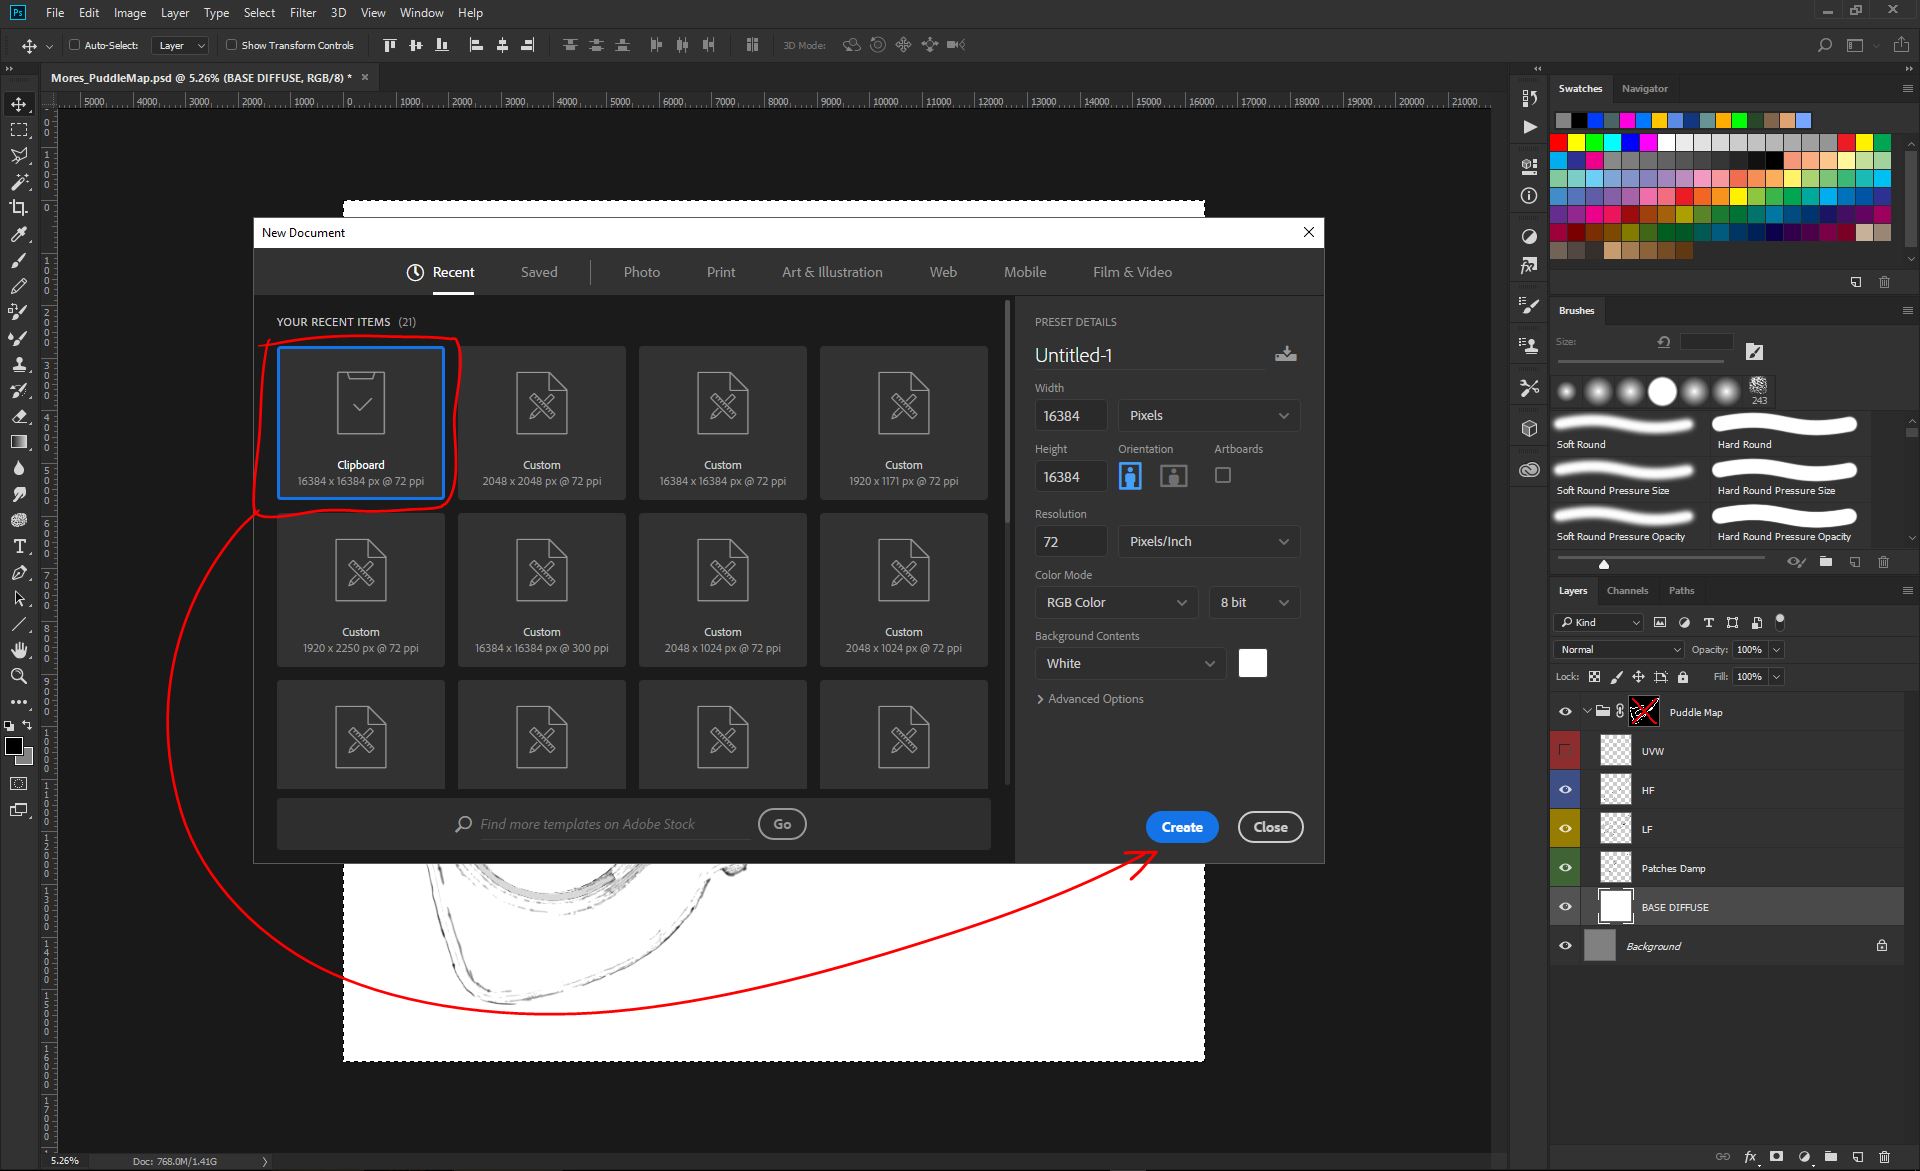
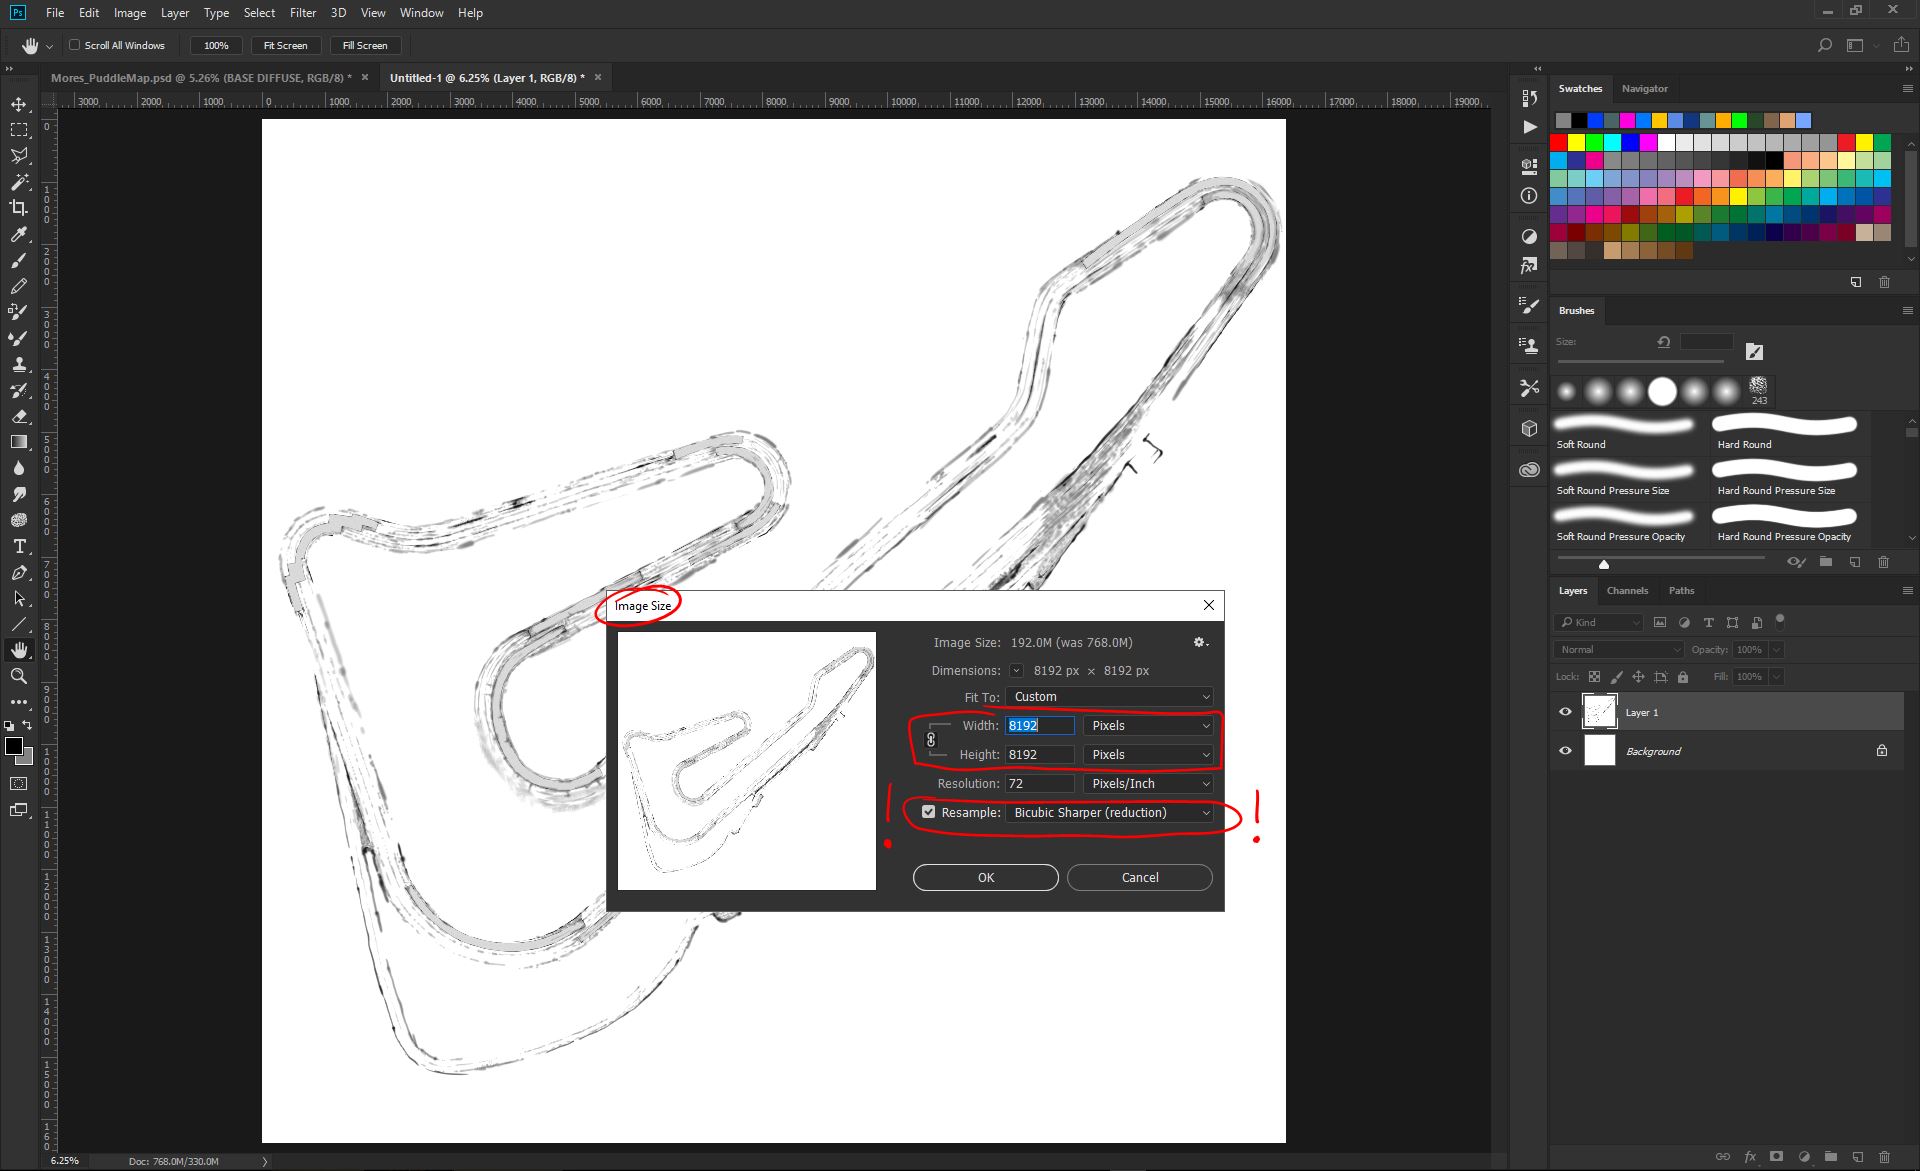
Now create a new document, with the same size as the Clipboard;
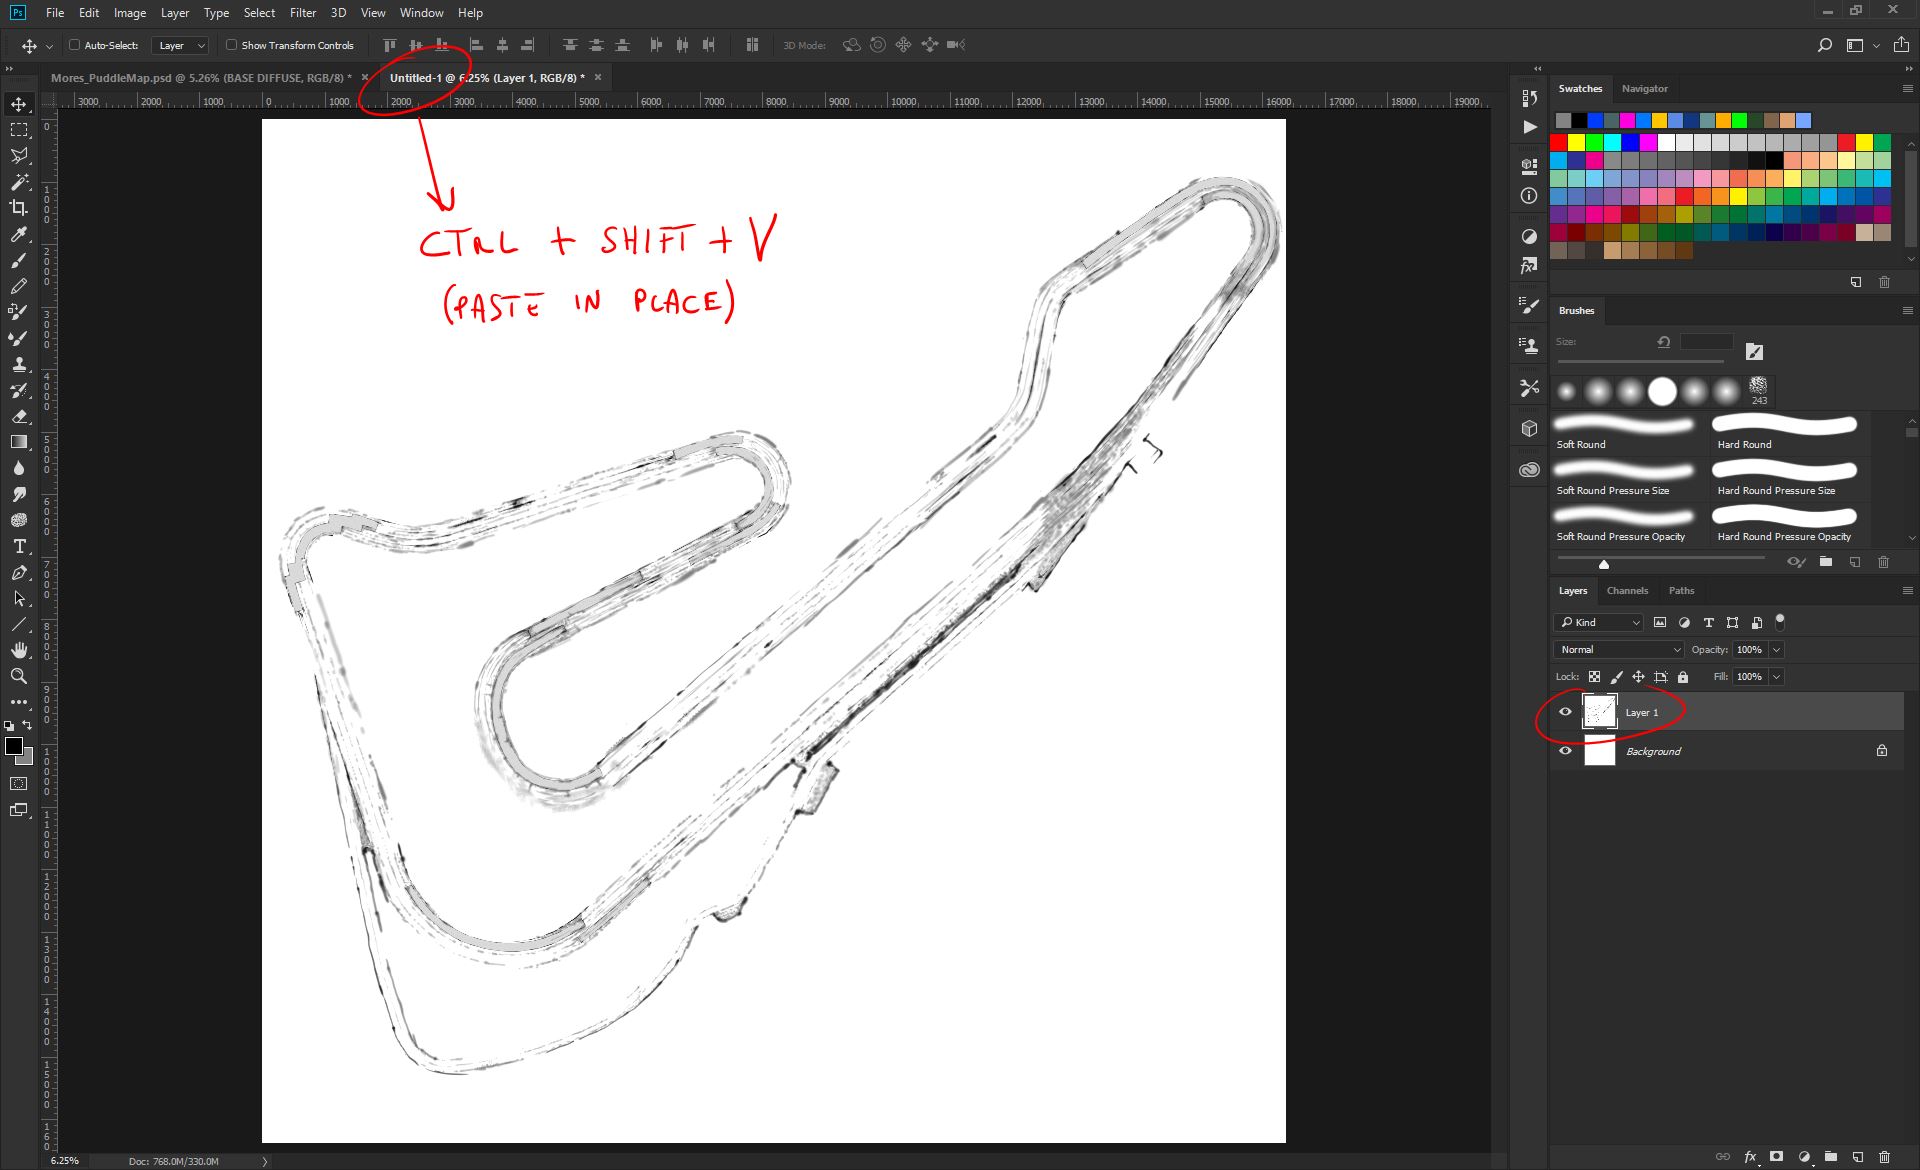
Now paste in place the clipboard, so that you'll drop the composed puddle map into the stack;
Now we are pretty much ready for the 16K--→8K downsample. Be sure to use the Bicubic Sharper resample method for the riduction;
Now, as before, select all and Copy. Be sure you have the puddle map layer selected;
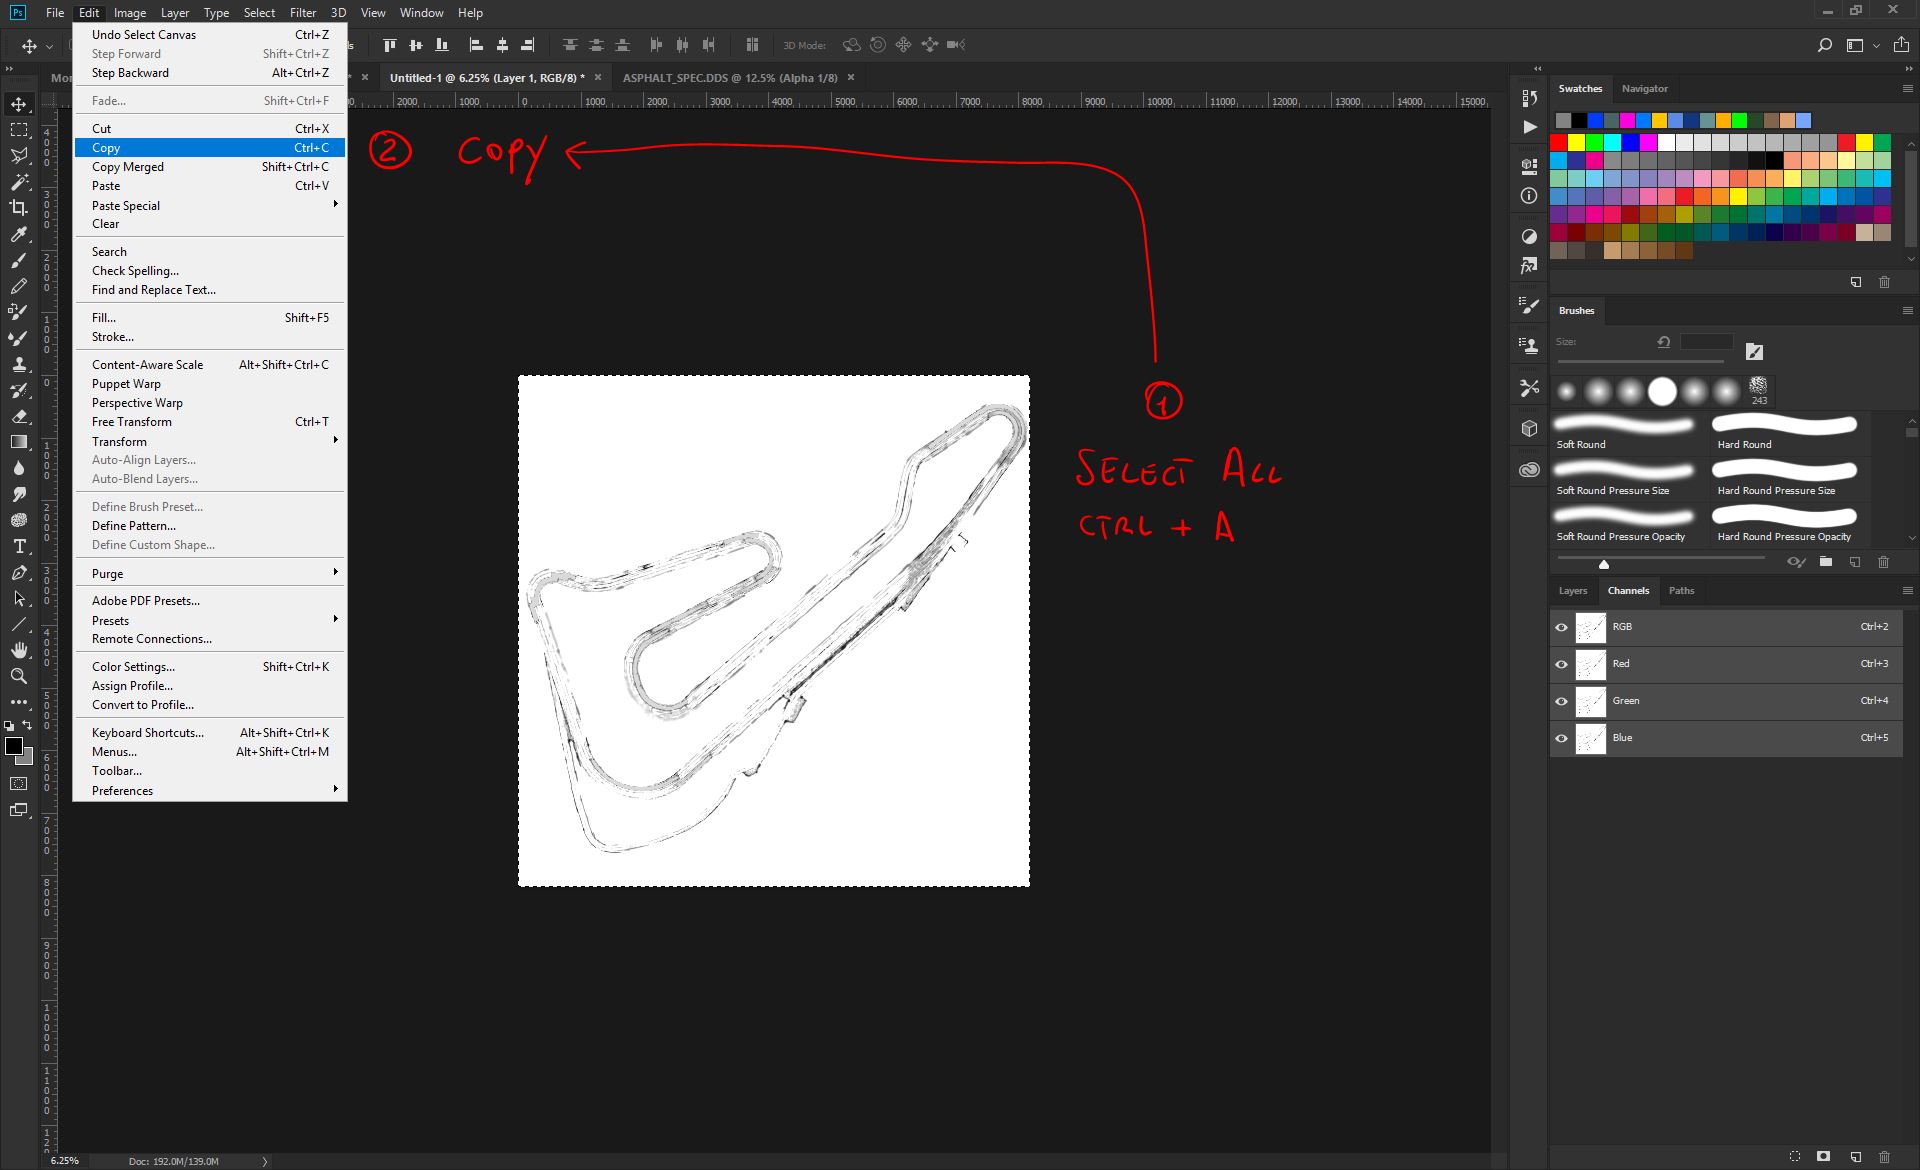
Now you have the puddle map in the memory clipboard.
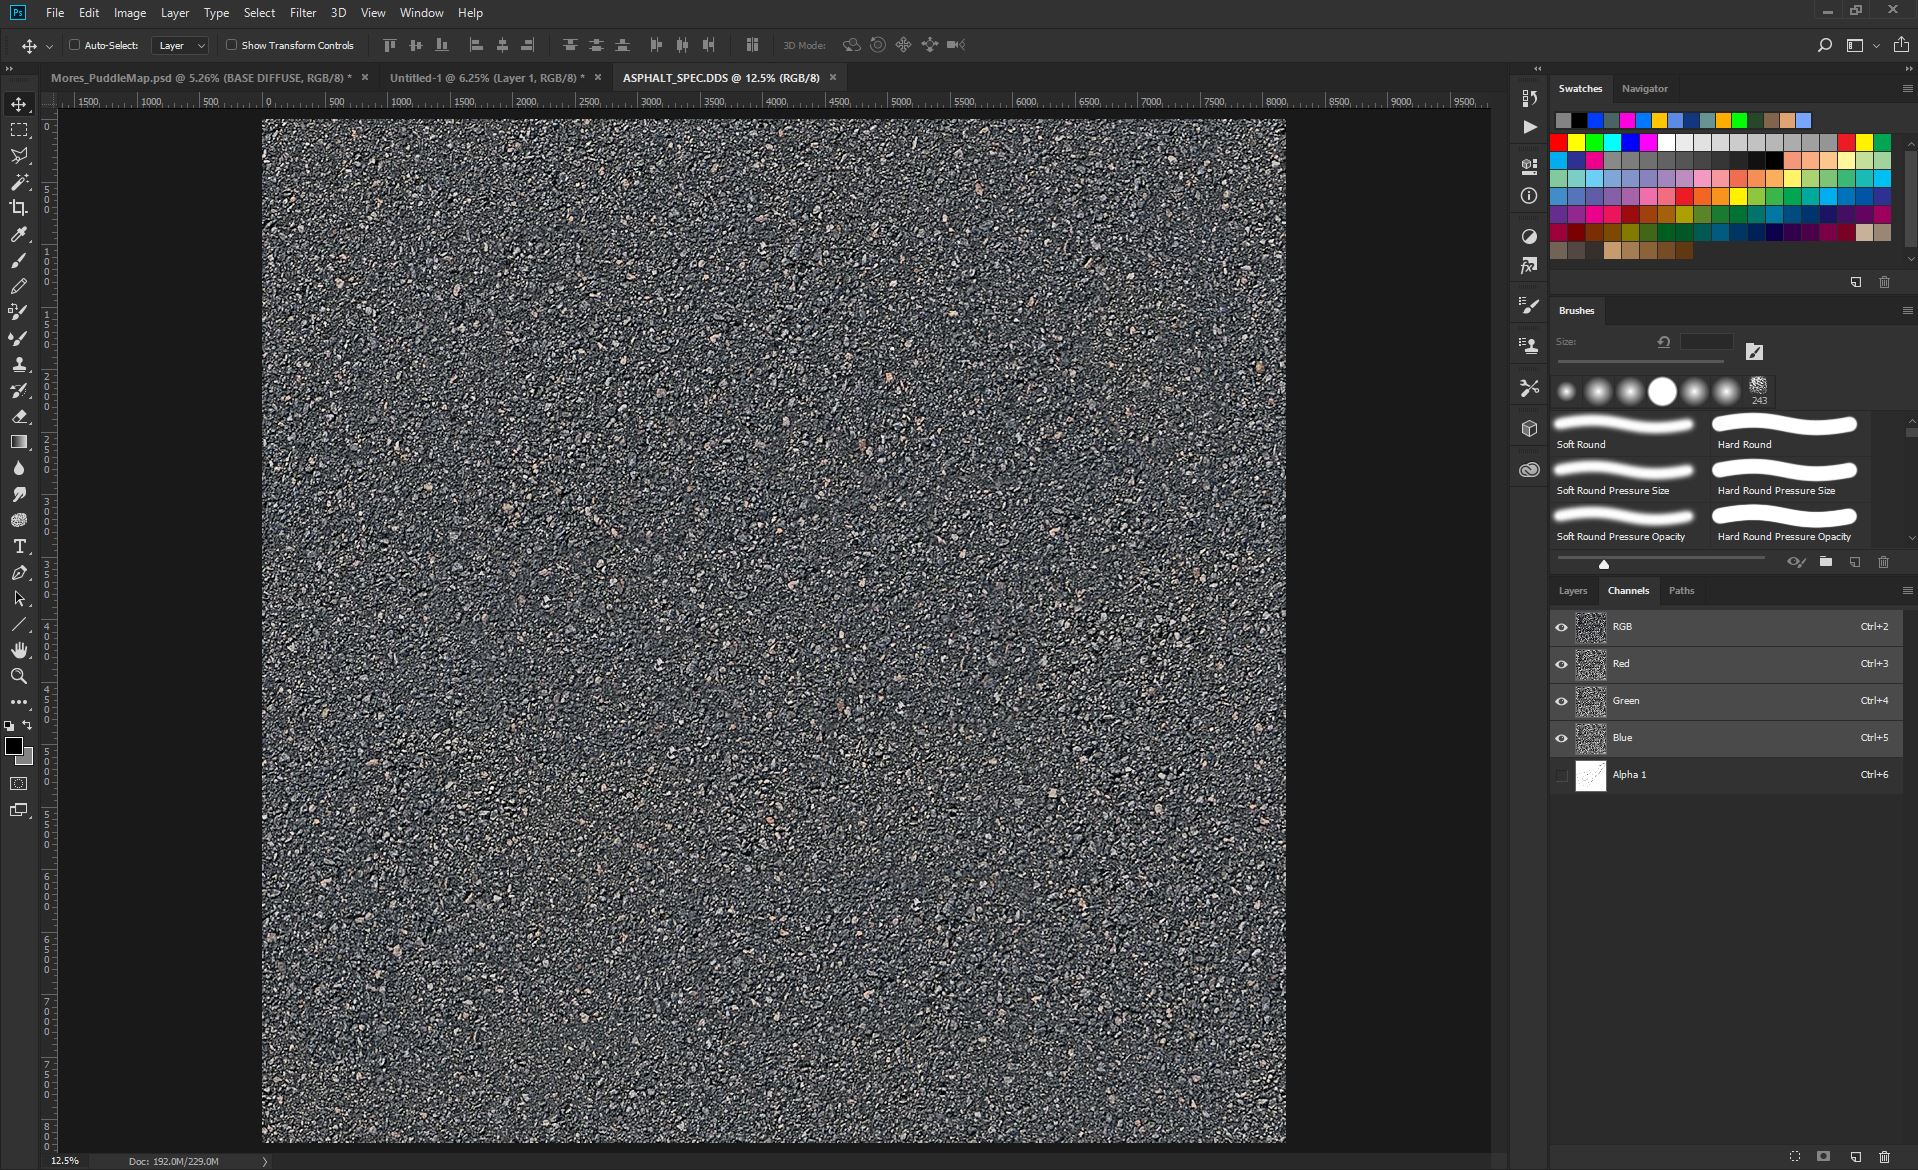
Open your track Asphalt_SPEC texture, BE SURE IT IS ALREADY 8192px*8192px. If it's smaller, or bigger, be sure to resize to 8192*8192 before to proceed;
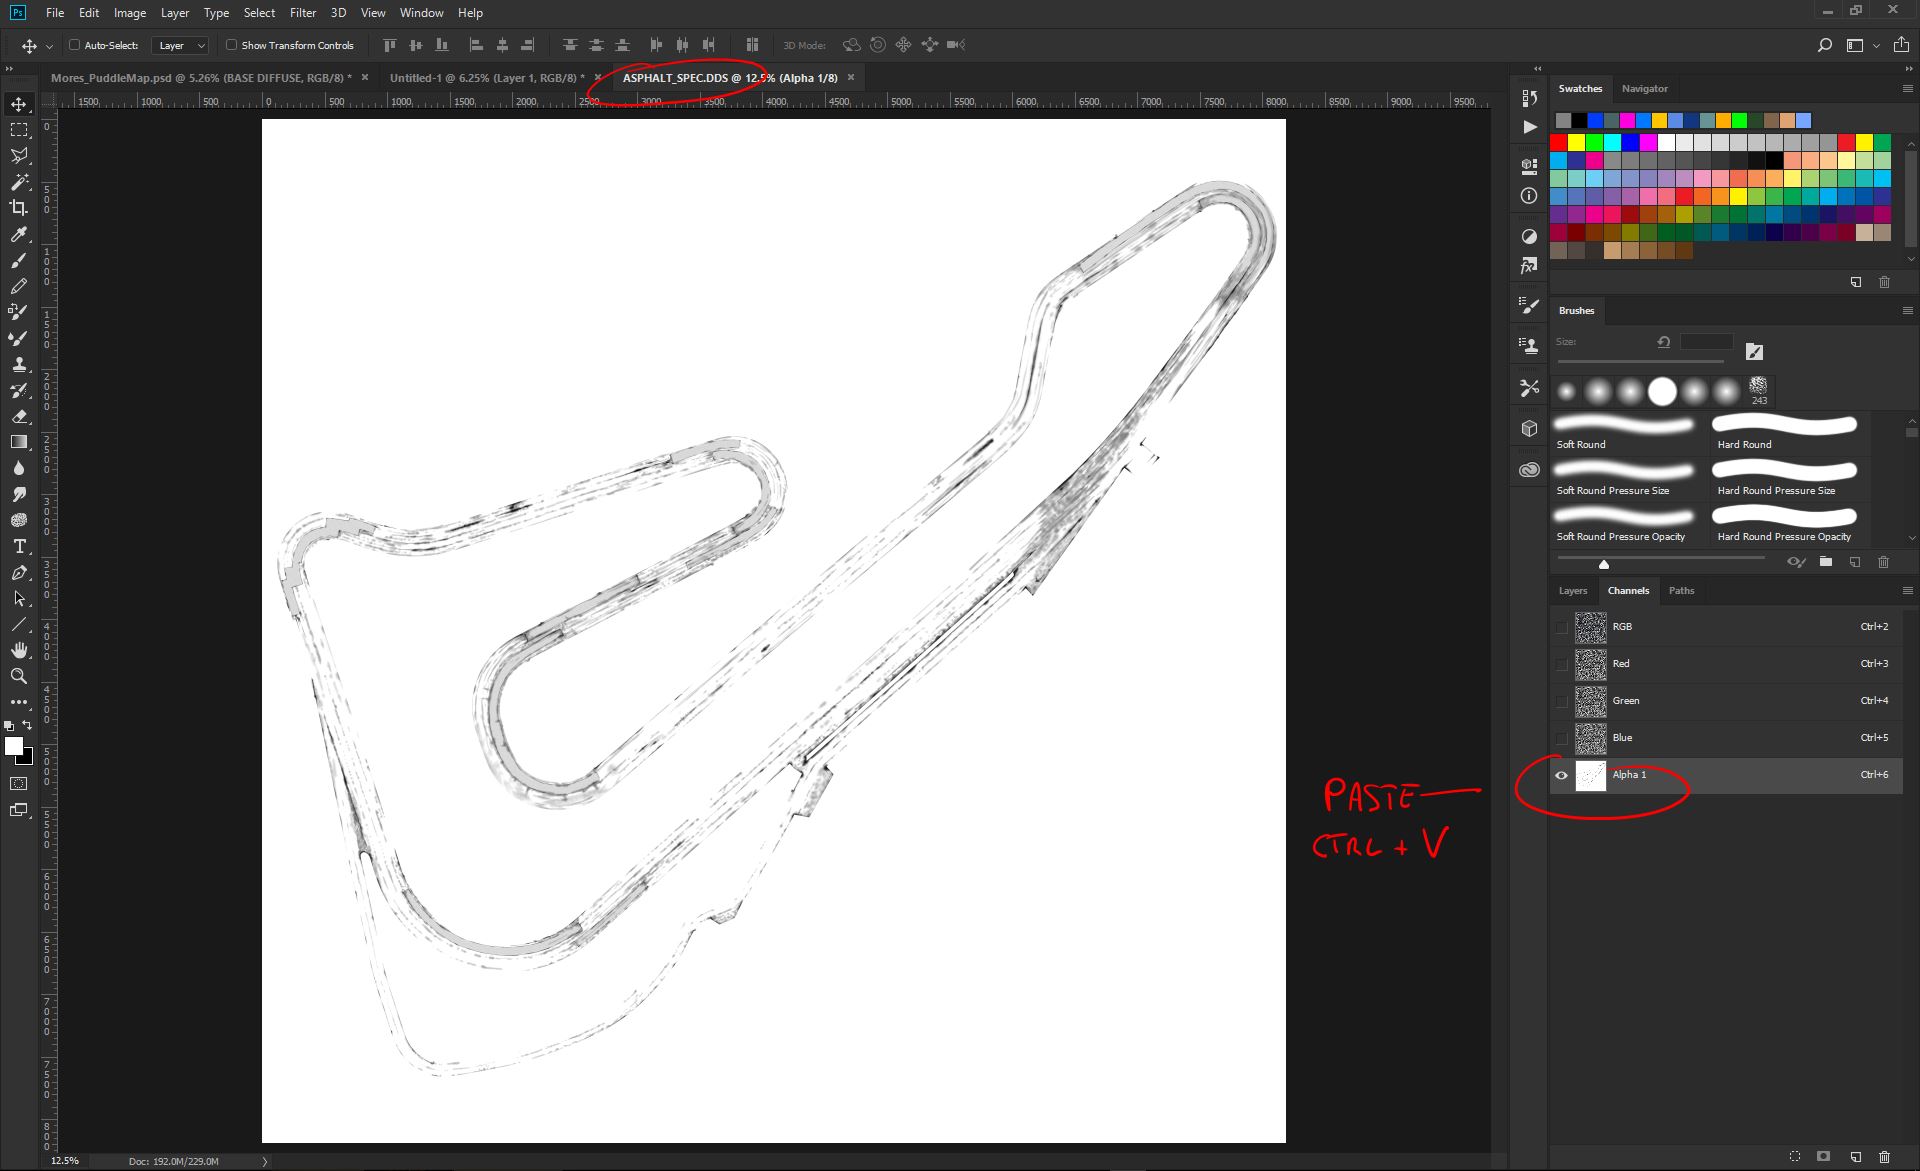
Now, go to the Channels panel, select the Alpha layer (if not present, create one), and paste in place. This will drop your clipboard inside the Alpha Channel.
Your Asphalt_SPEC is now ready to be exported as .DDS;
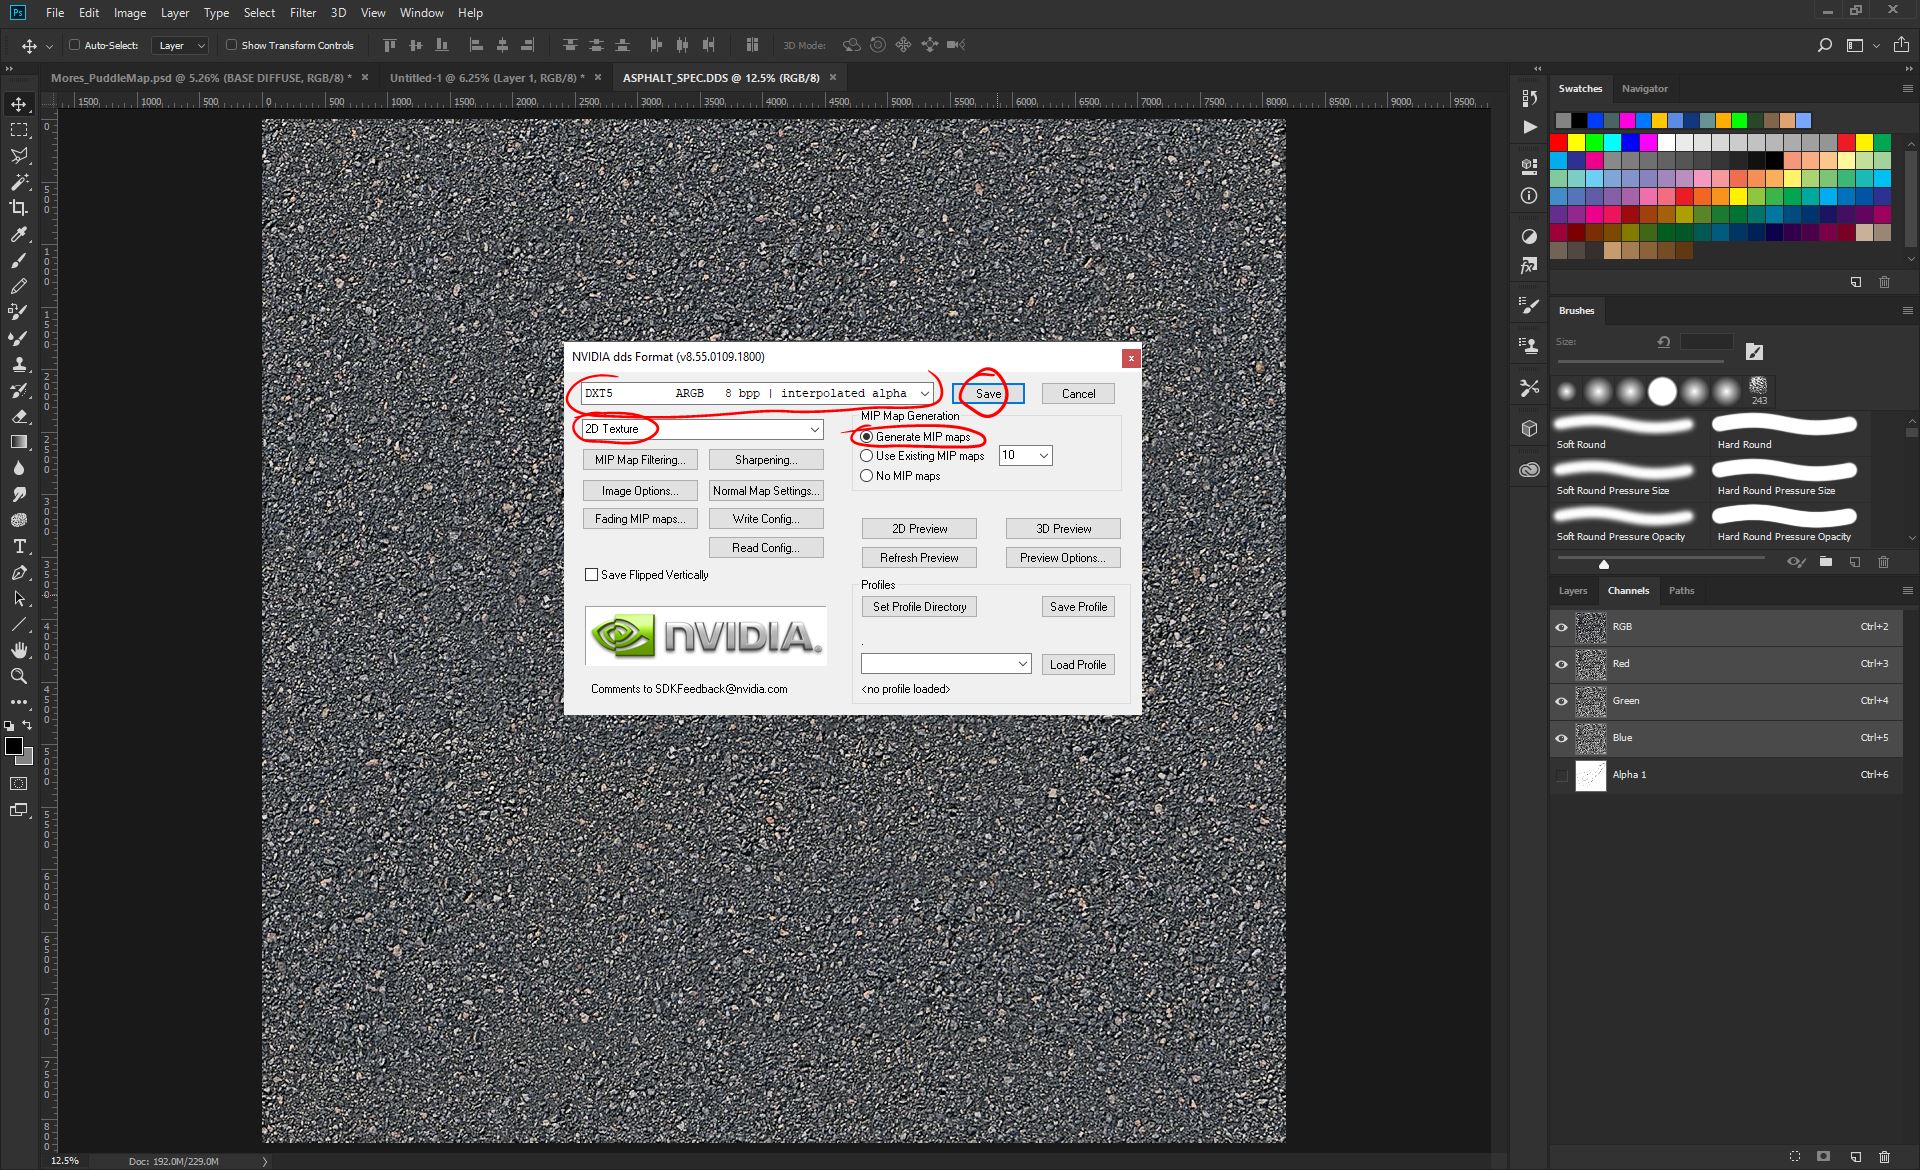
Last step, be sure to save as 2D Texture, DXT5 - ARGB 8bpp - Interpolated Alpha, generating MIP maps.
Save in your MAPs folder and wait for the export. Considering the size of the texture, the process could take quite a while to complete, just the time for a coffe!
Congratulation! Your Puddle Map is done!
ADDENDUM - New parameters to control Planar Reflections
As part of the improvements we did for the RainFX and Road/Kerb shaders, we also unlocked more controls for the planar reflections, to make them looking better, reducing clipping.
This is the typical Reflectedenv section, that you can find in our tracks:
ReflectionMapper=REFLECTEDENV
{
  Type=Planar
  TextureSize=(1024)
  UpdateRate=(100.000)
  StaticSwitch=(250.000)
  TrackingIns=NULL
Now we have two extra controls;
ReflectionMapper=REFLECTEDENV
{
  Type=Planar
  TextureSize=(1024)
  UpdateRate=(100.000)
  StaticSwitch=(250.000)
  FarPlane=(2000.00)
  MaxElementsCap=(64)
  TrackingIns=NULL
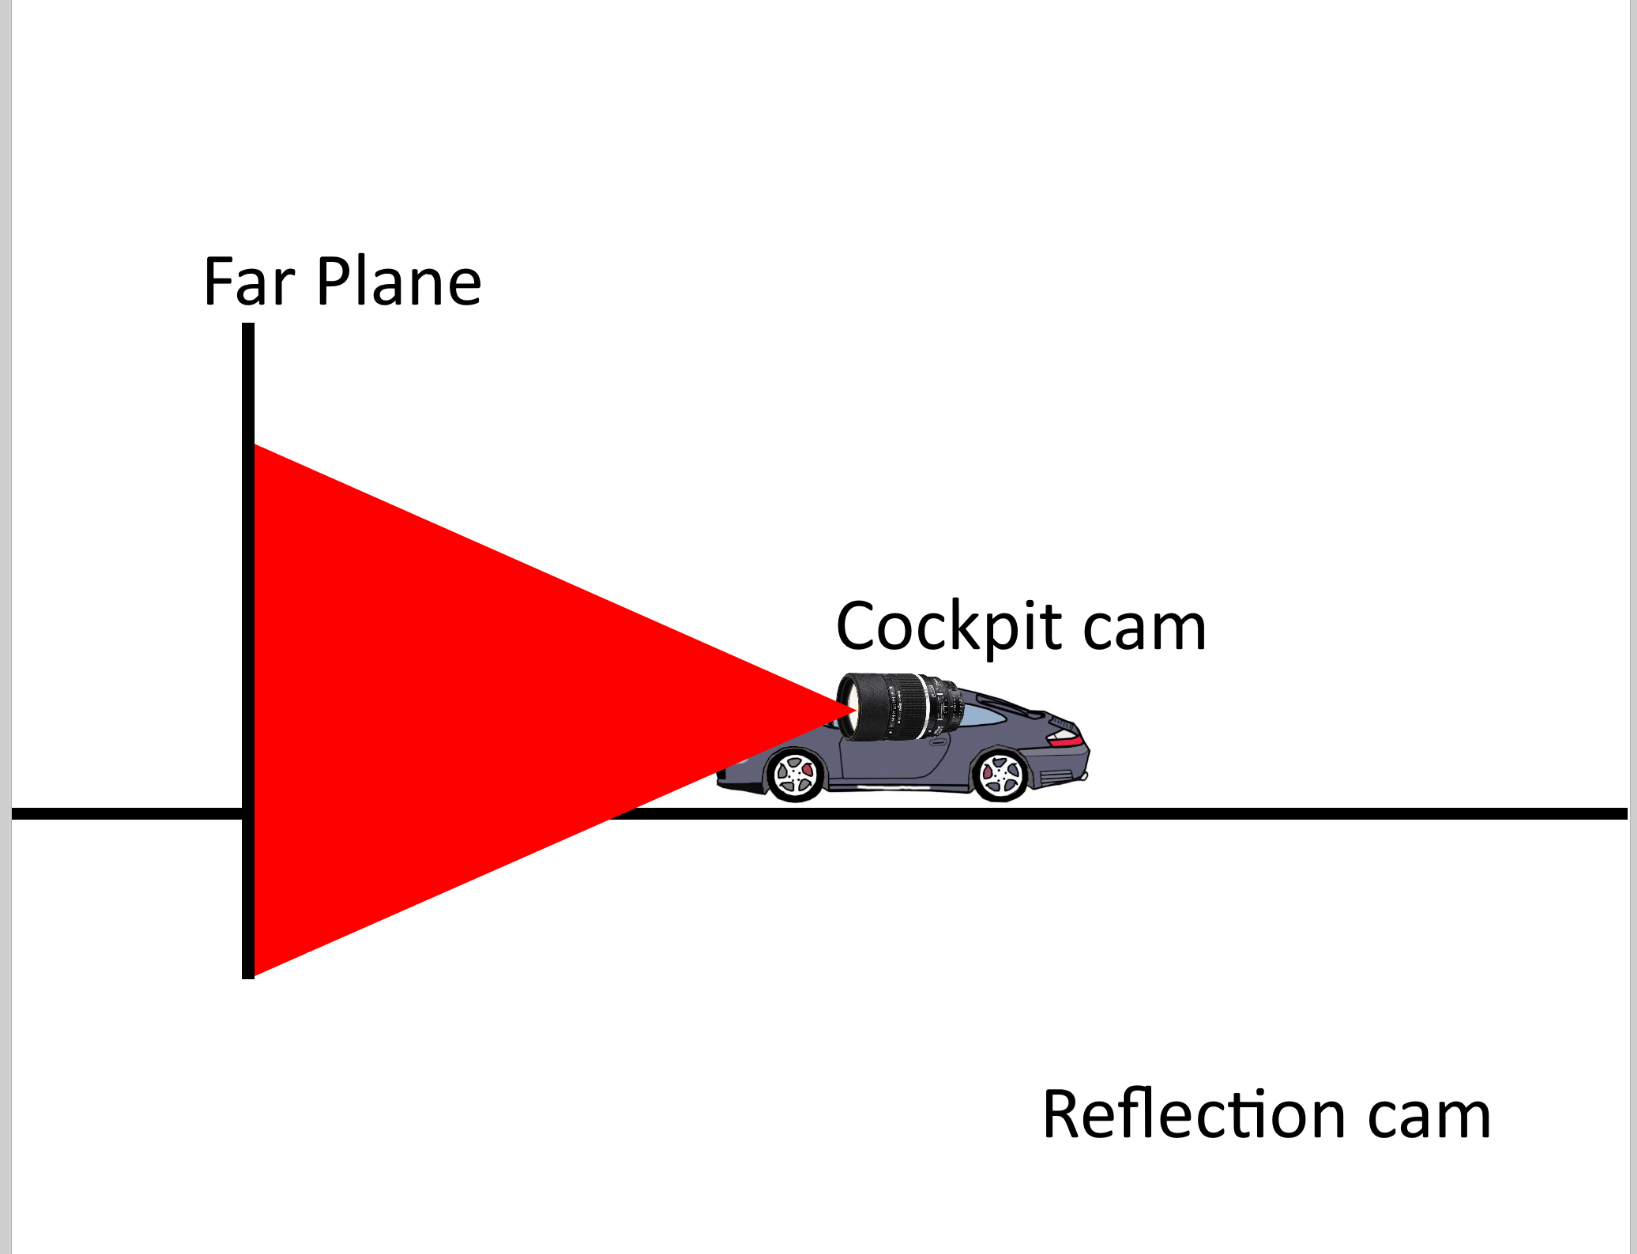
FarPlane distance is setting the linear distance between the "reflection cam" and the far plane projection. Usually bigger the track, longer is that number. Just find the shorter distance that allow you to not get any clipping in the reflections for the very far objects.

MaxElementsCap is setting the maximum amount of objects that can be reflected at the same time. The coded value is for 64 objects, even if you don't have this line in the Reflectedenv syntax. We do not suggest to go too far from that number, as it has an impact on frame render time, but if you are in a situation where you need to reflect more than 64 objects, then now you can.