New Car Dashboard System
Introduction
In the past, setting up car dashboards was a major pain in the you know what. With build 1133(Q2 2023), it has been made much easier. You no longer need separate meshes for every single item you want, now you just specify the offset and size in the cockpitinfo.ini file.
Set up in 3D program
Geometry

Formula E Gen3 Display
With the new system, you can remove all separate meshes you've made, and replace them with one single mesh. You may possibly need to use more than one if you cannot get positioning correct, like in the above image, the temperature wouldn't display correctly, so I needed a mesh for it. The other bar above could also be part of the main mesh, but it was done later, so everything else would need to be re-done, so I would suggest planning out exactly what you want to do before you do it. The way the mesh is setup is the exact same as before, it can be it's own instance, or attached to the steering wheel or whatever you need it to be.
Materials
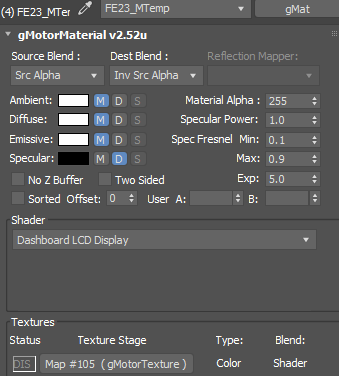
Material for a dashboard display, nothing has changed with them.
Luckily, nothing has changed with the materials, so you can re-use one of your old ones, if you have one.
Set up in game
First Launch
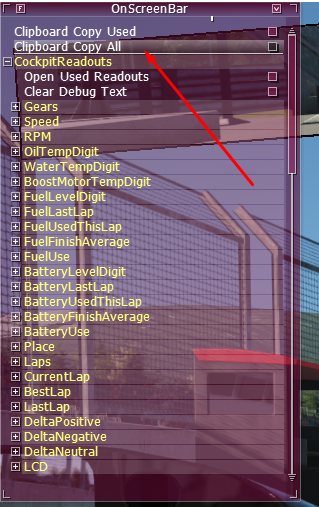
The first thing you need to do is select your car and go on track. One there, press race, and open the OnScreen Menus display:
Press Clipboard Copy All and paste that into your cockpitinfo.ini file.
You now have all available elements in your cockpitinfo file, you'll need to add the font and background to each of them. This part is the same as before, except now you'll use the same background for all elements.
GearsBackground=FE23_GEARBKG
GearsFont=FE17_FONTW.BMP
GearsScale=(1.191, 2.682)
GearsOffset=(0.657, 0.063)
GearsAlphaColor=(255, 255, 255, 255)
So copy and past the background and font to all elements.
Positioning the Elements
Go back to the main menu and load back in. Open the OnScreen Menus display once again. You can now click Open Used Readouts:
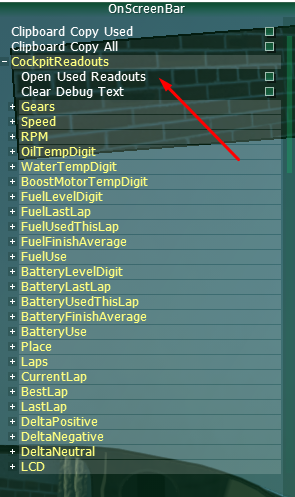
If you set the background and font correctly, everything should open. Let's start with gears. Increase the X and Y scales until you can see some text, then use the offsets to move it around on the background. Once you get it in place, you can move on to the next one. Once finished, you can once again do Copy Clipboard All and overwrite the previous data in the cockpitinfo file, this way you don't need to enter anything by hand.
Scale X - This scales the X axis of the element(left right)
Scale Y - This scales the Y axis of the element(up down)
Offset X - This moves the element on the X axis(left right)
Offset Y - This moved the element on the Y axis(up down)
Colour - This allows you to change the colour of the font.
Alpha - This allows you to adjust the transparency of the font.
Debug Text - This allows you to put some temporary text in, allowing you better control of where you place the elements.
Readout Icons
Readout icons are like other elements, except they are animated. You can use a custom texture, or you can set up a colour in the element settings. For these, you still have the scale and offset settings, but now you also have UV settings. These control how your texture or colour will appear on the background.
Uv Min/Max - Allows you to control how the display is printed on the background:
Segments - How many different steps the game will use to update the material. Say you're using the fuel bar, and your car has 100L of fuel. If you set segments to two, the bar will be full until you reach 50L of fuel, then it will switch to half full. So a higher number means more updates, but you can also set it to whatever you need to match your texture, like this:![]()
This is the RPM bar, it uses 39 segments. The RPM bar uses a custom texture:

You can see the alpha channel is where all the magic happens. If you are making your own, make sure all elements are spaced evenly to avoid errors.
Orientation - If you want the bar to be horizontal(0) or vertical(1)
Max value - The max value of what you want to display. If you only want it to show half of the fuel, you would set it to 0.5.
Alt value - If you want to use two colours, you can set this to something different than the max value, so a second colour will show once you hit the number, can be useful for a low fuel display.